


Snowflake stages are locations where data files are stored (staged) for loading and unloading data. They're essential for moving data within Snowflake or to and from external sources. Typically, there are two types of Snowflake stages: Snowflake Internal Stages and Snowflake External Stages. Each type comes with its own set of advantages and complexities.
In this article, we'll cover everything you need to know about Snowflake stages: types of stages, a step-by-step guide to creating stages, data loading/unloading via Snowflake stages, practical real-world hands-on examples, best practices for creating/managing Snowflake stages—and much more!
Let’s jump right in!!
What Are the Stages in Snowflake?
Snowflake stages are named storage locations in Snowflake where you can temporarily load or unload data files before transferring them to Snowflake tables. A Snowflake stage essentially acts as a pointer or reference to a data file or set of data files. It enables Snowflake to access these data files for loading and unloading data without the need to copy or move the files.
Stages overcome the limitations of directly loading files into tables. The main purpose of using Snowflake stages is to facilitate data movement between Snowflake and other sources or destinations. These stages help Snowflake to efficiently load/unload data from various sources, including local files or cloud storage services(like S3, GCS and Azure Containers), to and from Snowflake tables.
Some of the common use cases of using Snowflake stages are:
- Loading data from external sources into Snowflake tables for analysis and reporting purposes
- Unloading data from Snowflake tables to external destinations for backup or sharing
- Loading data from internal sources into Snowflake tables for transformation and processing
- Unloading data from Snowflake tables to internal destinations for temporary storage or staging
Now that we've set the context for what Snowflake stages are, let's delve into the main types of Snowflake stages.
Want to take Chaos Genius for a spin?
It takes less than 5 minutes.

What Are the Types of Stages in Snowflake?
As we have already covered in the previous section, Snowflake stages are locations where data files are stored for loading/unloading data in Snowflake. There are two types of Snowflake stages:
- Internal Stages
- External Stages
1) Snowflake Internal Stages
Snowflake Internal Stages are stages that store data files internally within Snowflake. They are ideal for loading data from local files or other internal sources into Snowflake tables, or for unloading data from Snowflake tables to local files or other internal destinations. Internal stages ensure high performance and security, as the data and files are stored as well as encrypted within Snowflake. But, it's important to note that Snowflake Internal Stages can also lead to increased storage costs and space within Snowflake, while also imposing restrictions on data sources and destinations.
There are three types of internal stages in Snowflake:
- User stages can only be accessed by the associated user account
- Table stages can only be used with the linked table
- Named stages are user-defined and can be accessed by multiple users/tables
Syntax to create Snowflake Internal Stage:
Here is one simple way you can create and use Snowflake Internal Stages. The syntax to create a Snowflake Internal Stage is:
CREATE STAGE [ IF NOT EXISTS ] <name> [ COMMENT = '<string>' ]As you can see, here <name> is the name of the Snowflake stage, and <string> is an optional comment for the stage.
Here is the full syntax breakdown of Snowflake Internal Stages:
CREATE [ OR REPLACE ] [ { TEMP | TEMPORARY } ] STAGE [ IF NOT EXISTS ] <internal_stage_name>
    internalStageParams
    directoryTableParams
  [ FILE_FORMAT = ( { FORMAT_NAME = '<file_format_name>' | TYPE = { CSV | JSON | AVRO | ORC | PARQUET | XML } [ formatTypeOptions ] } ) ]
  [ COPY_OPTIONS = ( copyOptions ) ]
  [ COMMENT = '<string_literal>' ]
[ [ WITH ] TAG ( <tag_name> = '<tag_value>' [ , <tag_name> = '<tag_value>' , ... ] ) ]Note: When uploading from the SnowSQL client, you reference my_stage using the @ symbol e.g. @my_stage.
2) Snowflake External Stages
Snowflake External Stages store data files in an external location. They serve the purpose of loading data from external sources into Snowflake tables or exporting data from Snowflake tables to external destinations. These Snowflake External Stages support a broad spectrum of data sources and destinations, reducing the storage cost and space in Snowflake. But, Snowflake External Stages also require additional configuration and authentication—and depend on the availability and reliability of the external location.
Snowflake supports the following cloud storage services for external stages:
External stages define the path to these external cloud repositories where files can be loaded/unloaded.
Syntax to create Snowflake External Stage:
You can create and use Snowflake External Stages using Snowsight or by simple SQL syntax. The syntax to create a Snowflake Internal Stage is:
CREATE STAGE my_external_stage
URL = '<external_location>'
TYPE = 'EXTERNAL_STAGE'
[ CREDENTIALS = ( <credentials> ) ]
[ ENCRYPTION = ( <encryption> ) ]
[ FILE_FORMAT = ( <format> ) ]Here is the full syntax breakdown of Snowflake External Stages:
CREATE [ OR REPLACE ] [ { TEMP | TEMPORARY } ] STAGE [ IF NOT EXISTS ] <external_stage_name>
    externalStageParams
    directoryTableParams
  [ FILE_FORMAT = ( { FORMAT_NAME = '<file_format_name>' | TYPE = { CSV | JSON | AVRO | ORC | PARQUET | XML } [ formatTypeOptions ] } ) ]
  [ COPY_OPTIONS = ( copyOptions ) ]
  [ COMMENT = '<string_literal>' ]
[ [ WITH ] TAG ( <tag_name> = '<tag_value>' [ , <tag_name> = '<tag_value>' , ... ] ) ]Now that we've outlined the basics, let's proceed to the step-by-step process of creating Snowflake stages.
How Do You Create Snowflake Stages—A Step-By-Step Guide
In the above section, we learned about the types of stages in Snowflake: internal and external. Now, in this part, we will focus on how to create and use Snowflake internal and external stages.
First, let's start off by creating Snowflake Internal Stages step-by-step.
Working With Snowflake Internal Stages
As we already know, Snowflake Internal stages are stages that store data files internally within Snowflake. They are ideal for loading data from local files or other internal sources into Snowflake tables, or for unloading data from Snowflake tables to local files or other internal destinations.
There are three types of internal stages in Snowflake: user, table, and named stages. Each type has its own characteristics and use cases. You can create and use internal stages using the web interface (Snowsight) or simple SQL command.
Let’s see how to create and use each type of Snowflake Internal Stage in Snowflake:
Creating and Using User Stages
User stages are the default stages that are automatically created for each user. This stage serves as a convenient choice if your files will only be accessed by a single user but need to be copied into multiple tables. User stages possess the following characteristics and limitations: They are referenced using @~; these stages cannot be altered or dropped, and they do not support setting file format options. Instead, you must specify file format and copy options as part of the COPY INTO <table> command.
To create a user stage, you don’t need to do anything. Snowflake automatically creates a user stage for you when you create a user. You can reference the user stage by using @~ and list down your user stage using the following query:
List @~;Creating and Using Table Stages
Table stages are linked to specific tables in Snowflake. When a table is created, a corresponding stage is also automatically created. They are named after the table, and are owned and managed by the table owner. This stage is a convenient option if your files need to be accessible to multiple users and only need to be copied into a single table. Table stages possess the following characteristics and limitations: They have the same name as the table; these stages cannot be altered or dropped, and they do not support transforming data while loading it.
To create a table stage, you need to create a table. Snowflake automatically creates a table stage for you when you create a table. You can reference your table stage using the following query:
@%<table_name>Creating and Using Snowflake Named Stages
Named stages are database objects that provide the greatest degree of flexibility for data loading. Unlike personal user stages or table-specific stages, named stages can be accessed by multiple authorized users and leveraged to load data into several tables. This makes them ideal for cross-functional loading use cases.
The trade-off is that you do have to manually create named stages yourself—they are not generated automatically behind the scenes as user and table stages are. But the upside is they overcome the inherent limitations of those other stage types in terms of access and reuse.
To create a named stage, you have two options: either use Snowsight or you can write a simple CREATE STAGE command. Both methods allow you to designate a name and optionally set other properties. The syntax to create a named stage is:
CREATE STAGE IF NOT EXISTS int_named_stage COMMENT = 'Snowflake internal named stage';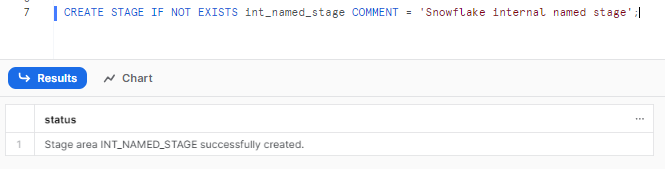
Creating Snowflake Internal stages using Snowflake Web UI(Snowsight)
To create a Snowflake External Stage using the web interface, follow these steps:
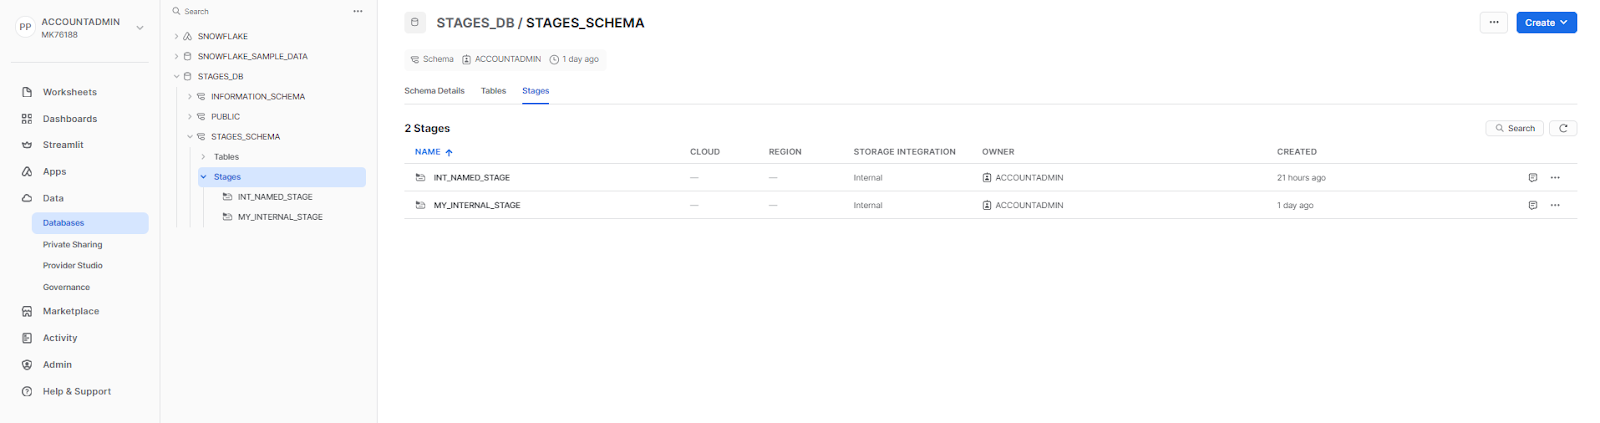
Step 1— Login to your Snowsight account and navigate to the db and schema where you want to create the stage.
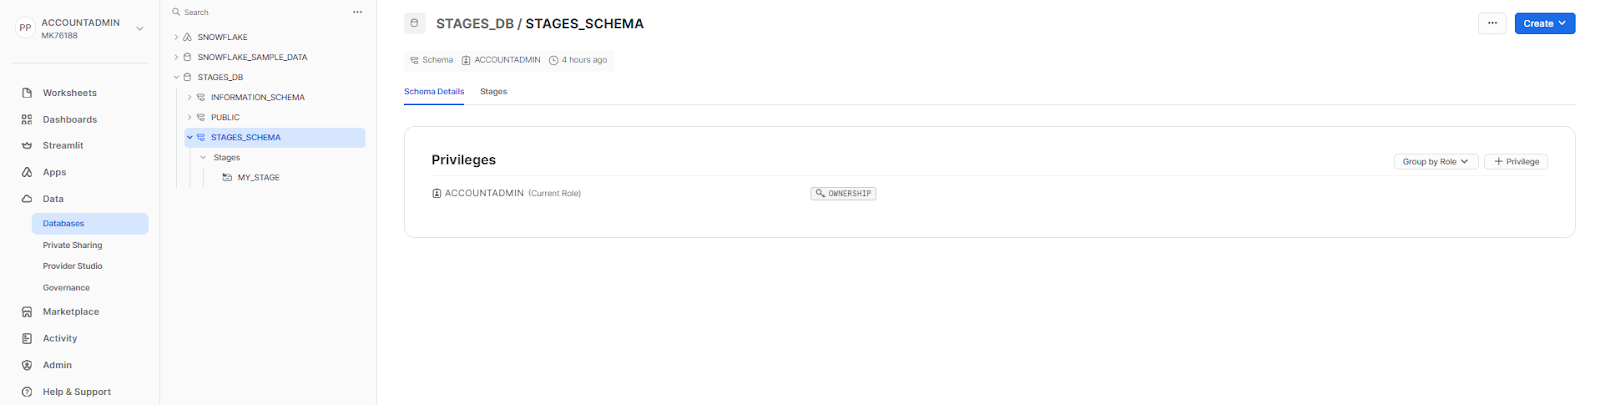
Step 2—Click on the "Create" button in the upper right and select "Stage" then "Snowflake Managed".
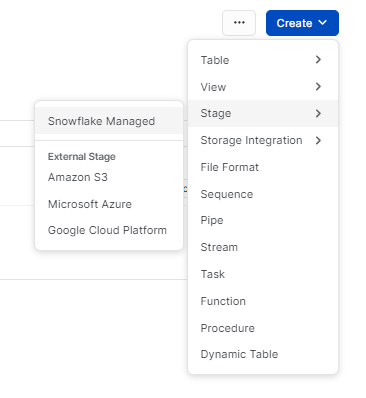
Step 3—Give your stage a name in the "Stage Name" field.
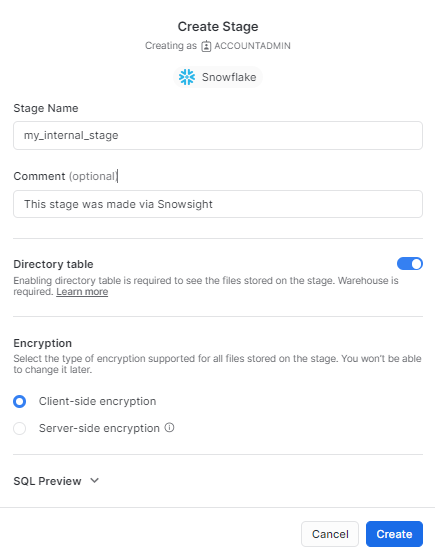
Step 4—You can optionally enable a directory table to see files on the stage, but this incurs additional costs. For now, uncheck this option.

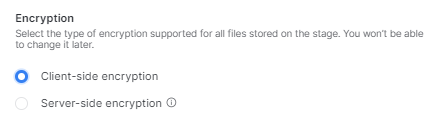
Step 5—Choose the type of encryption to use for protecting files, such as Client-side/Server-side encryption. Note encryption type can't be changed later.
Step 6—Add any other parameters like comments, etc.
Step 7—Review the stage configuration and click “Create” when you're ready to create the internal named stage. You should see the following message once you have successfully created the Snowflake Internal Stage.

That’s it! You’ve successfully created Snowflake Internal Stage using Snowsight.
That covers how to create all three Snowflake internal stage types in Snowflake. Now let's look at external stages.
Working With Snowflake External Stages
Above, we learned how to create and use Snowflake Internal Stages. In this part, we will focus on how to create and use Snowflake External Stages.
As we already know, Snowflake External stages are stages that store data files in an external location. They are used to load data from external sources into Snowflake tables or to export data from Snowflake tables to external destinations.
There are many advantages of using Snowflake External Stages, such as:
- Supports a wide range of data sources and destinations
- Reduces the storage cost and space in Snowflake
- Leverages the features and capabilities of the cloud storage services
BUT, using Snowflake External Stages in Snowflake also comes with some challenges and limitations, such as:
- Requires additional configuration and authentication
- Depends on the availability and reliability of the external location
- Lacks native support for some data formats or sources
Now let’s see how to create and use external stages in Snowflake for different cloud storage services.
Create Snowflake stages for Amazon S3
Amazon S3 is a cloud storage service provided by Amazon Web Services (AWS). It allows you to store and access data files in buckets/folders. You can use the AWS Identity and Access Management (IAM) service to control the access and permissions for your S3 buckets and folders.
To create a Snowflake External Stage for S3, you can use the CREATE STAGE command. The full syntax to create an external stage for S3 is:
CREATE STAGE [ IF NOT EXISTS ] <name>
URL = 's3://<bucket>/<path>'
CREDENTIALS = (AWS_KEY_ID = '<aws_key_id>' AWS_SECRET_KEY = '<aws_secret_key>')
ENCRYPTION = ( <encryption> ) ]
FILE_FORMAT = ( <file_format> ) ]where <name> is the name of the stage, <bucket> is the name of the S3 bucket, <path> is the optional path within the bucket, <aws_key_id> and <aws_secret_key> are your AWS credentials for accessing the S3 bucket, <encryption> is the encryption method for the data files, and <file_format> is the data format for the data files.
Check out this article to learn a step-by-step guide on creating Snowflake stages for Amazon S3
Creating Snowflake External Stages for Amazon S3 using Snowflake Web UI(Snowsight)
To create a Snowflake external stage for Amazon s3 using the web interface, follow these steps:
Step 1—Login to Snowflake

Step 2—Head over to Database option
Step 3—Select the Database and Schema in which you want to create an external stage.
Step 4—Go to the Stages tab and click Create; a dropdown will appear.

Step 5—Select Amazon S3 option
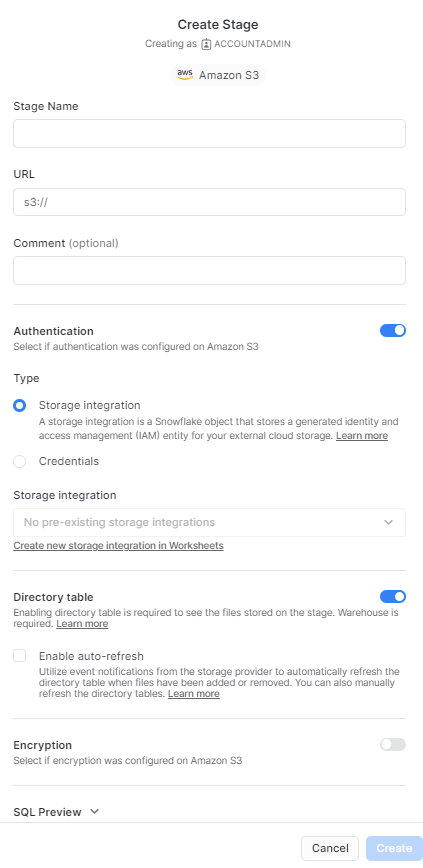
Select Amazon S3 and then provide the details of the stage name. Choose the stage you want to connect to, provide the URL of the location, and toggle the authentication and click on storage integration to establish the connection. Finally, click on create to create the Snowflake external stage for S3.
Create Snowflake stages for GCS
Google Cloud Storage is a cloud storage service provided by Google Cloud Platform (GCP). It allows you to store and access data files in buckets and objects. You can use the Google Cloud IAM service to control the access and permissions for your GCS buckets and objects.
To create a Snowflake External Stage for GCS, follow these steps:
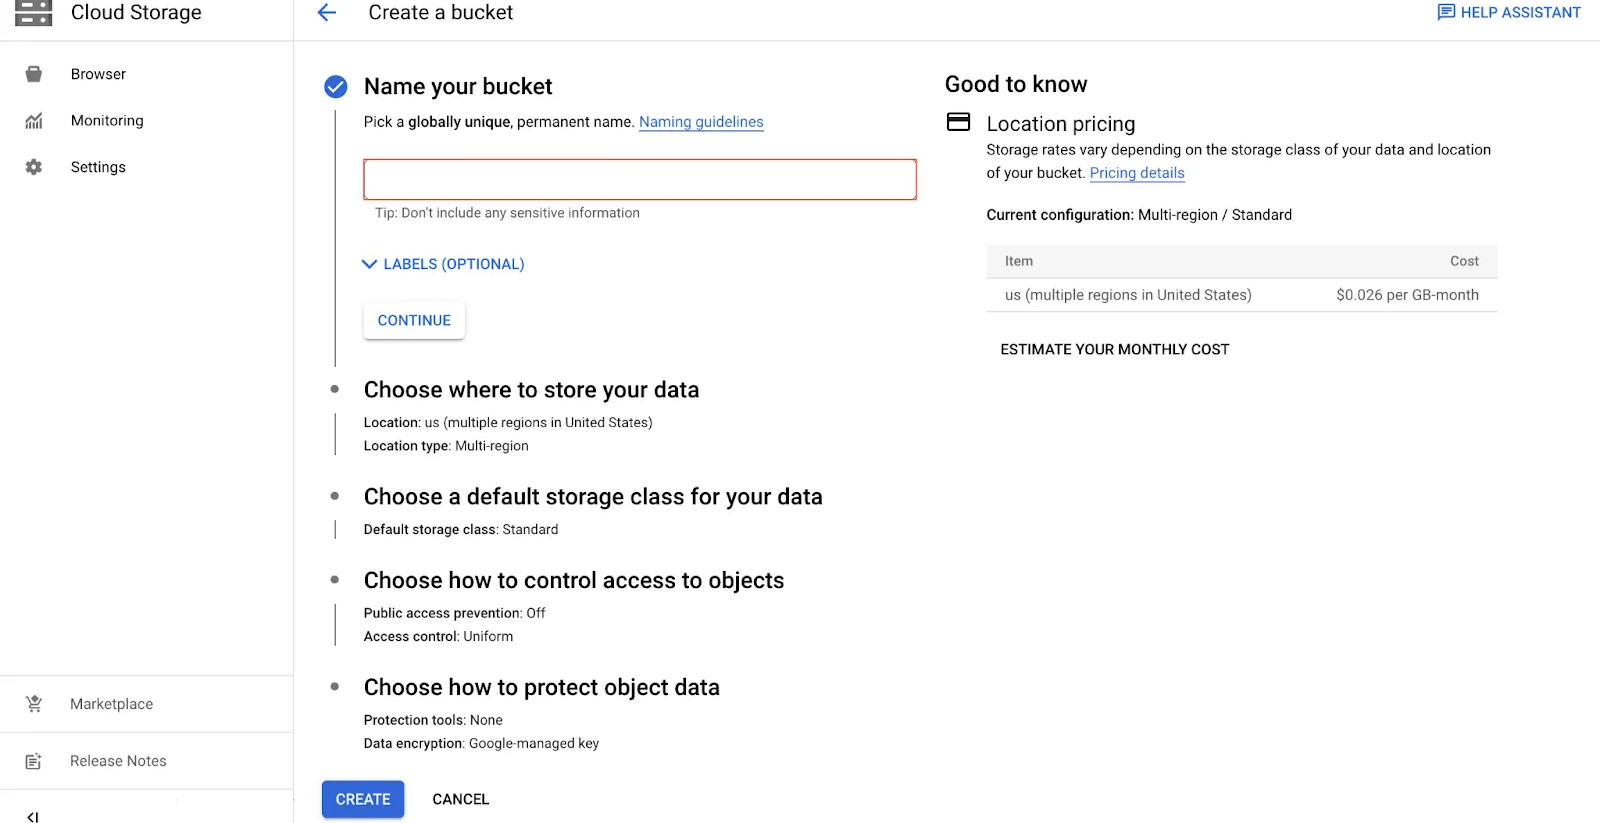
Step 1—Create a GCS Bucket
- Login to the GCP console and go to Storage > Cloud Storage
- Click “Create Bucket"
- Give bucket a name and set properties like location, storage class etc.
- Click "Create" to create the GCS bucket
Step 2—Create a Storage Integration in Snowflake
- Run CREATE STORAGE INTEGRATION command in Snowflake
- Provide name, set type to EXTERNAL_STAGE, and specify GCS as storage provider
- Enable the integration and provide allowed GCS bucket location
Here is the full syntax breakdown of creating a Cloud Storage Integration in Snowflake for GCS
CREATE STORAGE INTEGRATION <integration_name>
  TYPE = EXTERNAL_STAGE
  STORAGE_PROVIDER = 'GCS'
  ENABLED = TRUE
  STORAGE_ALLOWED_LOCATIONS = ('gcs://<bucket>/<path>/', 'gcs://<bucket>/<path>/')
[ STORAGE_BLOCKED_LOCATIONS = ('gcs://<bucket>/<path>/', 'gcs://<bucket>/<path>/') ]Step 3—Retrieve Service Account Details
- Run DESC INTEGRATION command on the storage integration
- Note down the service account email generated by Snowflake
Step 4—Create IAM Custom Role in GCP
- Go to IAM & Admin > Roles in GCP Console
- Click "Create Role" and give it a name/description
- Create the custom role
Step 5—Assign Role to Snowflake Service Account
- Navigate to the GCS bucket
- Click Show Info Panel > Add new principals and select the custom role
- Search and add the Snowflake service account
Check out this documentation to Creating a Custom IAM Role in GCS
Step 6—Create External Stage in Snowflake
- First, create a file format
- Then run CREATE STAGE command to create stage. To create an external stage for GCS, you can use the CREATE STAGE command. The syntax to create an external stage for GCS is:
CREATE STAGE [ IF NOT EXISTS ] <name>
URL = 'gcs://<bucket>/<path>'
CREDENTIALS = (GCS_SERVICE_ACCOUNT = '<gcs_service_account>' GCS_PRIVATE_KEY = '<gcs_private_key>')
ENCRYPTION = ( <encryption> )
FILE_FORMAT = ( <format> )where <name> is the name of the stage, <bucket> is the name of the GCS bucket, <path> is the optional path within the bucket, <gcs_service_account> and <gcs_private_key> are your GCP credentials for accessing the GCS bucket, <encryption> is the encryption method for the data files, <format> is the data format for the data files, and <options> are the copy options for the data files.
For example, to create an external stage called my_gcs_stage that points to a GCS bucket called my-bucket, you can use:
CREATE STAGE my_gcs_stage
URL = 'gcs://my-bucket/'
CREDENTIALS = (GCS_SERVICE_ACCOUNT = '<gcs_service_account>' GCS_PRIVATE_KEY = '<gcs_private_key>')
FILE_FORMAT = (TYPE = CSV);Creating Snowflake External Stages for GCS using Snowflake Web UI(Snowsight)
To create a Snowflake external stage for Amazon s3 using the web interface, follow these steps:
Steps 1, 2, and 3 are the same as above. You can check the “Creating Snowflake External Stages for Amazon S3 using Snowflake Web UI(Snowsight)” section for reference.
Step 4—Go to the Stages tab and click Create; a dropdown will appear.

Step 6—Select Google Cloud Platform option
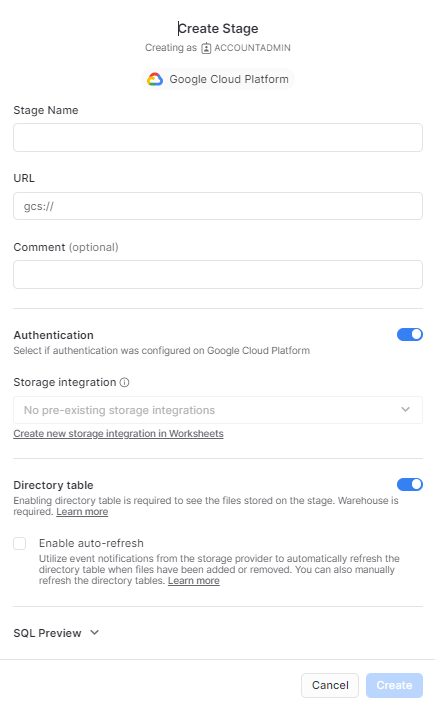
Select Google Cloud Platform and then provide the details of the stage name. Choose the stage you want to connect to, provide the URL of the location, toggle the authentication, and click on storage integration to establish the connection. Finally, click create to create the Snowflake external stage for the Google Cloud Platform.
Create Snowflake stages for Azure
Microsoft Azure Blob Storage is a cloud storage service provided by Microsoft Azure. It allows you to store and access data files in containers and blobs. You can use the Azure Active Directory (AAD) service to control the access and permissions for your Azure containers and blobs.
To create a Snowflake External Stage for Azure, follow these steps:
Step 1—Create an Azure Storage Account
- In Azure portal, go to Storage Accounts > Create a resource
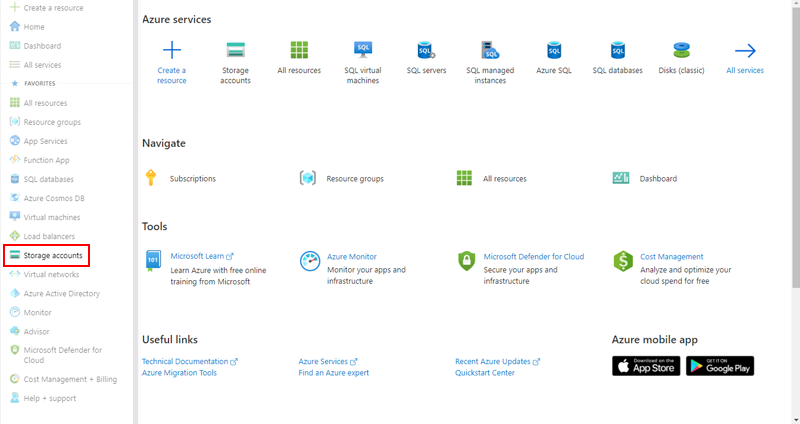
- Enter subscription, resource group, name etc
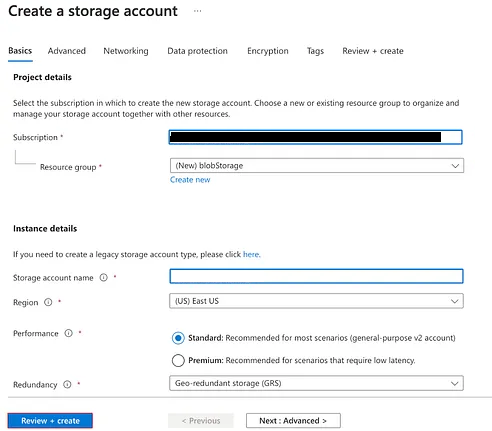
- Click Review + Create to provision the storage account
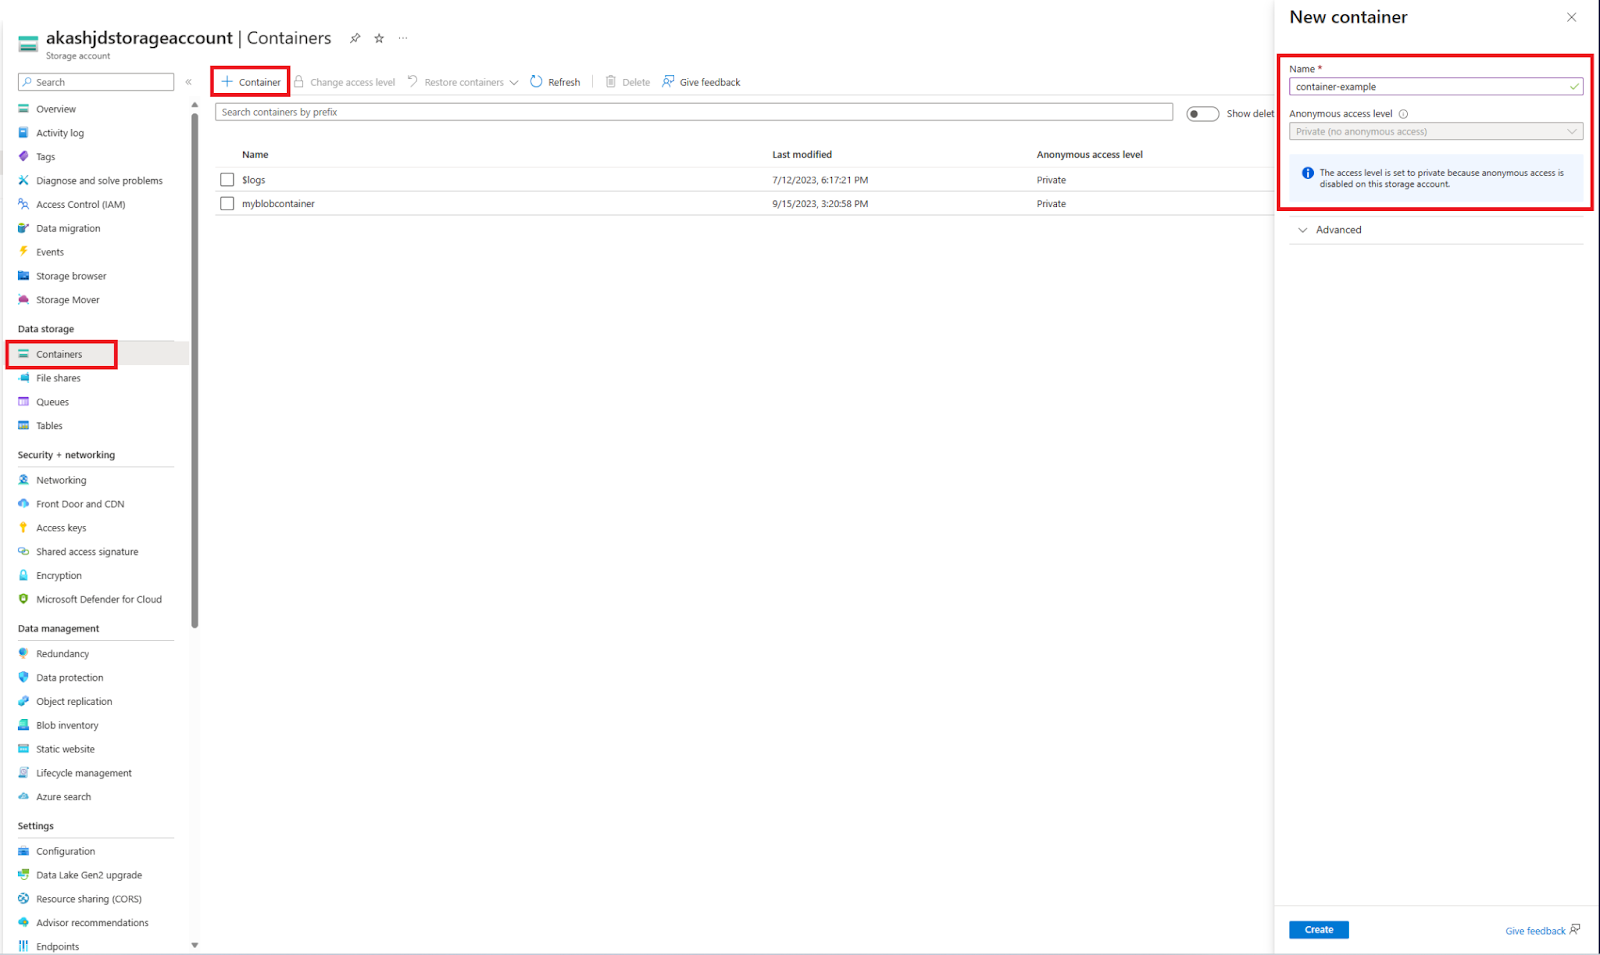
Step 2—Create a Storage Container
- Go to the Containers page under the storage account
- Click + Container to create a new container
- Enter name and set access level, then click Create
Step 3—Upload Data Files
- Open the container and click Upload
- Select the files you want to upload from local system
- Click Upload to upload them into the container
Step 4—Create Storage Integration in Snowflake
- Run CREATE STORAGE INTEGRATION command
- Set type as EXTERNAL_STAGE, provider as AZURE
- Specify Azure Tenant ID and allowed storage locations
Here is the full syntax breakdown of creating a Cloud Storage Integration in Snowflake for Azure
CREATE STORAGE INTEGRATION <integration_name>
  TYPE = EXTERNAL_STAGE
  STORAGE_PROVIDER = 'AZURE'
  ENABLED = TRUE
  AZURE_TENANT_ID = '<tenant_id>'
  STORAGE_ALLOWED_LOCATIONS = ('azure://<account>.blob.core.windows.net/<container>/<path>/', 'azure://<account>.blob.core.windows.net/<container>/<path>/')
[ STORAGE_BLOCKED_LOCATIONS = ('azure://<account>.blob.core.windows.net/<container>/<path>/', 'azure://<account>.blob.core.windows.net/<container>/<path>/') ]Step 5—Authorize Snowflake Access
- Copy consent URL from integration. To get the Azure consent URL, run the command mentioned below;
DESC INTEGRATION <Integration>;- Paste the AZURE_CONSENT_URL in the browser and accept the access request
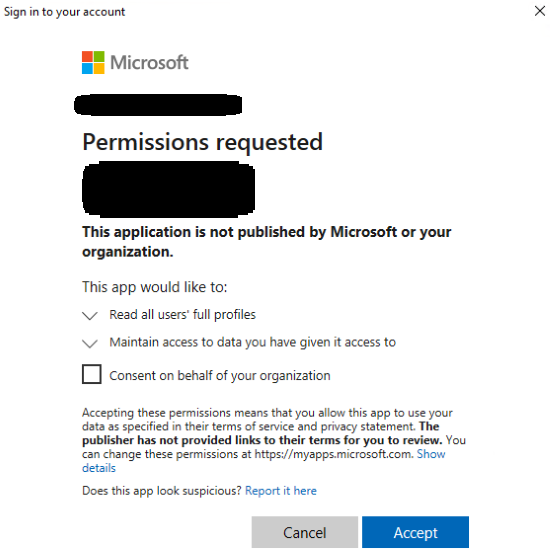
- In Azure, grant "Storage Blob Data Contributor" role to Snowflake > Add AZURE_MULTI_TENANT_APP_NAME as a member
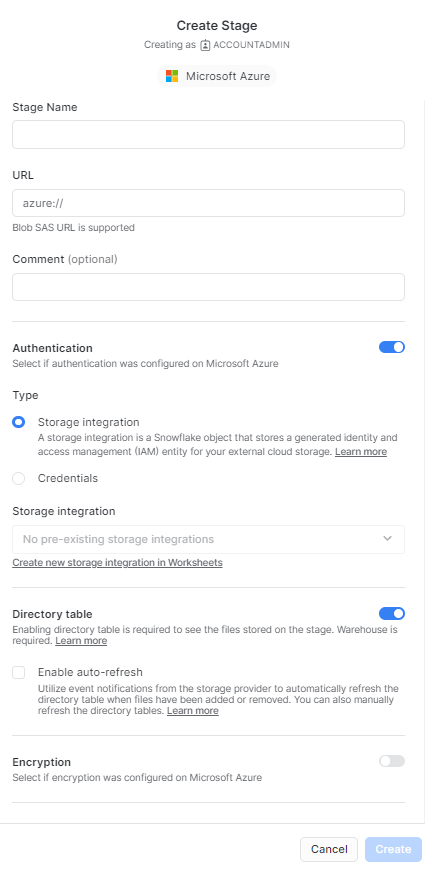
Step 6—Create Snowflake External Stage in Snowflake
- Create a file format using CREATE FILE FORMAT
- Run CREATE STAGE, reference integration name
- Provide Azure container URL and file format
Here is the full syntax to create an external stage for Azure, you can use the CREATE STAGE command. The syntax to create an external stage for Azure is:
CREATE STAGE my_azure_stage
  STORAGE_INTEGRATION = azure_int
  URL = 'azure://myaccount.blob.core.windows.net/mycontainer/load/files/'
FILE_FORMAT = my_csv_format;Creating Snowflake External Stages for Azure using Snowflake Web UI (Snowsight)
To create a Snowflake external stage for Amazon s3 using the web interface, follow these steps:
Steps 1, 2, and 3 are the same as above. You can check the “Creating Snowflake External Stages for Amazon S3 using Snowflake Web UI(Snowsight)” section for reference.
Step 4—Go to the Stages tab and click Create; a dropdown will appear.

Step 5—Select the Microsoft Azure option
Select Microsoft Azure and then provide the details of the stage name. Choose the stage you want to connect to, provide the URL of the location, toggle the authentication, and click on storage integration to establish the connection. Finally, click on Create to create the Snowflake external stage for Microsft Azure.
We have now covered how to create both internal and external stages, which can be used to stage data files. Next, let's explore loading/unloading data.
How do you load/unload data using Snowflake stages?
Above, we learned about the types of stages in Snowflake and how to create them. In this part, we will learn how to load/unload data using Snowflake stages. Loading and unloading data are the processes of moving data between Snowflake tables and Snowflake stages, either internal or external. Loading data is also known as data ingestion while unloading data is also known as data extraction.
Snowflake provides three commands for loading and unloading data using stages:
- PUT: This command uploads data files from a local folder on a client machine to a Snowflake internal stage(i.e. User, Table, and Named stages). It is used to stage data files before loading them into Snowflake tables.
- GET: This command downloads data files from a Snowflake stage to a local folder on a client machine. It is used to retrieve data files after unloading them from Snowflake tables.
- COPY INTO: This command copies data from a Snowflake stage to a Snowflake table, or vice versa. It is used to load data into or unload data from Snowflake tables.
Note: External stages do not support the GET and PUT commands.
Now let’s see how to use these commands to load and unload data using Snowflake stages.
How do you load data from a Snowflake stage(—Data Loading)?
Data loading is the process of copying data from a Snowflake stage to a Snowflake table. Data loading can be performed in two steps:
👉 First Step—Upload data files from a local folder on a client machine to a Snowflake stage using the PUT command or you can manually upload the files via Snowsight.
Below we provide an overview of critical loading use cases leveraging these commands.
To load data from a local folder on a client machine to a Snowflake stage, you can use the PUT command. For this, you need to set up the Snowsql client on your desktop.
For Snowflake Internal Named Stage
The syntax of the PUT command is:
PUT file://<local_path> @<stage_name> [ <options> ]For Snowflake Internal User Stage
The syntax of the PUT command is:
PUT file://<local_path> @~/stage_directory [ <options> ]For Snowflake Internal Table Stage
The syntax of the PUT command is:
PUT file://<local_path> @%<table_name> [ <options> ]As you can see, here <local_path> is the path of the local folder or file, <stage_name> is the name of the Snowflake stage, and <options> are optional parameters for the command.
PUT command also supports compressing the data files before uploading them to the stage using the AUTO_COMPRESS option.
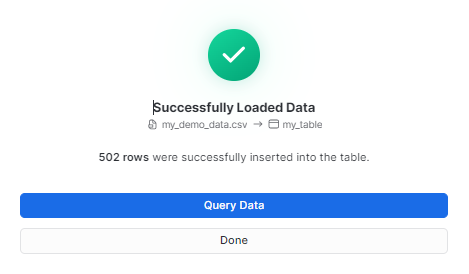
For example, to upload and compress a CSV file called my_demo_data.csv from a local folder to a Snowflake stage called my_internal_stage, you can use:
PUT file://my_folder/my_demo_data.csv @my_internal_stage AUTO_COMPRESS=TRUE;PUT command returns a list of files that have been uploaded to the stage, along with their size and MD5 hash.
Alternatively,
You can directly use Snowsight to upload your file into your Snowflake internal named stages. To do so, follow the steps outlined below:
Step 1— Login to your Snowsight account and navigate to the db and schema where you have created Snowflake internal named stage.

Step 2—Select the stage where you want to upload the files.
Step 3—Click on the “+Files” button located at the top right-hand corner of your screen.
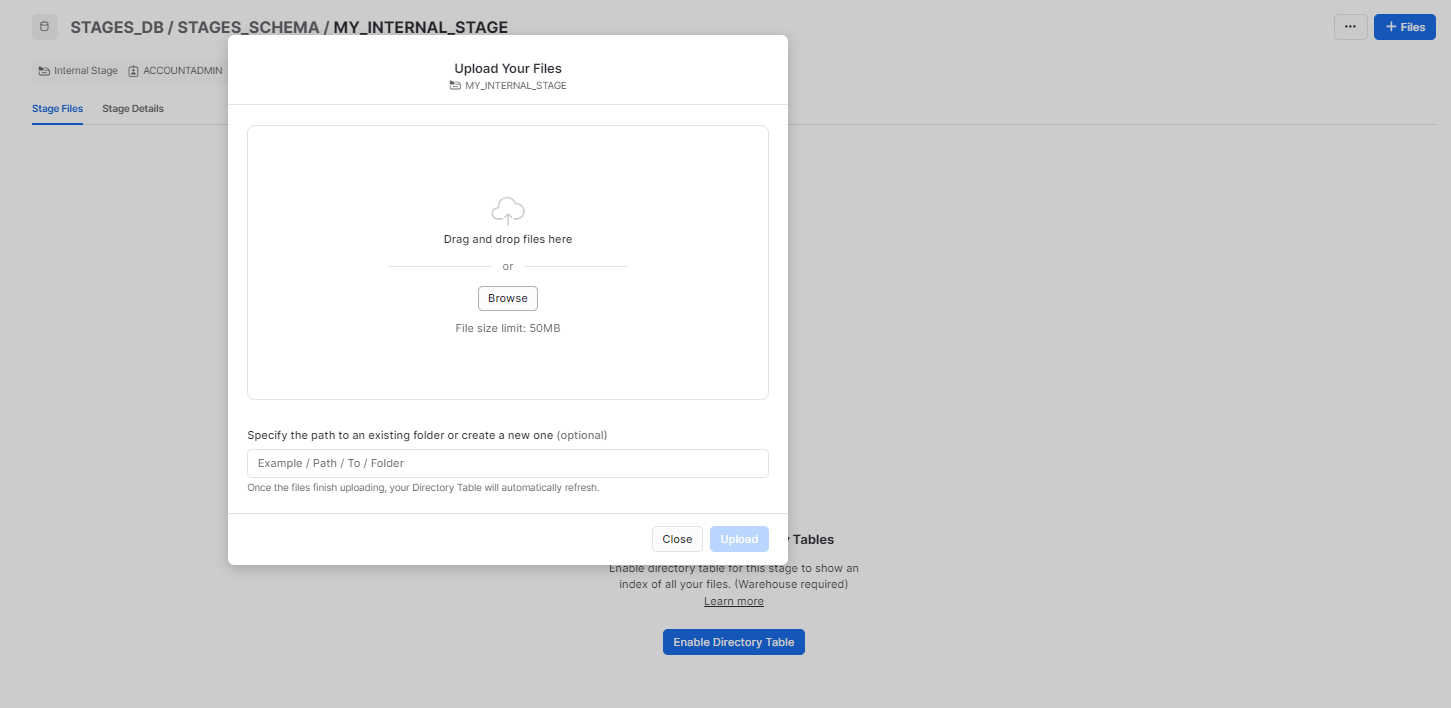
Step 4—Upload the file you want to load into your Snowflake stage.
Step 5—Click on “Upload”

👉 Second Step—Load data files from a Snowflake stage to a Snowflake table using the COPY INTO command.
To load data from a Snowflake stage to a Snowflake table, you can use the COPY INTO command. Here is the simple syntax:
COPY INTO <table_name> FROM @<stage_name> [ <options> ]As you can see, here <table_name> is the name of the Snowflake table, <stage_name> is the name of the Snowflake stage, and <options> are optional parameters for the command.
NOW,
For Loading Data From Snowflake Internal Named Stage Into Table
The syntax of the COPY INTO command is:
COPY INTO <table_name> from @<stage_name>/my_demo_data.csv FILE_FORMAT = (FORMAT_NAME= 'CSV');For Loading Data From Snowflake Internal User Stage Into Table
The syntax of the COPY INTO command is:
COPY INTO <table_name> from @~/stage_directory/my_demo_data.csv FILE_FORMAT = (FORMAT_NAME= 'CSV');For Loading Data From Snowflake Internal Table Stage Into Table
The syntax of the COPY INTO command is:
COPY INTO <table_name> from @%<table_name>/my_demo_data.csv FILE_FORMAT = (FORMAT_NAME= 'CSV');Alternatively,
You can directly use Snowsight to load your file into your Snowflake table. To do so, follow the steps outlined below:
Step 1— Login to your Snowsight account and navigate to the db and schema where you have created Snowflake internal named stage.
Step 2—Select the stage where you have uploaded the files.
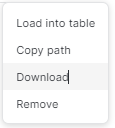
Step 3—Click on the meatball menu option located at the far right-hand corner of that specific staged file.

Step 4—Click on “Load data into table”.
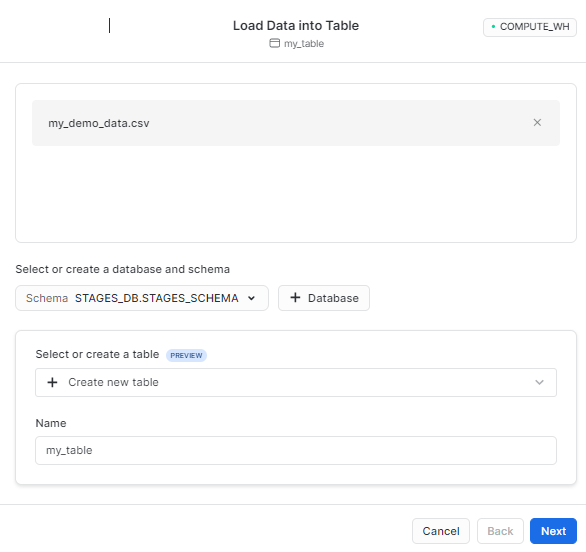
Step 5—Create or Select the table where you want to load and hit “Next”.
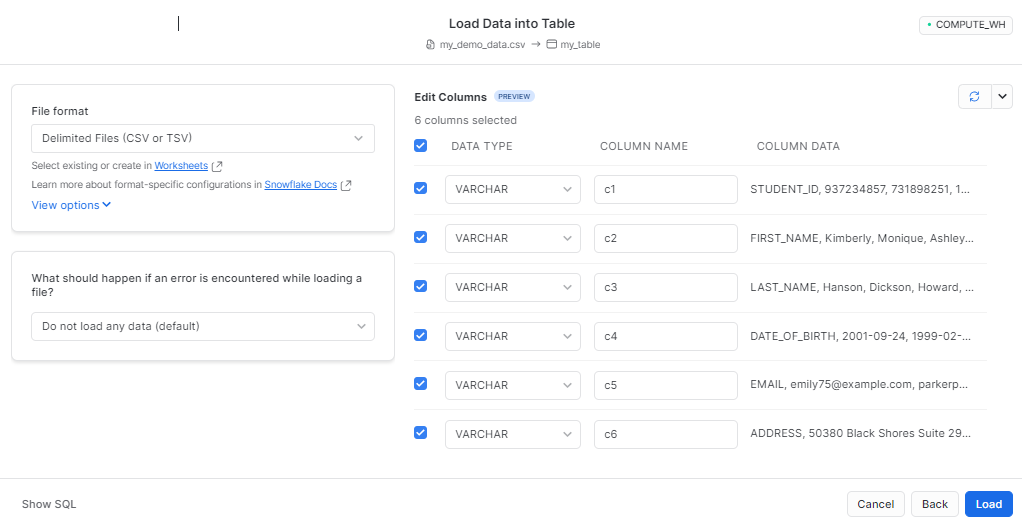
Step 6—Click on “Load” to load it.
For Loading Data From Snowflake External Stage Into Table
📁 Using Amazon S3
Accessing the referenced S3 bucket using a referenced storage integration named myint. Note that both examples truncate the MASTER_KEY value:
COPY INTO <table_name>
  FROM s3://mybucket/data/my_demo_data.csv
  STORAGE_INTEGRATION = <integration_name>
  ENCRYPTION=(MASTER_KEY = '<master_key>')
  FILE_FORMAT = (FORMAT_NAME = CSV);
Accessing the referenced S3 bucket using supplied credentials:
COPY INTO <table_name>
  FROM s3://mybucket/data/my_demo_data.csv
  CREDENTIALS=(AWS_KEY_ID='$AWS_ACCESS_KEY_ID' AWS_SECRET_KEY='$AWS_SECRET_ACCESS_KEY')
  ENCRYPTION=(MASTER_KEY = '<master_key>')
  FILE_FORMAT = (FORMAT_NAME = CSV);
📁 Using GCS
Accessing the referenced GCS bucket using a referenced storage integration
COPY INTO <table_name>
  FROM 'gcs://mybucket/data/my_demo_data.csv'
  STORAGE_INTEGRATION = <storage_intergration>
  FILE_FORMAT = (FORMAT_NAME = CSV);
📁 Using Microsoft Azure
Accessing the referenced container using a referenced storage integration.
COPY INTO <table_name>
  FROM 'azure://myaccount.blob.core.windows.net/data/my_demo_data.csv'
  STORAGE_INTEGRATION = <storage_intergration>
  ENCRYPTION=(TYPE='AZURE_CSE' MASTER_KEY = 'kPx...')
  FILE_FORMAT = (FORMAT_NAME = CSV);
Accessing the referenced container using supplied credentials:
COPY INTO <table_name>
  FROM 'azure://myaccount.blob.core.windows.net/mycontainer/data/my_demo_data.csv'
CREDENTIALS=(AZURE_SAS_TOKEN='?sv=2016-05-31&ss=b&srt=sco&sp=rwdl&se=2018-06-27T10:05:50Z&st=2017-06-27T02:05:50Z&spr=https,http&sig=bgqQwoXwxzuD2GJfagRg7VOS8hzNr3QLT7rhS8OFRLQ%3D')
  ENCRYPTION=(TYPE='AZURE_CSE' MASTER_KEY = 'kPx...')
  FILE_FORMAT = (FORMAT_NAME = CSV);
COPY INTO command returns a list of files that have been loaded to the table, along with the number of rows and bytes copied, and the status and error message if any.
How do you get data from a Snowflake stage(—Data Unloading)?
Data unloading is the process of copying data from a Snowflake table to a Snowflake stage. Data unloading can be performed in two steps:
👉 First Step—Unload data files from a Snowflake table to a Snowflake stage using the COPY INTO command.
To unload data from a Snowflake table to a Snowflake stage, you can use the COPY INTO command.
For Snowflake Internal Named Stage
The syntax of the COPY INTO command is:
COPY INTO @<stage_name> FROM <table_name> FILE_FORMAT = (FORMAT_NAME = 'CSV');For Snowflake Internal User Stage
The syntax of the COPY INTO command is:
COPY INTO @~/stage_directory FROM <table_name> FILE_FORMAT = (FORMAT_NAME = 'CSV');For Snowflake Internal Table Stage
The syntax of the COPY INTO command is:
COPY INTO @%<table_name> FROM <table_name> FILE_FORMAT = (FORMAT_NAME = 'CSV');For Snowflake External Stage
The syntax of the COPY INTO command is:
COPY INTO @my_ext_stage FROM <my_table>As you can see, here <table_name> is the name of the Snowflake table, <stage_name> is the name of the Snowflake stage
COPY INTO command returns a list of files that have been unloaded to the stage, along with the number of rows and bytes copied, and the status and error message if any.
👉 Second Step—Download data files from a Snowflake stage to a local folder on a client machine using the GET command.
To download data from the Snowflake stage to a local folder, you can simply use the GET command.
For Snowflake Internal Named Stage
The syntax of the GET command is:
GET @<stage_name> file://<local_path>For Snowflake Internal User Stage
The syntax of the COPY INTO command is:
GET @~/stage_directory file://<local_path>For Snowflake Internal Table Stage
The syntax of the GET command is:
GET @%<table_name> file://<local_path>For Snowflake External Stage
The syntax of the GET command is:
GET @my_ext_stage file://<local_path>Alternatively,
You can directly use Snowsight to download your staged file into local directory. To do so, follow the steps outlined below:
Step 1— Login to your Snowsight account and navigate to the db and schema where you have created Snowflake internal named stage.

Step 2—Select the stage where you have uploaded the files.
Step 3—Click on the meatball menu option located at the far right-hand corner of that specific staged file.

Step 4—Click on “Download”.
Now that we've covered creating stages and moving data in and out of them, let's discuss how to drop the Snowflake stage and explore some best practices for managing stages efficiently.
Dropping Snowflake Stages
Dropping Snowflake stages is the process of removing the specified named internal or external stage from the current or specified schema. Dropping Snowflake stages can help you save storage space and cost, as well as avoid clutter and confusion.
To drop Snowflake stages, you can use the DROP STAGE command. The syntax of the DROP STAGE command is:
DROP STAGE [ IF EXISTS ] <name>DROP STAGE command supports the following parameters:
- IF EXISTS: This parameter specifies that the command should not return an error if the stage does not exist.
- <name>: This parameter specifies the name of the stage to drop. If the identifier contains spaces, special characters, or mixed-case characters, the entire string must be enclosed in double quotes. Identifiers enclosed in double quotes are also case-sensitive.
For instance, to drop a named stage called my_stage in the current schema and database, you can use:
DROP STAGE my_stage;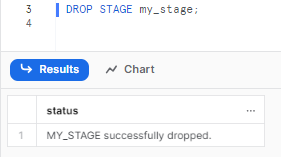
Snowflake DROP STAGE command returns a message indicating that the stage was successfully dropped, or an error if the stage does not exist or the user does not have the privilege to drop the stage.
Note: Dropped Snowflake stages cannot be recovered; they must be recreated. This command cannot be used to drop the stage associated with a table or user; only named stages (internal or external) can be dropped
If you want a quick rundown of what Snowflake stages are and their types, here is a short video to help you understand them thoroughly.
Best Practices for Creating and Managing Snowflake Stages
Now let's dive into some of the best practices for creating and managing Snowflake stages for different scenarios. These best practices can help you optimize your data movement, performance, security—and governance using Snowflake stages.
1. Create Separate Stages for External Sources
If you are using external stages to load data from multiple external sources, such as S3, GCS, or Microsoft Azure Blob Storage, it is recommended to create separate stages for each external source, which can help you avoid confusion and errors when loading data from different sources, as well as simplify the configuration and authentication of each stage.
2. Use Naming Conventions to Streamline and Organize Snowflake Stages
Whenever you are creating multiple stages, either internal or external, it is recommended to use naming conventions to streamline and organize your Snowflake stages. Naming conventions can help you identify the purpose, type, and owner of each Snowflake stage, as well as make it easier to grant and revoke permissions and access to your stages.
Example, you can use prefixes or suffixes to indicate the type of stage, such as int_ for internal stages and ext_ for external stages, or the source or destination of the stage, such as _s3 for S3 Snowflakestages, _gcs for GCS stages and so on.
3. Prefer External Stages for Raw Data
If you are loading or unloading large raw data files, such as log files, or web data, it is recommended to use external stages for storing these data files. Snowflake External Stages can help you reduce the storage cost and space in Snowflake, as the data files are stored in an external location. External stages can also help you leverage the features and capabilities of the cloud storage services, such as scalability, durability—and availability.
4. Use Internal Stages for Staging
While loading data from local files or other internal sources into Snowflake tables, it is recommended to use Snowflake Internal Stages for staging before loading into tables. Internal stages can help you improve the performance and security of your data loading, as the data files are stored and encrypted within Snowflake. Snowflake Internal Stages can also help you reduce the storage cost and space in Snowflake, as you can delete the staged data files after loading ‘em into tables.
5. Use Temporary Staging Tables
Let's say you are loading data from stages into tables, and you encounter errors or failures during the data loading, it is recommended to use temporary staging tables to handle these errors. Temporary staging tables are tables that are created for the sole purpose of staging data before loading them into the final destination tables. They are usually created with the TEMPORARY or TRANSIENT option, which means they are automatically dropped or deleted after the session or the retention period ends.
6. Secure Access with Encryption/Permissions
Always limit access to your Snowflake stages with permissions and encryption. Permissions and encryption can help you enhance the security and compliance of your stages, as well as protect your data from unauthorized or malicious access. You can use the following methods to limit the access to your stages:
- Grant and revoke privileges on Snowflake stages
- Encrypt data files in Snowflake external/internal stages by using methods like Client-side or Server-side encryption
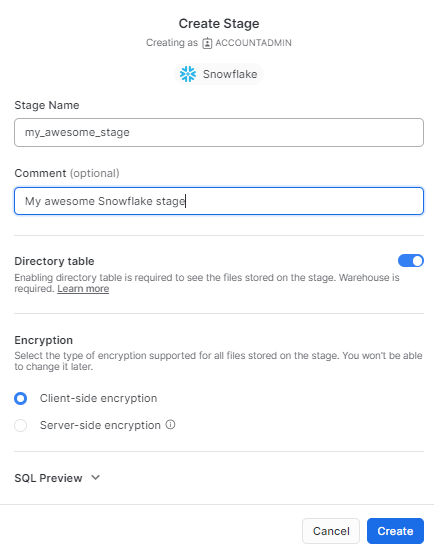
7. Add comments and document Snowflake stages
It is always recommended to add comments and document Snowflake stages. Comments can help you describe the purpose, type, and owner of each stage, as well as provide additional information or instructions for using the stage. Comments can also help you maintain and manage your stages, as well as collaborate and communicate with other users or roles.
Here's how you can add comments while creating Snowflake stages (using SQL):
CREATE STAGE my_awesome_stage COMMENT = 'My awesome Snowflake stage';Here's how you can add comments while creating Snowflake stages (Snowsight):
What Is the Difference Between Snowflake External Stage and External Table?
We've reached to the final section of this article, where we'll delve into the differences between Snowflake External Stages and Snowflake external tables. To give you an overview, the main difference between a Snowflake External Stage and an external table is that an external stage does not store or manage data files, whereas an external table does store and manage some file-level metadata meaning, that an external stage cannot be queried directly, while an external table can be queried as if it were a regular table in Snowflake.
The following table summarizes some of the key differences between Snowflake External Stages and external tables:
| Snowflake External Stage | Snowflake external tables |
| A pointer or a reference to a data file or a set of data files in an external location | A metadata object that contains information about the data files in an external stage |
| Does not store or manage the data files | Stores and manages some file-level metadata |
| Cannot be queried directly | Can be queried as if it were a regular table in Snowflake |
| Supports data loading and unloading using the COPY INTO command | Supports data querying and joining using the SELECT command |
| Requires configuration and authentication for accessing the external location | Requires specifying the file format and copy options for the data files |
| Supports a wide range of data sources and destinations | Supports any data format that the COPY command supports |
| Reduces the storage cost and space in Snowflake | Enhances the performance and security of the data querying |
Save up to 30% on your Snowflake spend in a few minutes!


Conclusion
Snowflake stages are essential for loading and unloading data in Snowflake, offering a range of features and capabilities. These stages serve as locations where data files are stored (staged) to facilitate data movement within Snowflake or outside of it.
In this article, we covered:
- What are the stages in Snowflake?
- What are the types of stages in Snowflake?
- How do you create Snowflake stages?
- How do you load/unload data using Snowflake stages?
- Best Practices for Creating and Managing Snowflake Stages
- Difference between Snowflake External Stage and external table?
—and so much more!
You can think of Snowflake stages as the bridges that connect your data sources and destinations. They facilitate easy and efficient data movement across different locations. Also, they enable you to optimize data movement, performance, security—and governance using various options and methods.
FAQs
What are Snowflake stages?
Snowflake stages are locations where data files are stored (staged) for loading and unloading data.
What are the main types of stages?
Internal, external - store files within or outside Snowflake.
What 3 Snowflake internal stage types exist?
There are 3 types of Snowflake internal stage: User, table, and named stages.
What permissions do internal Snowflake stages have?
User & table stages are restricted; named stages are customizable.
Which external cloud platforms can stages use?
Amazon S3, Azure, Google Cloud Storage buckets.
How are stages created in Snowflake?
You can use CREATE STAGE commands or Snowsight UI.
Can different file formats be specified for a stage?
Yes, Snowflake supports staging a variety of file types, including CSV, JSON, Avro, ORC, Parquet, and XML. You can specify the file type using the FILE_FORMAT option in the CREATE STAGE or COPY command.
What is the difference between stage and pipe in Snowflake?
Stages are named database objects that can be used to simplify and streamline bulk loading data into and unloading data out of database tables, while Pipes are named database objects that define COPY statements for loading micro-batches of data using Snowpipe.
How is data loaded into Snowflake tables?
You can use COPY INTO command to ingest files from a stage.
How do you query data from an external stage without loading it into a table?
You can query data from an external stage without loading it into a table using the SELECT command with the FROM @<stage_name> clause.
How is data unloaded out of Snowflake?
COPY INTO {stage} from table exports table data.
How can data be uploaded into a stage?
You can use PUT to upload files from the OS into a Snowflake stage.
How are files downloaded from stages?
You can use GET command or Snowsight to download staged files to local storage.
How can staged files be listed?
Use LIST @stage_name to view files in a stage.
How to secure confidential data in stages?
Encrypt using security features native to the cloud platforms.
Can staging be used for ETL processes?
Yes, stages enable cloud-optimized ELT data pipelines.
Where can staged file metadata be viewed?
In stage directory tables showing objects and details.
How can obsolete stages be removed?
You can use DROP STAGE to delete unneeded stages. Purge files first.
What happens to Snowflake table stages on table drop?
Tables stages are automatically deleted with the table.


