


If you are working with Snowflake, you probably know how important tables are. Tables are where you store and organize your data, and where you run your queries and analyses. But sometimes, you may want to get rid of a table that you do not need anymore. Maybe it’s outdated, duplicated—or just taking up massive space. So how do you do that? To do so, all you need is Snowflake DROP TABLE command.
In this article, we will cover everything you need to know about how to drop a table in Snowflake—using Snowflake DROP TABLE command, covering syntax, recovery capabilities, impacts—and best practices for it.
What are Snowflake Tables?
Snowflake tables are schema-level objects that store and organize data in rows and columns. They support both structured and semi-structured data and allow users to perform various operations using simple SQL commands. Snowflake offers different types of tables, such as permanent, transient and temporary, depending on the data durability and session scope. To create a table, you can use the CREATE TABLE statement or the Snowflake Web-UI (Snowsight).
For example, to create a table using simple DDL SQL statement would be:
CREATE TABLE <table_name> (
  <col_name> <col_type> [options],
  -- Additional column definitions
  [constraints]
);
As you can see, the <table_name> parameter specifies the name of the table you want to create. The col_name and col_type parameters define the name and data type of each column in the table. You can also specify options for each column, such as whether it is not null, has a default value, or has any constraints (Constraints are rules that enforce the integrity and validity of the data in the table).
Check out this article to learn more in-depth about Snowflake tables.
Want to take Chaos Genius for a spin?
It takes less than 5 minutes.

How do you DROP tables in Snowflake—Using Snowflake DROP TABLE?
If you want to delete a table from your schema in Snowflake, you can use the DROP TABLE command. This command removes the table from the current or specified schema but does not permanently delete it from the system. You can also recover a dropped table using the UNDROP TABLE command and the Time Travel feature, which we will discuss later on.
Basic syntax:
The basic syntax for dropping a table using Snowflake DROP TABLE command is:
DROP TABLE table_name;Snowflake drop table syntax
Full syntax:
DROP TABLE [ IF EXISTS ] <name> [ CASCADE | RESTRICT ]Snowflake drop table syntax
Parameters:
- [IF EXISTS] option allows you to drop the table only if it exists, and avoid an error if it does not, which we will discuss in the next section.
- <name> parameter specifies the identifier for the table to drop. If the identifier contains spaces, special characters, or mixed-case characters, the entire string must be enclosed in double quotes. If the table identifier is not fully-qualified (in the form of db_name.schema_name.table_name or schema_name.table_name), the command looks for the table in the current schema for the session.
- CASCADE option drops the table even if the table has primary/unique keys that are referenced by foreign keys in other tables.
- RESTRICT option returns a warning about existing foreign key references and does not drop the table.
Note: The default option is CASCADE.
To illustrate how to use the Snowflake DROP TABLE command, let’s create a simple table called students with three columns: id, name, and email. We can use the following SQL statement to create the table:
CREATE TABLE students (
  id INT PRIMARY KEY,
  name VARCHAR(50),
  email VARCHAR(50)
);
let’s insert some dummy data into the students table:
INSERT INTO students VALUES
(1, 'Chaos', '[email protected]'),
(2, 'Genius', '[email protected]'),
(3, 'Johnny', '[email protected]');
Snowflake drop table example
Now, let's use DESCRIBE command query to describe the table
DESC TABLE students;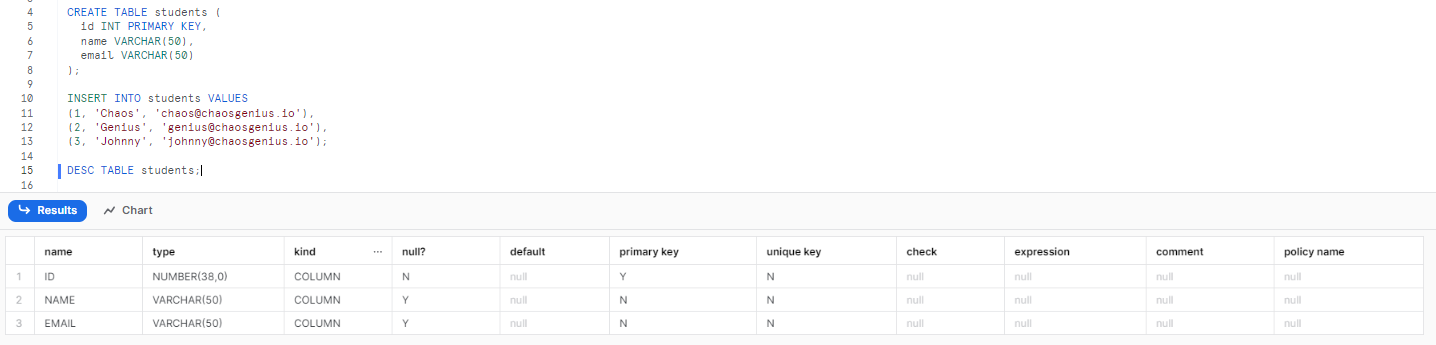
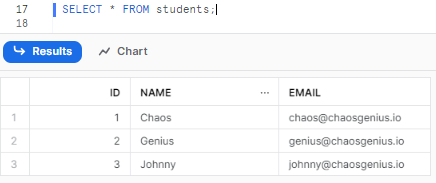
We can also verify that the table and the data are created by running the following query:
SELECT * FROM students;Output should look like this:
Now, let’s say we want to drop the students table from the schema. We can use the following SQL statement to do that:
Either, this:
DROP TABLE students;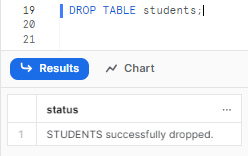
Or
DROP TABLE demo_db.demo_schema.students;Snowflake drop table example
If you try to query the students table again, you will get an error:
SELECT * FROM students;Here is the output:
SQL compilation error:Object 'STUDENTS' does not exist or not authorized.As you can see, the table has been dropped from the schema, but not from the system. We can still recover the same table using the Snowflake UNDROP TABLE command and the Time Travel feature, which we will cover in the later section.
Conditional Table Deletion with Snowflake DROP TABLE [IF EXISTS]
Sometimes, you may want to drop a table only if it exists in your schema, and avoid getting an error if it does not. It can be really useful when you are not sure whether the table has been created or not, or when you want to run a script that drops multiple tables without checking each one. For this very purpose, you can use the Snowflake DROP TABLE [IF EXISTS ] statement.
Syntax:
The syntax of Snowflake DROP TABLE if exists is:
DROP TABLE [IF EXISTS] table_name;Snowflake drop table syntax
Note: IF EXISTS option allows you to drop the table only if it exists, and ignore it if it does not.
Let's see how to use the Snowflake DROP TABLE [IF EXISTS] statement, let’s use the same students table that we created and dropped in the previous section. Suppose we want to drop the students table again, but we are not sure whether it exists or not. We can use the following SQL statement to drop the table if it exists, and do nothing if it does not:
DROP TABLE IF EXISTS students;Snowflake drop table syntax
![Conditional Table Deletion with Snowflake DROP TABLE [IF EXISTS] - Snowflake DROP TABLE](https://www.chaosgenius.io/blog/content/images/2023/11/snowflake-drop-table-3.png)
So you can see the table does not exist in the schema, and the command did not return an error. Instead, it completed successfully and gave us a warning message. This way, we can avoid getting an error when we try to drop a table that does not exist.
Recovering Dropped Tables in Snowflake
Say you accidentally dropped a table in Snowflake and wondered how to get it back? Don’t worry, dropping a table—using the Snowflake DROP TABLE command does not permanently remove it. You can use the Time Travel feature and the Snowflake UNDROP TABLE command to restore the dropped table.
What is Snowflake Time Travel?
Time Travel is a feature that allows you to access historical Snowflake data. Every table has a data retention period, which is the number of days that Snowflake retains the data in the table. Snowflake Standard Edition has a data retention period of 24 hours(1 day) by default and is automatically enabled for all Snowflake accounts., but you can change it up to 90 days for each table.
So, when you drop a table, Snowflake retains a version of the table in Time Travel for the duration of the data retention period. Once this period expires, what happens next to the dropped table depends on whether it's permanent, transient, or temporary. A permanent table gets moved to Fail-safe, a temporary storage for an additional 7 days. During this period, you can contact Snowflake support to restore the table, but direct access to it isn't available. Once the table exits Fail-safe, it's purged. BUT, transient or temporary tables have no Fail-safe so they are immediately purged once they move out of Time Travel.
Now, let's dive into how to actually recover dropped tables from Snowflake—using Snowflake UNDROP TABLE command.
How do you UNDROP tables in Snowflake—Using Snowflake UNDROP TABLE?
UNDROP TABLE is a command that allows you to restore a dropped table from Time Travel.
Syntax:
The syntax of the UNDROPing the Snowflake table is:
UNDROP TABLE <name>;where <name> is the name of the dropped table. You can also specify the schema and database name if the table is not in the current schema or database.
For example:
UNDROP TABLE my_schema.my_table;To illustrate how to use the UNDROP TABLE statement, let’s use the same students table that we created and dropped—using Snowflake DROP TABLE in the previous section. Let’s suppose we want to undrop the students table again. We can use the following SQL statement to undrop the table.
UNDROP TABLE students;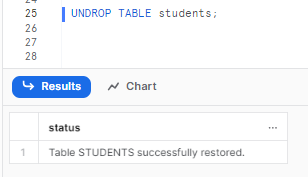
If you query the students table again, you will get all of your table data recovered:
SELECT * FROM students;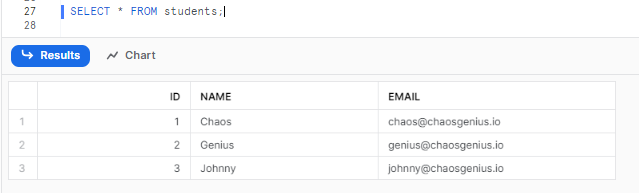
TLDR; Carefully using Time Travel and UNDROP TABLE helps avoid common data loss risks when dropping tables in Snowflake.
How to check if a table was dropped?
You may encounter a situation where a table that you expected to exist in your schema is missing. It could be because the table was dropped by someone? either intentionally or accidentally. So how can you check if a table was dropped and who dropped it in Snowflake?
One way to check if a table was dropped is to use the QUERY_PROFILE, QUERY_HISTORY view or the QUERY_HISTORY table function in the Snowflake Information_schema. These views and functions allow you to query the history of queries executed in your account within the last 7 days. You can filter the results by the query type, which is Snowflake DROP TABLE for dropping tables, and the query text, which contains the name of the table that was dropped. For example, if you want to check if a table called students was dropped in the last 7 days, you can use the following query:
SELECT *
FROM TABLE(INFORMATION_SCHEMA.QUERY_HISTORY())
WHERE QUERY_TYPE = 'DROP TABLE'
AND QUERY_TEXT ILIKE '%students%';
Snowflake drop table check
The output will show you the details of the queries that dropped the sales table, such as the query ID, the user who issued the query, the role that was active, the warehouse that was used, the start and end time, and the execution status. You can also use the query ID to view the query profile and the query result, if available.
Or
Another way to check if a table was dropped is to use the QUERY_HISTORY view in the Snowflake Account Usage schema. This view allows you to query the history of queries executed in your account within the last 365 days (1 year), but with some differences from the Information Schema view and function. For example, the data in this view may have a latency of up to 120 minutes (2 hours), and the records for dropped objects are included in the view. You can use the same query as above, but replace the INFORMATION_SCHEMA schema with the ACCOUNT_USAGE schema:
SELECT *
FROM ACCOUNT_USAGE.QUERY_HISTORY
WHERE QUERY_TYPE = 'DROP TABLE'
AND QUERY_TEXT ILIKE '%students%';
Snowflake drop table check
The output will show you the same details as the Information Schema view and function, but with a longer time range and a possible data latency.
Or
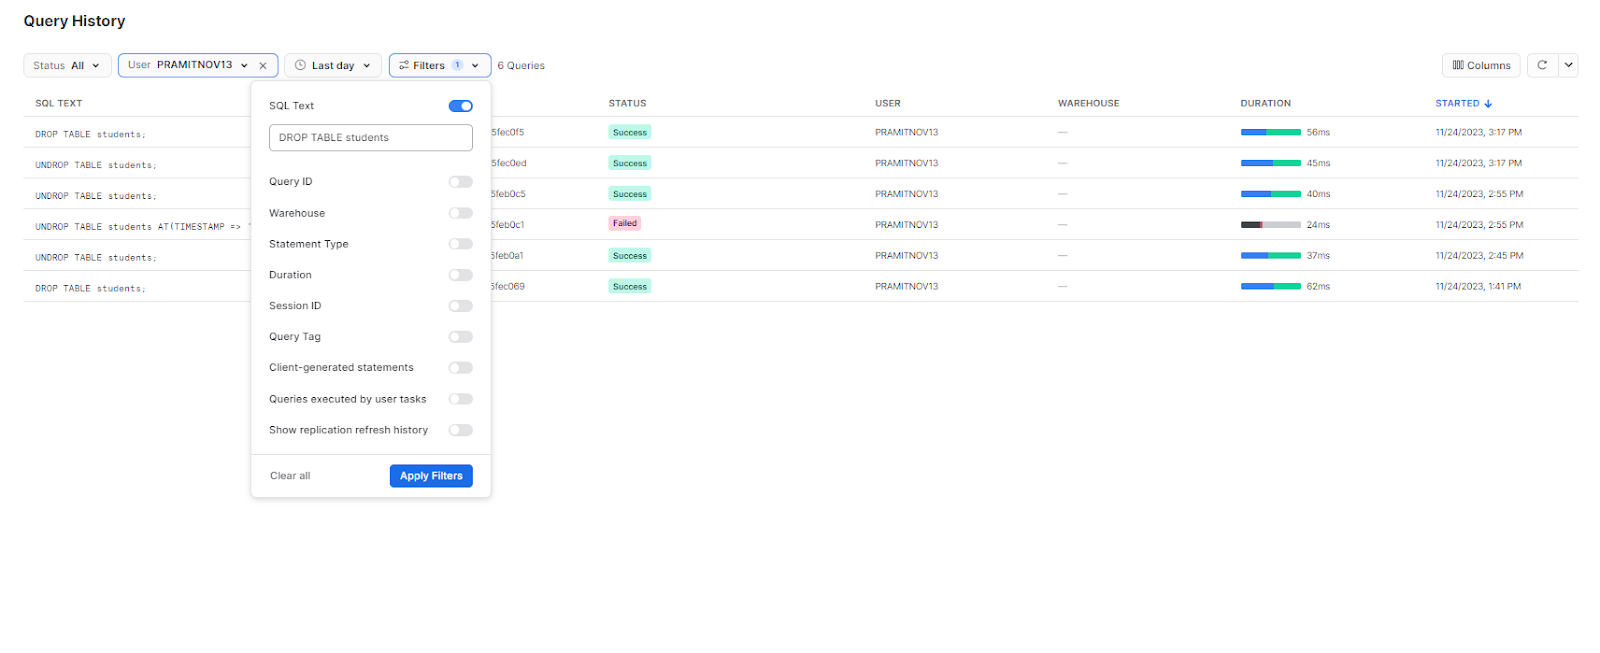
There is an alternative method—using Snowsight. So to access the entire detailed info of the query, head over to your Activity menu and click on Query History. Select the Filter dropdown option and enable SQL. Then, type the query text you want to search. For instance, if you're searching for the Snowflake DROP TABLE students query, simply type that and apply the filter. You should then be able to see the complete details, including the status of the query and the user who executed it.
As you can see, both the Information Schema and the Account Usage views and functions can help you see who dropped a table in Snowflake. You can use the USER_NAME column to see the name of the user who issued the query that dropped the table, and the ROLE_NAME column to see the role that was active for the user at the time of the query. For example, if you want to see who dropped the students table and what role they used, you can use the following query:
SELECT USER_NAME, ROLE_NAME
FROM TABLE(INFORMATION_SCHEMA.QUERY_HISTORY())
WHERE QUERY_TYPE = 'DROP TABLE'
AND QUERY_TEXT ILIKE '%students%';
Snowflake drop table check
Together these auditing capabilities help manage compliance obligations around data while diagnosing issues from unwanted table deletion.
Snowflake DROP TABLE—Considerations and Best Practices
Dropping a table in Snowflake is a simple and powerful way to delete a table from your schema, but it also has some implications and risks that you should be aware of. In this article section, we will discuss some of the best practices for using the Snowflake DROP TABLE command.
Verify table no longer needed:
Always verify that the table is no longer needed or used by anyone or anything. You can check the query history to see when and how the table was accessed, and who accessed it. You can also check the dependencies of the table, such as views, foreign keys, or other tables that reference the table.
Always back it up
Clone the table first, in case you need to restore it later. Cloning a table creates a copy of the table with the same data and metadata, but with a different name. You can use the CLONE command to clone a table in Snowflake.
CREATE TABLE drop_demo_db.drop_demo_schema.students_clone CLONE drop_demo_db.drop_demo_schema.students;

Select * from students_clone;
Restrict DROP TABLE permissions
To prevent unauthorized or accidental dropping of tables, you should restrict the DROP TABLE permissions to only the users and roles that need them. In Snowflake, you can use the GRANT and REVOKE commands to grant or revoke privileges
So these are some of the best practices for using the Snowflake DROP TABLE command in Snowflake. If you follow these tips carefully, you can avoid losing important data or breaking existing dependencies.
How do you DROP External tables in Snowflake—Using Snowflake DROP EXTERNAL TABLE?
External tables reference data living outside Snowflake, typically in cloud storage or external stages like S3, Azure Blobs or GCP Buckets. The external stage persists independently rather than getting created or destroyed inherently from DDL commands. External tables do not store the data in Snowflake, but only store the metadata, such as file names, locations, formats, and properties.
So, If you want to remove an external table from your schema in Snowflake, you can use the DROP EXTERNAL TABLE command. This command removes the external table from the current or specified schema but does not affect the data files that the external table refers to. You can also recover a dropped external table using the CREATE EXTERNAL TABLE command with the same name and location as the original external table.
Syntax:
The syntax for dropping an EXTERNAL TABLE command is the same as the Snowflake DROP TABLE, except you need to add “EXTERNAL” after DROP.
DROP EXTERNAL TABLE [ IF EXISTS ] <name> [ CASCADE | RESTRICT ]Snowflake drop external table syntax
Parameters:
- <name> parameter specifies the identifier for the external table to drop. If the identifier contains spaces, special characters, or mixed-case characters, the entire string must be enclosed in double quotes.
- [IF EXISTS] option allows you to drop the external table only if it exists, and ignore it if it does not.
- CASCADE option drops the external table even if it has primary/unique keys that are referenced by foreign keys in other tables.
- RESTRICT option returns a warning about existing foreign key references and does not drop the external table.
To showcase you how to use the DROP EXTERNAL TABLE command, let’s create a simple external table called products that accesses data stored in a JSON file in an Amazon S3 bucket. We can use the following SQL statement to create the external table:
CREATE EXTERNAL TABLE grocery_products (
  id INT,
  name VARCHAR(50),
  price DECIMAL(10,2)
)

WITH LOCATION = @Your_External_Stage
FILE_FORMAT = (TYPE = JSON);
Snowflake drop table example
It will create an external table called grocery_products with three columns: id, name, and price. The location parameter specifies the path to the JSON file in the S3 bucket, which is referenced by a named file stage called @Your_External_Stage. The file_format parameter specifies the type and format of the data file, which is JSON in this case.
You can simply verify that the external table and the metadata are created by running the following query:
SELECT * FROM grocery_products;Now, let’s say we want to drop the external table products from our schema. We can use the following SQL statement to do that:
DROP EXTERNAL TABLE grocery_products;If you try to query the external table grocery_products again, you will get an error, which means that the external table has been dropped from the schema.
Unlike a standard/permanent table, dropping an external table immediately results in its purging. An external table cannot be recovered using Time Travel; also, there is no UNDROP EXTERNAL TABLE command available. When a dropped external table needs to be restored, it must be recreated from absolute scratch. BUT, an interesting aspect is that the data file in the S3 bucket(or any) remains intact and unchanged. Therefore, you can recover the external table by creating it again with the same name and location as before. Note that no history from the previous version of the external table is retained.
How do you DROP Temporary tables in Snowflake—Using Snowflake DROP TABLE?
Although we discussed this earlier, let's briefly define what a Snowflake Temporary table is...
Snowflake temporary table is a table that only exists within the session in which it was created and will get automatically dropped whenever the session ends. Temporary tables are useful for storing temporary data that is only needed for the current session, such as ETL data or session-specific data. Temporary tables are not visible to other users or sessions, and the data stored in them is NOT recoverable after the session ends.
How do you DROP Snowflake Temporary Tables?
To drop a temporary table in Snowflake, you can use the same syntax as Snowflake DROP TABLE command, but it's better if you specify the table name as a fully-qualified identifier (in the form of db_name.schema_name.table_name or schema_name.table_name).
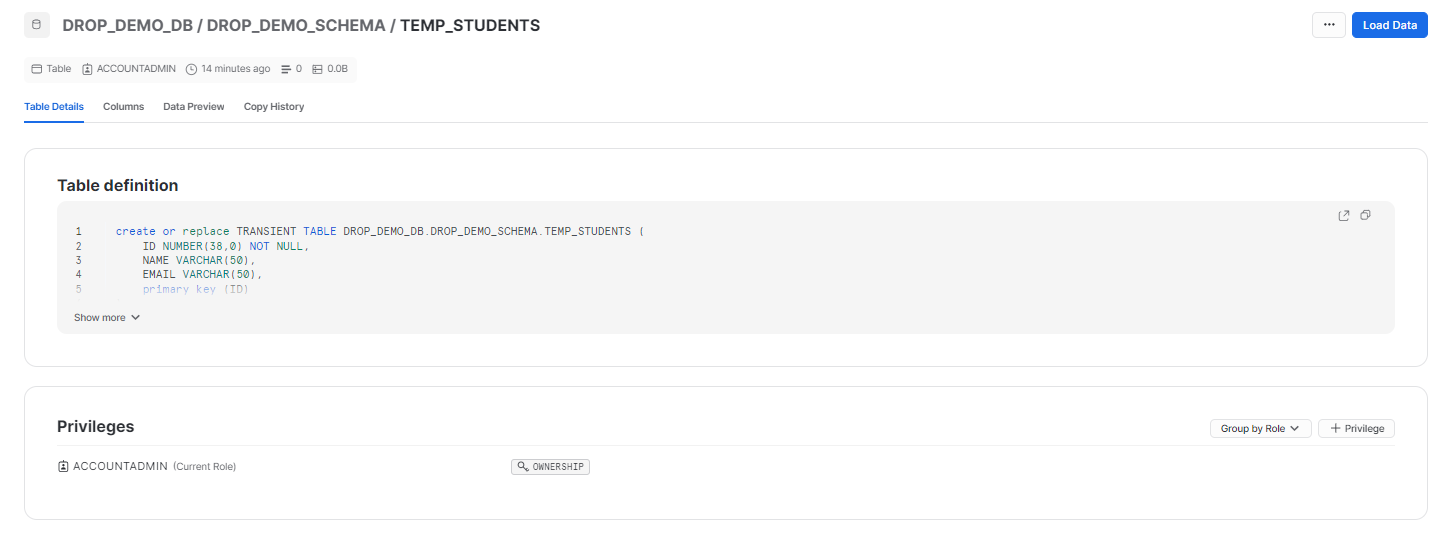
To showcase how to drop a temporary table using the Snowflake DROP TABLE command, let’s create a simple table called temp_students with three columns: id, name, and email. We can use the following SQL statement to create the table:
CREATE TEMPORARY TABLE temp_students (
  id INT PRIMARY KEY,
  name VARCHAR(50),
  email VARCHAR(50)
);
Now, let’s say we want to drop the temp_students table from the schema. We can use the following SQL statement to do that:
Either, this:
DROP TABLE temp_students;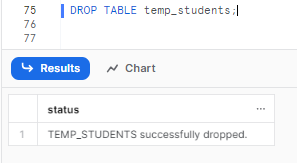
Or
DROP TABLE demo_db.demo_schema.temp_students;If you try to query the temp_students table, you will get an error:
SELECT * FROM temp_students;Here is the output:
SQL compilation error: Object 'TEMP_STUDENTS' does not exist or not authorized.Note that dropping a temporary table is not necessary, as it will be automatically dropped when the session ends. BUT, you may want to drop a temporary table explicitly if you want to free up the storage space or avoid any kind of potential naming conflicts with other tables.
How do you DROP Transient tables in Snowflake—Using Snowflake DROP TABLE?
Now, let’s move on to dropping Snowflake Transient Table.
Snowflake transient table is a table that persists until it is explicitly dropped and is available to all users with the appropriate privileges. Transient tables are similar to permanent tables, EXCEPT that they do not have a Fail-safe as well as Time Travel period. Transient tables are useful for storing temporary data that needs to be kept after the current session ends, but does not require a high level of data security and data recovery.
To drop a Snowflake transient table, you can also use the same syntax as Snwoflake DROP TABLE command, but it's better if you specify the table name as a fully-qualified identifier (in the form of db_name.schema_name.table_name or schema_name.table_name).
To showcase how to drop a temporary table using the Snowflake DROP TABLE command, let’s create a simple table called transient_students with three columns: id, name, and email. We can use the following SQL statement to create the table:
CREATE TRANSIENT TABLE transient_students (
  id INT PRIMARY KEY,
  name VARCHAR(50),
  email VARCHAR(50)
);
Now, let’s say we want to drop the transient_students table from the schema. We can use the following SQL statement to do that:
Either, this:
DROP TABLE transient_students;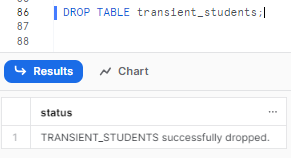
Or
DROP TABLE transient_students;If you try to query the temp_students table, you will get an error:
SELECT * FROM transient_students;Here is the output:
SQL compilation error:Object 'TRANSIENT_STUDENTS' does not exist or not authorizedNote that dropping a transient table is permanent, as the data stored in the table will be deleted forever and cannot be recovered. Therefore, you should be careful when dropping a transient table, and make sure that you have a backup or a clone of the table if you need it later.
How do you drop multiple tables in a Snowflake?
There might be a case where you might need to drop multiple tables, rather than dropping them one by one. This can save you time and effort, especially when dealing with a large number of tables for deletion. However, Snowflake doesn't support dropping multiple tables with a single DROP TABLE command. So, how can you drop multiple tables at once in Snowflake?
One way to drop multiple tables at once in Snowflake is by generating the DDL for dropping the tables and then executing the DDL. You can use the INFORMATION_SCHEMA.TABLES view to get the list of tables that you want to drop.
For example, suppose you have multiple temporary tables called temp_1, temp_2 and temp_3 in the demo_schema schema of the demo_db database, and you want to drop 'em all. You can use the following query to generate the DDL for dropping the tables:
SELECT 'DROP TABLE ' || table_name || ';'
FROM  INFORMATION_SCHEMA.TABLES
WHERE TABLE_NAME LIKE 'temp_%';
You can then copy and paste the output and run it as a script to execute the DDL and drop the tables.
Or
You can also use a stored procedure to automate the process of generating and executing the DDL. For example, you can use the following stored procedure to drop multiple tables at once in Snowflake:
CREATE OR REPLACE PROCEDURE drop_tables (list varchar)
RETURNS string
LANGUAGE javascript
AS
$$
  var l = LIST.split (',');
  var sqls = [];
  for (i=0; i<l.length; i++) {
    var sql = "DROP TABLE IF EXISTS " + l [i].trim ();
    var rs = snowflake.execute ( {sqlText: sql});
    sqls.push (sql);
  }
  return JSON.stringify (sqls);
$$;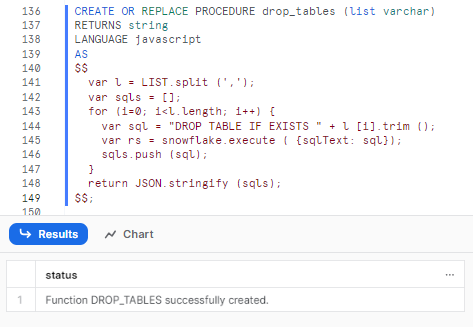
As you can see, this stored procedure takes a list of table names as a parameter and drops each table if it exists. It also returns a JSON string of the SQL statements that were executed. To use the stored procedure, you can simply call it with the list of table names that you want to drop. For example, if you want to drop the same four tables as before, you can use the following command:
CALL drop_tables ('drop_demo_db.drop_demo_schema.temp_1, drop_demo_db.drop_demo_schema.temp_2, drop_demo_db.drop_demo_schema.temp_3, drop_demo_db.drop_demo_schema.temp_4');The output should look like this:

You can also verify that the tables have been dropped by running the following query:
SELECT *
FROM INFORMATION_SCHEMA.TABLES
WHERE TABLE_NAME LIKE 'temp_%';
The output should be empty, indicating that the tables have been dropped.
Step-by-Step Guide to Dropping Tables using Snowsight
Snowflake provides a web-based UI (Snowsight) that allows easily creating and managing tables, letting you skip the intricate SQL commands for a more visual, interactive experience.
In this section, we will show you a step-by-step guide on how to drop a table in Snowflake using only Snowsight. To do this:
Step 1—Login to Snowflake
Log in to Snowflake. Enter your credentials on the login page. Once logged in, you'll be directed to the Snowflake Snowsight interface.
Step 2—Select the “Data” Option
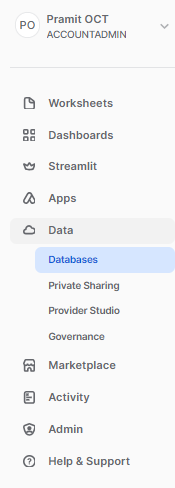
On the left-hand side panel of the Snowflake UI, you'll find several options. Click on the Data option.
Step 3—Choose the “Database” Option
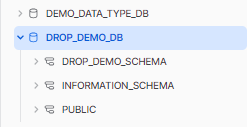
Within the Data section, you'll see an option for Databases. Click this to view a list of all the databases you have access to in your Snowflake account.
Step 4—Select Your Database and Schema
From the list of databases, select the one in which you intend to drop the table. After selecting a database, you'll need to choose the appropriate schema.
Step 5—Select “Tables” option
After selecting your database and schema, select the table section.
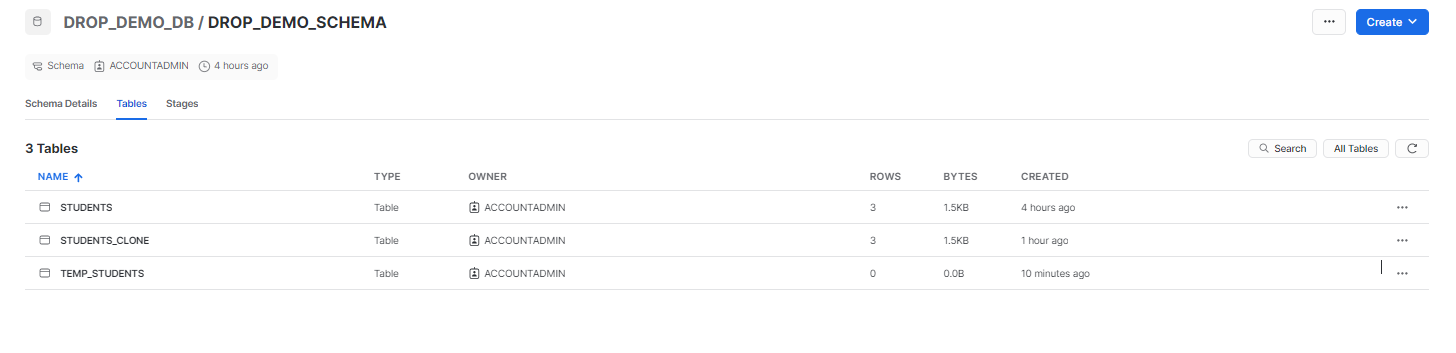
Step 6—Select the Table that you want to DROP
Once you are in the Table section, you need to select the table that you want to drop. To do this, simply click on that table. That's it!
Step 7—DROP the Table
Now, for the very final step to drop the table, all you have to do is click on the three-dot icon at the top right-hand corner of your screen. An option will appear; click on Drop, and you will receive a confirmation popup.

Now, click on the blue button that says “Drop Table”, and your table will be dropped.
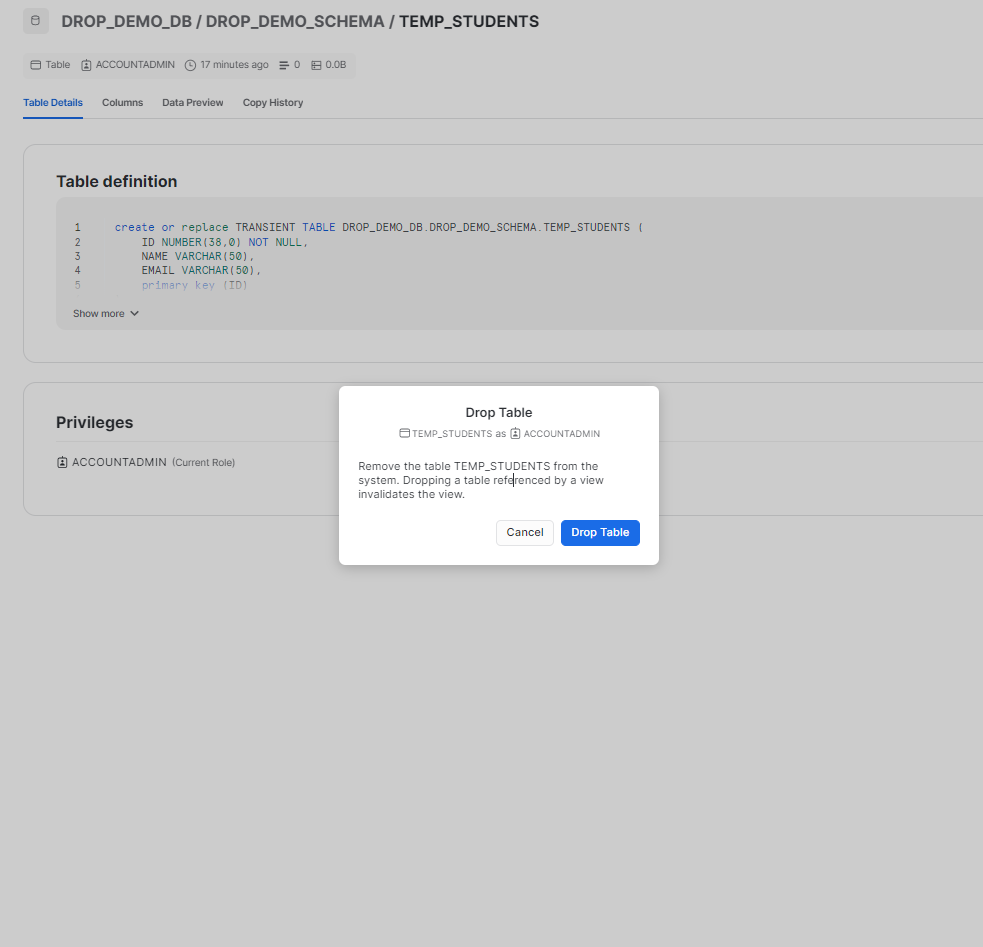

Just like that, with a few clicks in Snowsight, dropping a table in Snowflake becomes surprisingly simple. All you have to do is select a few options and click some buttons—that's it! No need to write complex code.
Save up to 30% on your Snowflake spend in a few minutes!


Conclusion
And that's a wrap! Dropping a table in Snowflake is surprisingly simple. The Snowflake DROP TABLE command is here to assist you with that. It provides a straightforward method for users to deliberately remove obsolete and unwanted tables. In this article we covered:
- What are Snowflake Tables?
- How do you drop a table in Snowflake?
- How do you recover dropped Tables in Snowflake?
- How to check if a table was dropped ?
- Snowflake DROP TABLE—Considerations and Best Practices
- How do you DROP External tables in Snowflake?
- How do you DROP Temporary & Transient tables in Snowflake?
- Step-by-Step Guide to Dropping Table Snowflake—using Snowsight
—and so much more!
FAQs
What is the basic syntax to drop a table in Snowflake?
The basic syntax is DROP TABLE table_name.
Does the Snowflake DROP TABLE command permanently delete tables?
No, it removes the table from the schema but retains it in Time Travel, from which it can be recovered within the retention period.
What command is used to restore a dropped table in Snowflake?
Snowflake UNDROP TABLE command restores dropped tables from within Time Travel.
How long are dropped tables retained in Time Travel by default?
Dropped tables are retained for 1 day (24 hours) in Time Travel by default. This is configurable up to 90 days.
What happens when a permanent table moves out of Time Travel after being dropped?
Permanent tables enter a Fail-safe state for 7 more days, after which they are permanently purged if not restored.
What happens to transient and temporary tables after Time Travel expires?
Transient and temporary tables do not enter Fail-safe and are immediately deleted permanently.
Does the Snowflake DROP EXTERNAL TABLE command delete underlying data files?
No, it only removes metadata. External stage data persists independently.
How can you check if and when a table was dropped in Snowflake?
INFORMATION_SCHEMA.QUERY_HISTORY and ACCOUNT_USAGE.QUERY_HISTORY views provide table drop audit trails.
Should Snowflake DROP TABLE be restricted to certain users/roles in production?
Yes, Snowflake DROP TABLE should be restricted to prevent unintended data loss accidents.
How can you test Snowflake DROP TABLE without impacting production data?
Test in a cloned table sandbox first before dropping production tables.
Does CASCADE continue dropping a table even if it breaks dependencies?
Yes, CASCADE forces table drops regardless of dependent views, keys, etc.
Can a dropped table be restored after its Fail-safe period expires?
No. Once purged after Fail-safe, a table must be fully recreated.
Can you recover a dropped external table's data files?
No, only the metadata can be recreated. The external stage lifecycle is separate.
Is the IF EXISTS clause required when dropping tables?
No, but it avoids errors if the table was already dropped.
Do you need to qualify table names fully when dropping them?
Yes, to prevent deleting the wrong table accidentally.
Can clone tables provide backups of dropped ones?
Yes, clone a table before dropping to retain a restorable copy.
Can Snowsight's UI simplify dropping tables without writing SQL?
Yes, Snowsight allows visually dropping tables with a few clicks.


