


Data—whether it's customer information, financial records, transactions, or any other type—is a treasure for businesses. But, like any treasure, it's vulnerable to loss or damage due to human error or technical glitches. That's why having a robust data backup and recovery plan is crucial for any business that values its data. For Snowflake users, one feature that can help is Snowflake Time Travel. Time Travel is a powerful feature of Snowflake that enables users to access historical data and recover deleted data quickly and easily.
In this article, we'll cover everything you need to know about what Snowflake Time Travel is and what it can do for Snowflake backup and recovery. On top of that, we'll talk about the benefits of using Snowflake time travel to recover lost data and provide easy-to-follow steps on how to set it up and use it.
What is Time Travel in Snowflake?
Time Travel in Snowflake is a powerful feature that enables users to examine and analyze historical data, even if it has been modified or deleted.
Using Snowflake Time Travel, users can:
- Query data from the past, even if it has been updated or deleted since.
- Clone entire tables, schemas, and databases as they were at specific points in the past.
- Restore tables, schemas, and databases that have been dropped.
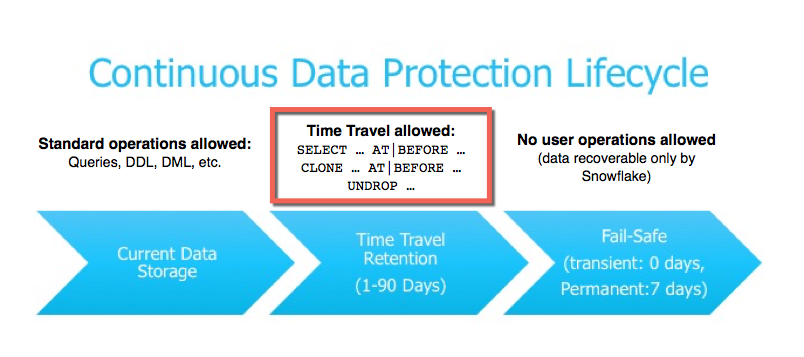
After the defined period ends, the data moves into Snowflake Fail-safe, making these actions no longer possible.
What Are the Benefits of Time Travel in Snowflake?
Snowflake Time Travel offers a range of benefits, which include:
- Provides protection for accidental or intentional data deletion.
- Allows users to query and analyze historical data at any point in time within the defined retention period.
- Allows cloning and restoring tables, schemas, and databases at specific points in time.
- Minimizes the complexity of data recovery by providing a straightforward way to retrieve lost data without complicated Snowflake backup and recovery processes.
- It helps keep track of how data is used and changed over time.
- Offers a low-cost approach to continuous data protection.
- Provides granular control over the retention period for different types of objects.
- Automatically keeps track of historical data and doesn't need any extra setup or configuration.
Want to take Chaos Genius for a spin?
It takes less than 5 minutes.

What Is the Difference Between Time Travel and Fail-Safe Snowflake?
1) Snowflake Time Travel
As we have already covered above, Snowflake Time Travel allows users to access historical data at any point within a defined retention period. This feature is particularly useful for recovering from accidental data modifications or deletions. With Time Travel, you can:
- Query historical data.
- Restore tables, schemas, and databases.
- Create clones of tables, schemas, and databases at specific points in the past.
The retention period for Time Travel is configurable and can be set up to 90 days, depending on your Snowflake edition. We will go over this in depth in the next section.
2) Snowflake Fail-safe
Snowflake Fail-safe is a data recovery service that acts as a last resort for data recovery. It provides an additional seven days of data retention after the Time Travel period has expired. The primary purpose of Fail-safe is to protect against catastrophic failures. But, remember that accessing data in Fail-safe requires assistance from Snowflake support, as it is not user-accessible for direct queries or restores.
Snowflake Time Travel vs. Fail-Safe
| Snowflake Time Travel | Snowflake Fail-safe |
|---|---|
| Snowflake Time Travel is designed for quick and user-initiated data recovery and historical data analysis within a configurable period. | Snowflake Fail-safe acts as a last-resort recovery option to prevent data loss after the Time Travel period has expired. |
| Users can directly query, restore, and clone historical data. | Requires Snowflake support intervention to access data. |
| Time Travel in Snowflake is configurable up to 90 days. | Snowflake Fail-safe is fixed at 7 days, following the end of the Time Travel period. |
| Users have full control over data restoration and querying within the retention period. | Snowflake Fail-safe is controlled by Snowflake support, not directly accessible by users. |
| Historical data is readily available for use. | Data is stored for emergency recovery and is not readily accessible. |
| May incur additional storage costs depending on the retention period and the amount of data. | Included as a built-in safety feature, though accessing data may involve support costs. |
What Is the Data Retention Period in Snowflake Time Travel?
The data retention period is a critical component of Snowflake Time Travel. Whenever data is modified, Snowflake preserves the state of the data before the update, allowing users to perform Time Travel operations. The data retention period determines the number of days for which the historical data is preserved.
Snowflake Standard Edition has a retention period of 24 hours(1 day) by default and is automatically enabled for all Snowflake accounts. However, users can adjust this period by setting it to 0 (or resetting it to the default of 1 day) at the account and object level, including databases, schemas, and tables.
For Snowflake Enterprise Edition and higher, the retention period can be set to 0 (or reset back to the default of 1 day) for transient and permanent databases, schemas, and tables. Permanent objects can have a retention period ranging from 0 to 90 days, giving users more flexibility and control over their data storage.
Whenever a data retention period ends, the historical data of the object will be moved into Snowflake Fail-safe, where past objects can no longer be queried, cloned, or restored. Snowflake's failsafe store data for up to seven days, giving users enough time to recover any lost or damaged data.
| Object | Time-Travel Retention period | Fail-Safe period |
| Temporary | 0 or 1 (reset back to the default of 1 day) | 0 |
| Transient | 0 or 1 (reset back to the default of 1 day) | 0 |
| Permanent (Snowflake Standard Edition) | 0 or 1 (reset back to the default of 1 day) | 7 |
| Permanent (Snowflake Enterprise Edition and higher) | 0 to 90 days | 7 |
Snowflake Time Travel SQL Extensions
Snowflake implemented the following SQL extensions to enable time travel functionality:
1) AT | BEFORE Clause: This clause can be specified in SELECT statements and CREATE...CLONE commands (immediately after the object name). It allows you to pinpoint the exact historical state of the data you wish to access by providing one of the following parameters:
- TIMESTAMP: Specifies the exact date and time at which you want to view the data.
- OFFSET (time_in_seconds): Specifies a time difference in seconds from the current timestamp, allowing you to go back or forward in time relative to the present moment.
- STATEMENT (identifier): Specifies a unique identifier, such as a query ID, associated with a specific statement execution, allowing you to view the data as it existed after that particular statement was executed.
2) UNDROP Command: This command enables you to recover dropped tables, schemas, or databases from a specific point in time. It allows you to undo the DROP operation by specifying the desired historical state.
We will delve more deeply into this in a later section.
How to Set Custom Data Retention Period for Time Travel in Snowflake?
Users with the ACCOUNTADMIN role can set the default retention period for their accounts using the DATA_RETENTION_TIME_IN_DAYS object parameter be set at the account, database, schema, or table level.
The default retention period for a database, schema, or individual table can be overridden using the parameter "DATA_RETENTION_TIME_IN_DAYS" during creation. Also, the retention period can be adjusted at any point in time, allowing users to customize it to suit their requirements.
Here is one example of a sample query that demonstrates how the "DATA_RETENTION_TIME_IN_DAYS" object parameter can be used to set a retention period of 30 days for a Snowflake table and database:
Database With a Retention Period of 30 Days
CREATE DATABASE my_database
DATA_RETENTION_TIME_IN_DAYS = 30;
Table With a Retention Period of 30 Days
CREATE TABLE my_table (
  id INT,
  name VARCHAR,
  created_at TIMESTAMP
)
DATA_RETENTION_TIME_IN_DAYS = 30;
Let's take another example to understand it even better; let's say a schema has a parent database with a 10-day time travel value. The schema inherits that value. If you change the value of the parent database, the schema and any tables within it will inherit the new value.
You can also set an exact value for a specific object, which will not change even if its parent objects change. BUT temporary and transient tables can only have a time travel value of 1 day.
Setting the value to 0 turns off the time travel feature, but you shouldn't do this at the account level because it only gives objects a default value. It's better to set individual objects' retention periods instead.
Use the following commands to set, alter, and display the DATA_RETENTION_TIME_IN_DAYS parameter value:
Set and Display 90-Day Time Travel at the Account Level:
ALTER ACCOUNT SET DATA_RETENTION_TIME_IN_DAYS=90;
SHOW PARAMETERS LIKE 'DATA_RETENTION_TIME_IN_DAYS' IN ACCOUNT;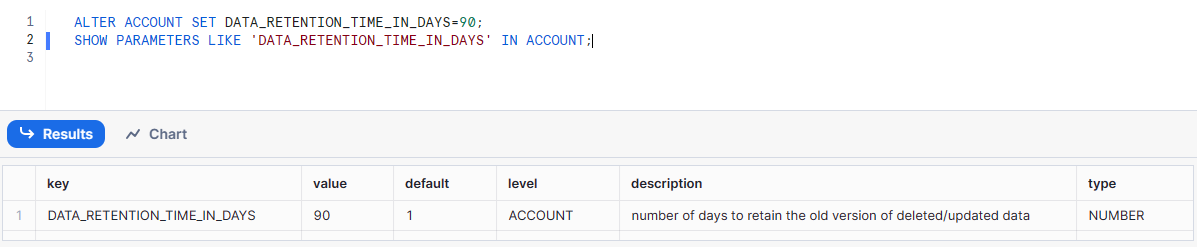
Set and Display 70-Day Time Travel at the Database Level:
CREATE OR REPLACE DATABASE some_db DATA_RETENTION_TIME_IN_DAYS=60;
ALTER DATABASE some_db SET DATA_RETENTION_TIME_IN_DAYS=70;
SHOW PARAMETERS LIKE 'DATA_RETENTION_TIME_IN_DAYS' IN DATABASE some_db;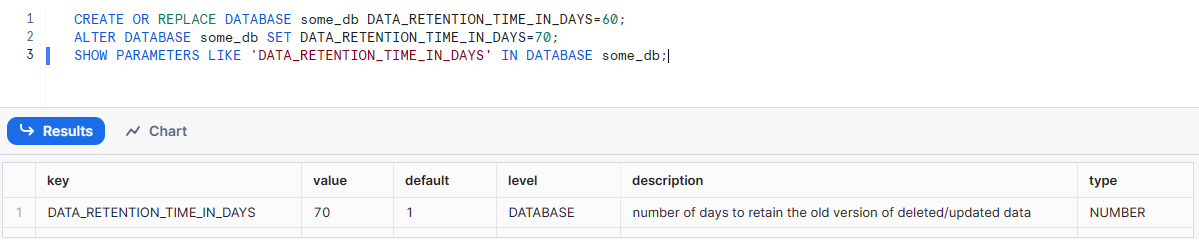
Set and Display 50-Day Time Travel at the Schema Level:
CREATE SCHEMA someschema DATA_RETENTION_TIME_IN_DAYS=40;
ALTER SCHEMA someschema SET DATA_RETENTION_TIME_IN_DAYS=50;
SHOW PARAMETERS LIKE 'DATA_RETENTION_TIME_IN_DAYS' IN SCHEMA someschema ;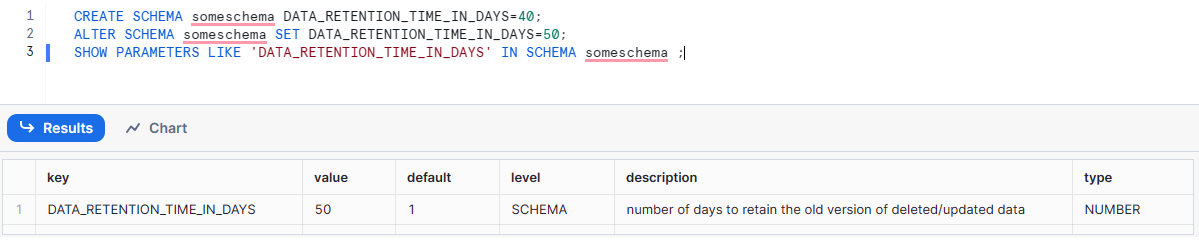
Set and Display 40-Day Time Travel at the Table Level:
CREATE TABLE some_table (col1 string) DATA_RETENTION_TIME_IN_DAYS=10;
ALTER TABLE some_table SET DATA_RETENTION_TIME_IN_DAYS=40;
SHOW PARAMETERS LIKE 'DATA_RETENTION_TIME_IN_DAYS' IN TABLE some_table;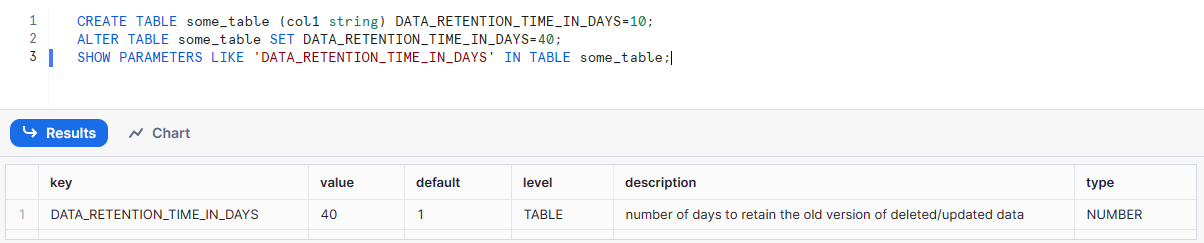
How to Enable or Disable Time Travel in Snowflake?
Time Travel in Snowflake is automatically enabled with the standard 1-day retention period.
But, if you want to extend the data retention period to 90 days for db, schemas, and tables, you can upgrade to Snowflake Enterprise Edition.
Note: Additional storage charges will apply for extended data retention.
How to Disable Snowflake Time Travel for the Account Level?
Disabling Snowflake Time Travel for an account is not possible, but the data retention period can be set to 0 for all db, schemas, and tables created in the account by setting DATA_RETENTION_TIME_IN_DAYS to 0 at the account level.
But remember that this default can be easily overridden for individual databases, schemas, and tables.
Now let's talk about the MIN_DATA_RETENTION_TIME_IN_DAYS parameter. This parameter does not alter or replace the DATA_RETENTION_TIME_IN_DAYS parameter value. It may, however, affect the effective data retention time.
The MIN_DATA_RETENTION_TIME_IN_DAYS parameter can be set at the account level to set a minimum data retention period for all databases, schemas, and tables without changing or replacing the DATA_RETENTION_TIME_IN_DAYS value.
Whenever MIN_DATA_RETENTION_TIME_IN_DAYS is set at the account level, the effective data retention period for objects is determined by:
MAX(DATA_RETENTION_TIME_IN_DAYS, MIN_DATA_RETENTION_TIME_IN_DAYS)How to Disable Time Travel in Snowflake for Individual Db, Schemas and Tables?
You cannot disable it for an account, but you may disable it for individual databases, schemas, and tables by setting DATA_RETENTION_TIME_IN_DAYS to 0.
If MIN_DATA_RETENTION_TIME_IN_DAYS is greater than 0 and set at the account level, the higher value setting takes precedence.How Time Travel Works in Snowflake Backup and Recovery?
Now let's begin the process of recovering the deleted data from Snowflake.
Whenever a table performs any DML operations in Snowflake, the platform keeps track of previous versions of the table's data for a specific duration, enabling users to query previous versions of the data using the AT | BEFORE clause.
With the help of this AT | BEFORE clause, users can easily query data that existed either precisely at or just before a particular point in the table's history. The specified point can be a time-based value (like a timestamp) or a time offset from the present, or it can be the ID for a completed statement like SELECT or INSERT.
For more in-depth information on what Time Travel in Snowflake is, check out this video.
Step-By-Step Guide to Query Historical Data in Snowflake
let's begin!!
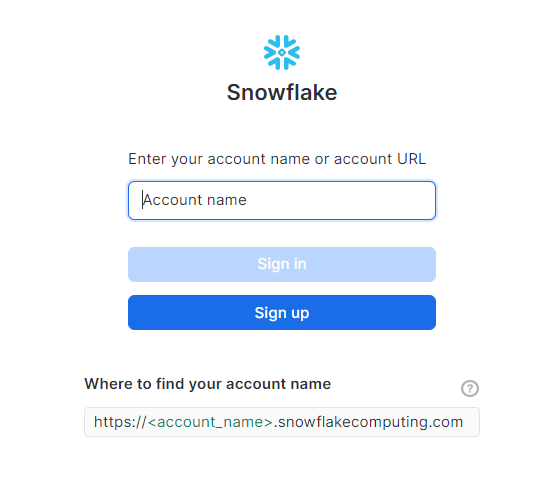
Step 1—Login/Signup to Your Snowflake Account
Start by logging in or signing up to your Snowflake account.
Step 2—Open the Snowflake Web UI and Navigate to the Worksheet
Once logged in, open the Snowflake web interface and navigate to the worksheet where you intend to work with historical data.

Step 3—Create a Table and Insert Data
First, create a table named awesome_first_table with two columns—id and name. Then, insert three rows of sample data into the table.
CREATE TABLE awesome_first_table (
  id INT PRIMARY KEY,
  name VARCHAR(50)
);
INSERT INTO awesome_first_table (id, name)
VALUES
  (1, 'abc'),
  (2, 'abc12'),
  (3, 'abc33');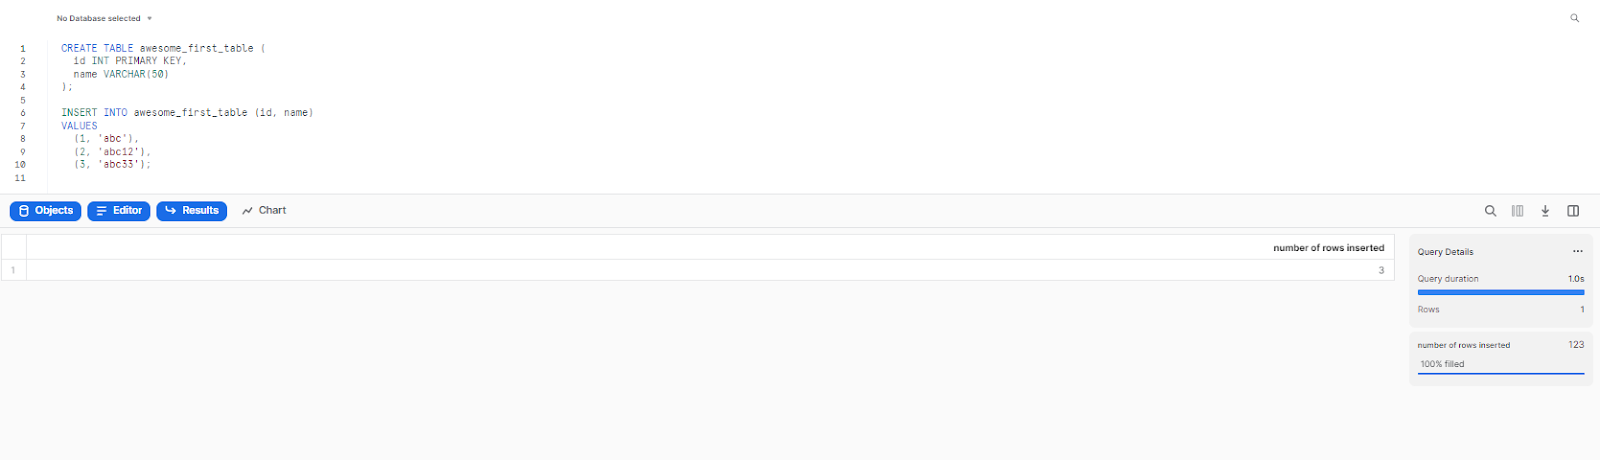
Step 4—Select All Records from the Table
To verify the data insertion, select all records from awesome_first_table.
select * from awesome_first_table ;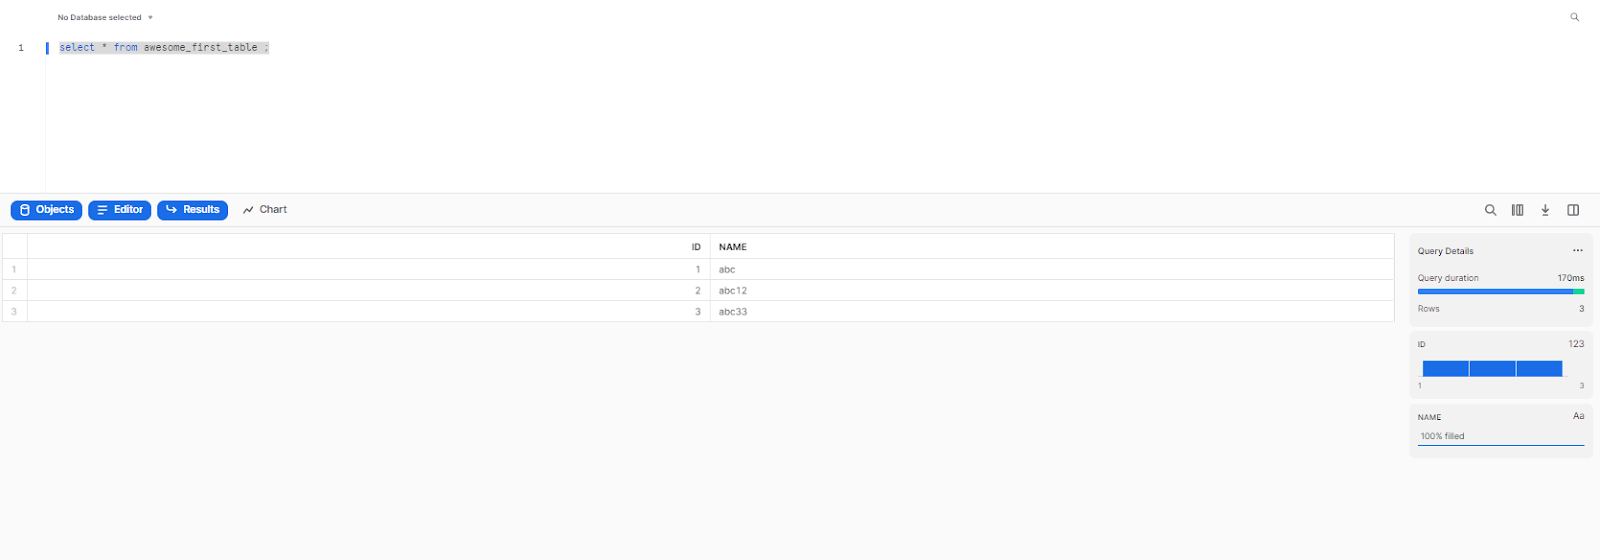
Step 5—Create a Temporary Table for Recovery
Create a temporary table named temporary_awesome_first_table to hold the recovered records.
create table temporary_awesome_first_table like awesome_first_table;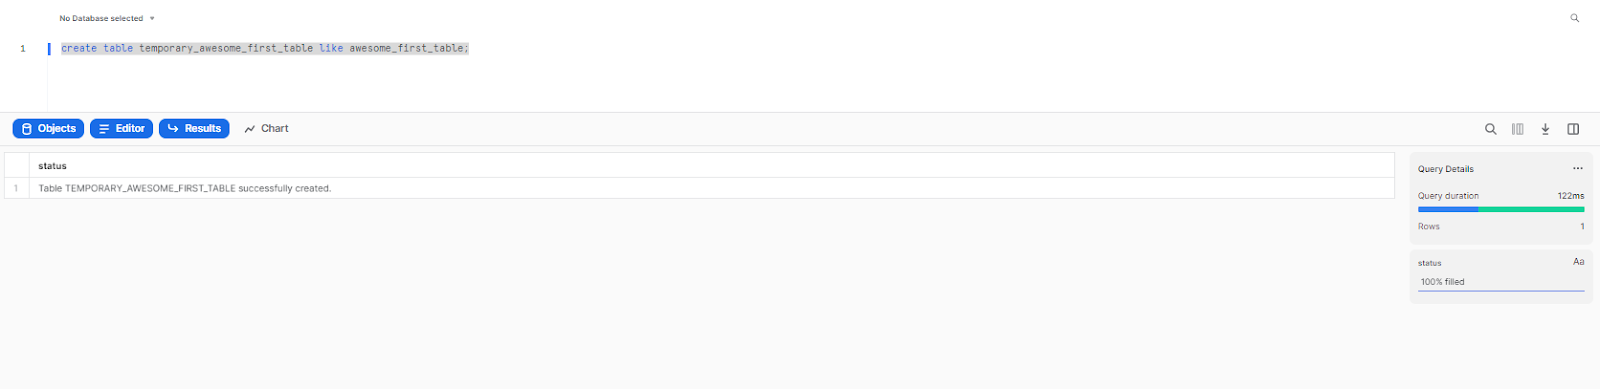
Step 6—Delete All Records from the Table
Delete all records from awesome_first_table.
delete from awesome_first_table ;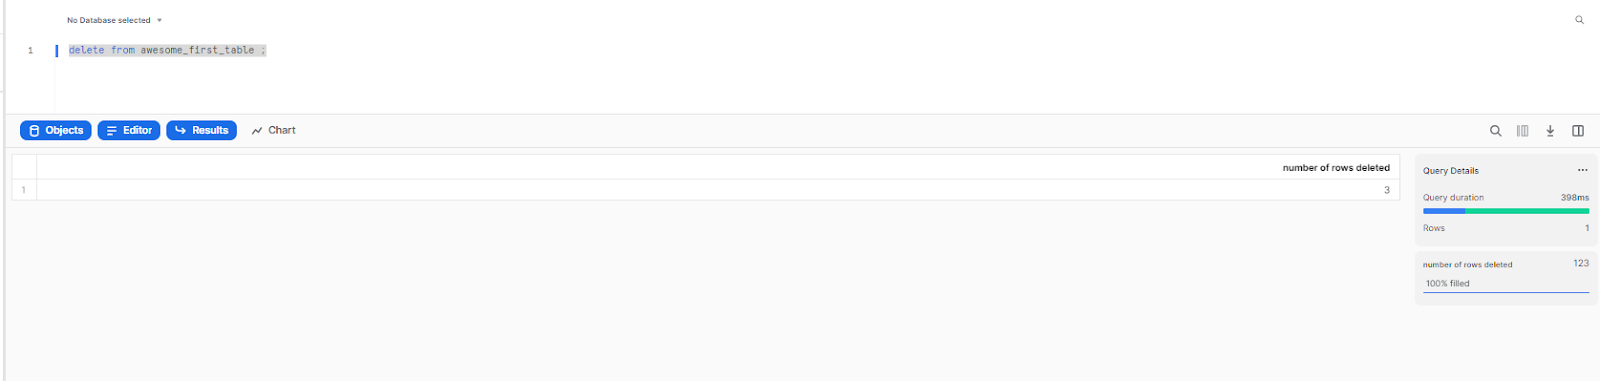
Step 7—Recover Deleted Records
To recover the records deleted a few minutes ago, use the AT clause with an offset. This example uses an offset of 5 minutes.
select * from awesome_first_table at(offset => -60*5);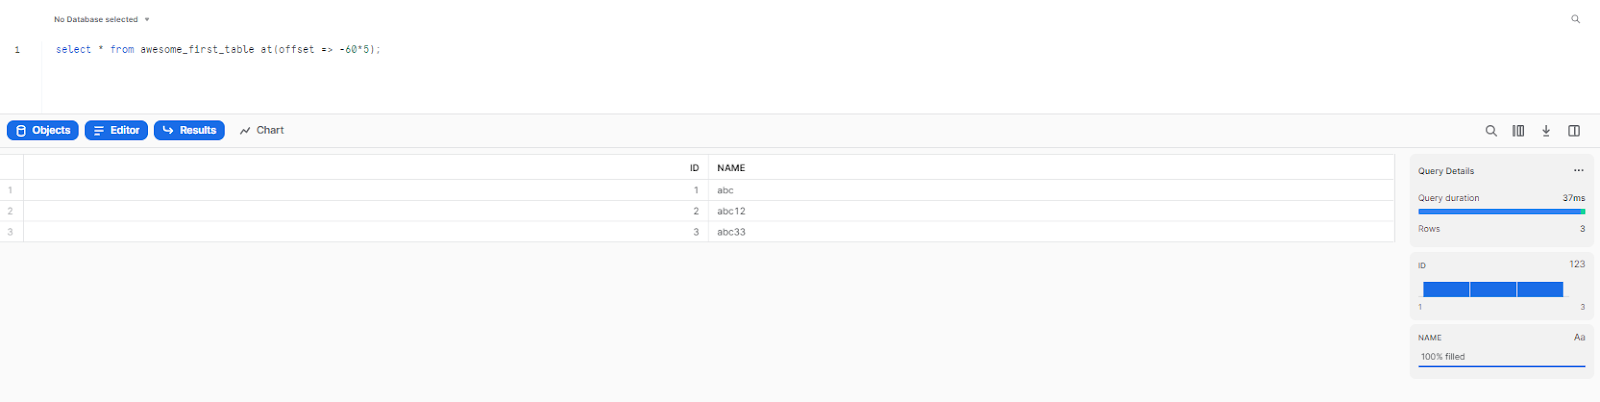
Instead of using offset, you can also provide the TIMESTAMP, or STATEMENT.
Using TIMESTAMP
Recover data as of a specific date and time.
SELECT * FROM awesome_first_table AT (TIMESTAMP => '2024-05-17 16:20:00'::timestamp_tz);Using STATEMENT
Recover data up to but not including changes made by a specific statement.
SELECT * FROM my_table BEFORE(STATEMENT => '<query-id>');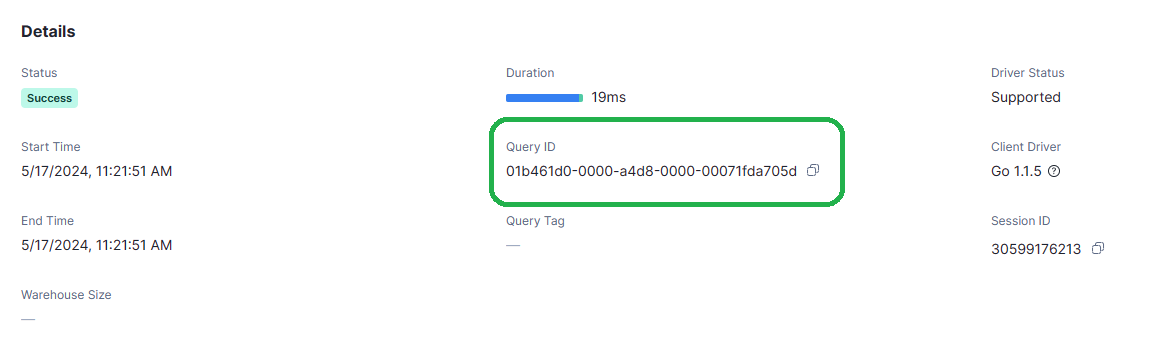
Note: If the TIMESTAMP, OFFSET, or STATEMENT specified in the AT | BEFORE clause falls outside the data retention period for the table, the query fails and returns an error.
Learn more from here.
Step 8—Copy Recovered Records to Temporary Table
Finally, copy the recovered records into the temporary table.
INSERT INTO temporary_awesome_first_table (select * from awesome_first_table at(offset => -60*5));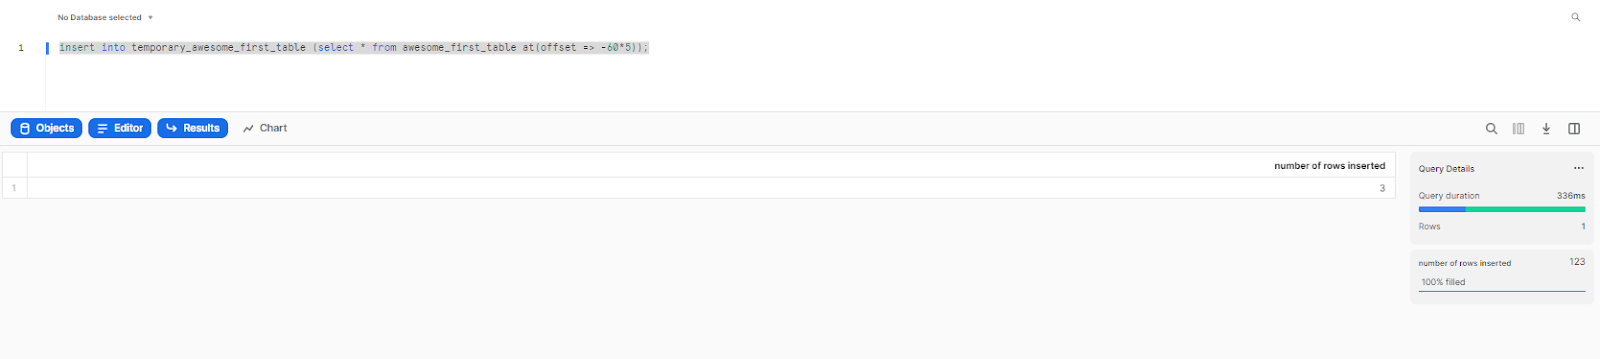
Using TIMESTAMP
INSERT INTO temporary_awesome_first_table (SELECT * FROM awesome_first_table AT (TIMESTAMP => '2024-05-17 16:20:00'::timestamp_tz));Using STATEMENT
INSERT INTO temporary_awesome_first_table (SELECT * FROM my_table BEFORE(STATEMENT => '<query-id>'));Cloning Objects with Snowflake Time Travel
You can use the AT | BEFORE clause with the CLONE keyword in the CREATE command for a table, schema, or database to create a logical duplicate of the object at a specific point in its history.
Snowflake does not have backups, but you can use cloning for backup purposes. If you have Enterprise Edition or higher, Snowflake supports time travel retention of up to 90 days. You can, however, create a zero-copy clone every 3 months to indefinitely preserve the object's history. You can save the table as a clone every 90 days for up to one year.
When you clone a table using Snowflake time travel, the DATA_RETENTION_TIME_IN_DAYS parameter value is also preserved in the cloned table.
After cloning a table, the parameter values are independent, meaning you can change the parameter value in the source table and it won't affect the clone.
You can use the CREATE TABLE, CREATE SCHEMA, and CREATE DATABASE commands with the CLONE keyword to create a clone of a table, schema, or database, respectively. The clone will represent the object as it existed at a specific point in its history.
To create a table clone, you can use the CREATE TABLE command:
CREATE TABLE restored_table CLONE my_table
  AT (TIMESTAMP => 'Sat, 09 May 2015 01:01:00 +0300'::timestamp_tz);
This above command will create a clone of my_table as it existed at the specified timestamp.
To create a clone of a schema and all its objects, you can use the following CREATE SCHEMA command:
CREATE SCHEMA restored_schema CLONE my_schema AT (OFFSET => -3600);This above command will create a clone of my_schema and all its objects as they existed 1 hour before the current time.
To create a clone of a database and all its objects, you can use the following CREATE DATABASE command:
CREATE DATABASE restored_db CLONE my_db
  BEFORE (STATEMENT => '----------------------');
The above command will create a clone of my_db and all its objects as they existed before the completion of the specified statement.
Recovering Objects with Snowflake Time Travel
Dropping and restoring objects in Snowflake is a simple process that allows you to keep a copy of dropped objects for a certain period of time before purging. Here's what you should know:
Dropping Objects:
When a table, schema, or database is dropped in Snowflake, it is not immediately overwritten or removed from the system. Instead, it is retained for the object's data retention period, during which time the object can be restored. The object can only be restored within only 7 days period. However, once this period has elapsed, restoration of the object becomes impossible.
To drop an object, use one of the following commands:
DROP TABLE <table_name>;
DROP SCHEMA <schema_name>;
DROP DATABASE <database_name>;Note: After dropping an object, creating an object with the same name does not restore the dropped object. Instead, it creates a new version of the object. The original, dropped version is still available and can be restored.
Listing Dropped Objects:
Dropped tables, schemas, and databases can be listed using the following commands with the HISTORY keyword specified:
For example,
SHOW TABLES HISTORY LIKE 'load%' IN mytestdb.myschema;

SHOW SCHEMAS HISTORY IN some_db;

SHOW DATABASES HISTORY;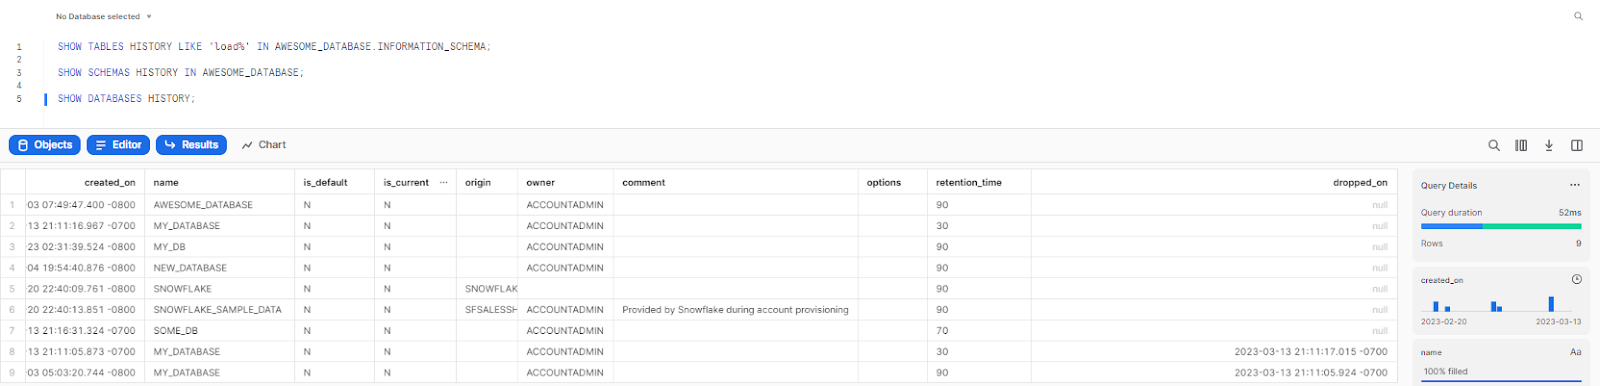
As you can see in the screenshot above, the output includes all dropped objects and an additional DROPPED_ON column, which displays the date and time when the object was dropped. If an object has been dropped more than once, each version of the object is included as a separate row in the output.
Note: After the retention period for an object has passed and the object has been purged, it is no longer displayed in the SHOW <object_type> HISTORY output.
Restoring Objects:
If an object has been dropped but still appears in the output of SHOW <object_type> HISTORY, it can be easily restored using the following commands:
Calling UNDROP restores the object to its most recent state before the DROP command was issued.
For example,
UNDROP TABLE mytable;

UNDROP SCHEMA myschema;

UNDROP DATABASE mydatabase;Note: if an object with the same name already exists, UNDROP will fail. In this case, you must rename the existing object before restoring the previous version of the dropped object.
4 Snowflake Time Travel Best Practices
1) Monitor Data Retention Periods
Snowflake allows users to set a Snowflake Time Travel retention period, specifying how long the platform should keep a history of changes. Snowflake stores Time Travel data for one day by default, but users can increase this period to 90 days.
Monitoring your retention period carefully is crucial to make sure that you only store data for a short amount of time. Longer retention periods can consume more storage, resulting in higher costs. Also, retaining unnecessary data for an extended period can pose a security risk, as it may contain sensitive information that should no longer be kept.
2) Monitor Storage Consumption
Snowflake Time Travel data can consume significant storage space, particularly when you have a long retention period. Therefore, it is essential to monitor your storage consumption carefully to ensure that you have the sufficient storage capacity to support your data warehousing needs.
Snowflake provides various tools and features that can help you monitor your storage usage, like Storage Billing and Snowflake’s Query Profile UI. If you monitor your storage consumption carefully, you can identify areas of inefficiency and optimize your data management practices to reduce costs and improve performance.
3) Implement an Extra Snowflake Backup and Recovery Plan
While Snowflake has Time Travel capabilities, having a backup recovery plan in place is always a smart thing. Accidents and data loss do happen, therefore it's vital to have a backup plan in place to ensure you can recover your data in the event of any mishap.
One way to implement an extra backup recovery plan is to use Snowflake’s Data Replication feature, which allows you to create backups in real time on another Snowflake account, providing you with an additional layer of protection against data loss.
4) Cost Optimization
Cost optimization is a crucial factor when it comes to Snowflake Time Travel, as it can consume a significant amount of resources and add to your expenses. Therefore, monitoring your costs carefully and optimizing your data management practices to minimize expenses is essential.
One way to optimize costs is by setting up data retention policies to ensure that you only store data for a short time. If you're searching for tools to optimize Snowflake costs, using an observability tool like Chaos Genius can be incredibly beneficial.
Chaos Genius gives you the best possible view of your Snowflake workflows. It breaks down costs into actionable insights and shows you where your Snowflake use could be improved. You can use this tool to pinpoint your Snowflake usage pattern and get informed cost-cutting recommendations, resulting in up to 10%–30% savings on Snowflake costs without sacrificing performance.
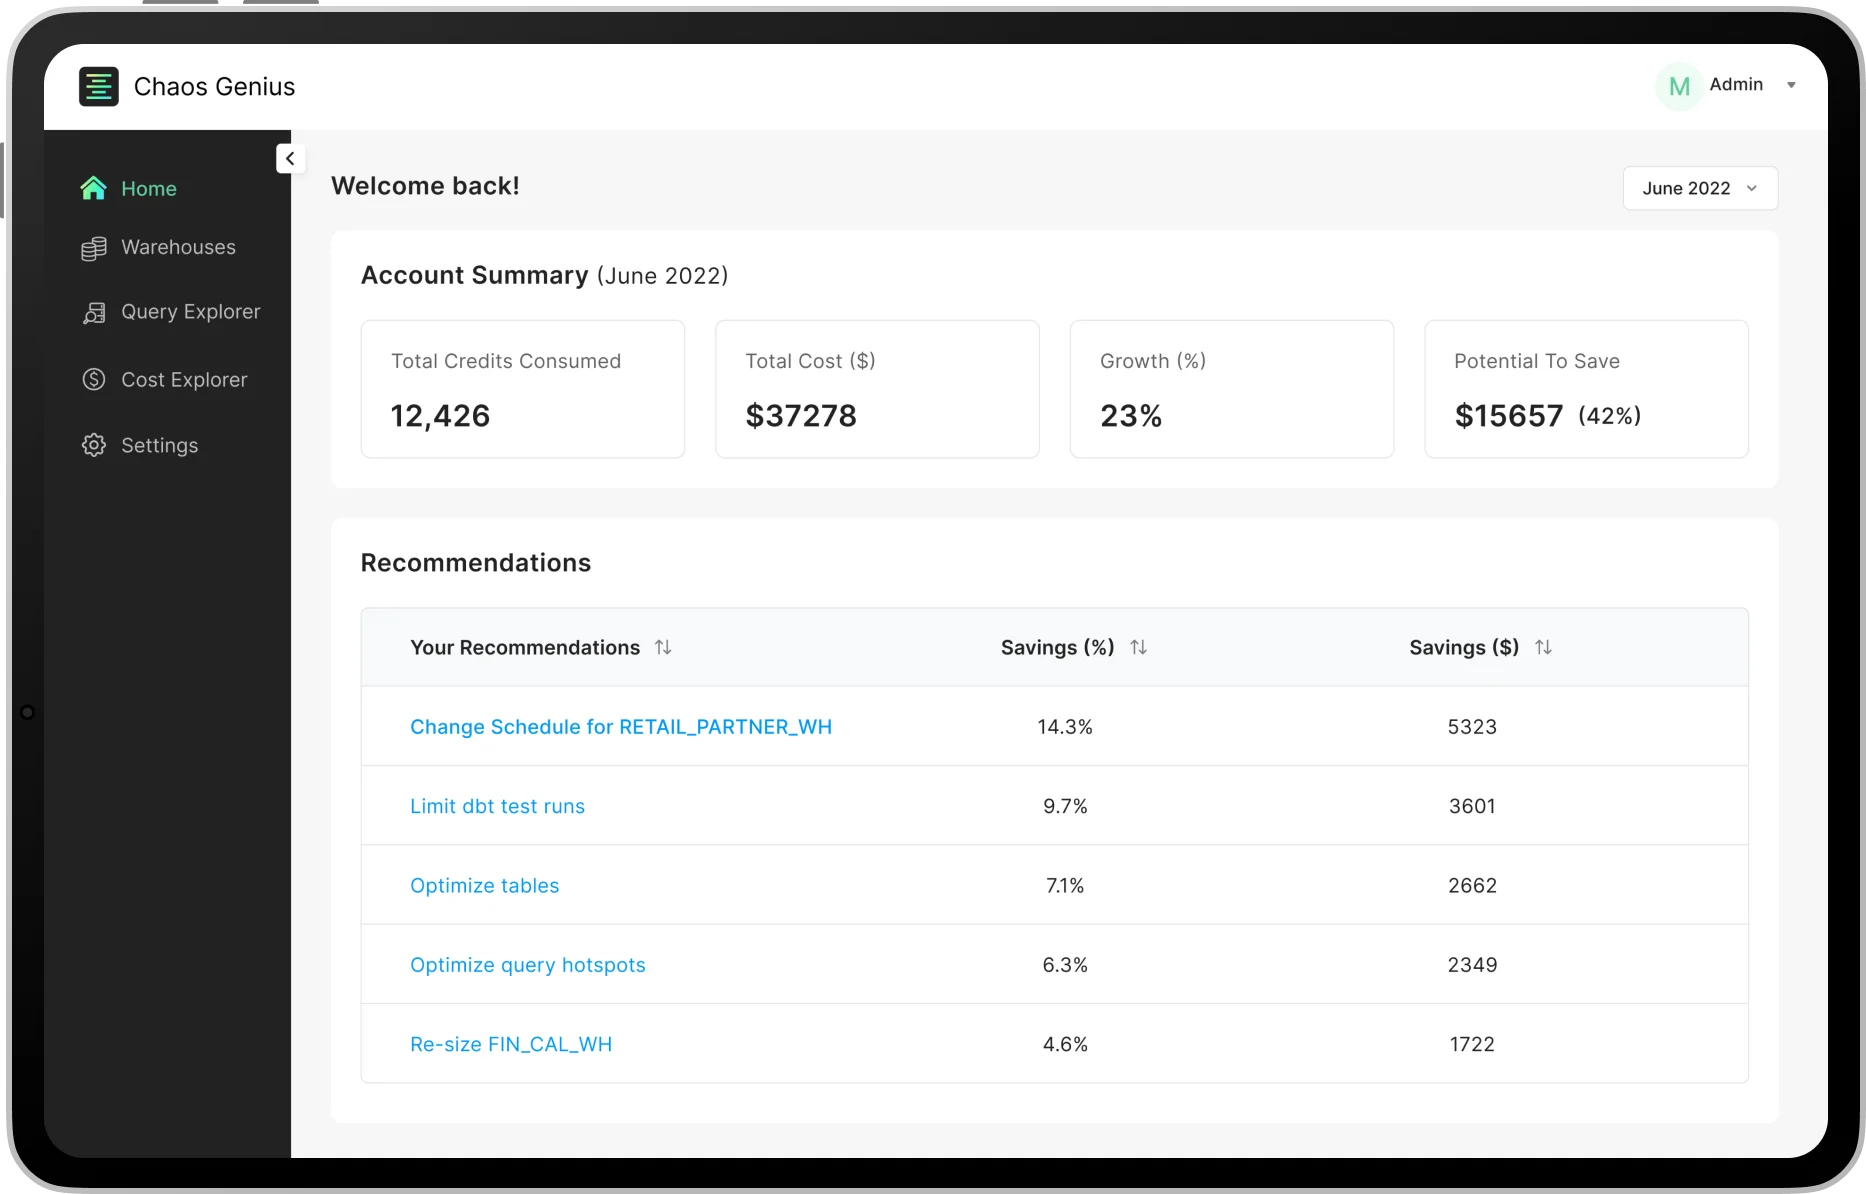
Schedule a demo with us today and see it for yourself!!
Save up to 30% on your Snowflake spend in a few minutes!


Conclusion
And that's a wrap! Snowflake Time Travel is an exceptionally powerful feature that allows users to retrieve past data at any time throughout a specified retention period. It is very beneficial for restoring data that has been accidentally modified or deleted. Time Travel allows you to query historical data, restore tables, schemas, and databases, and create clones of tables, schemas, and databases at specific points in the past.
In this article, we've covered:
- What is Snowflake Time Travel?
- What Are the Benefits of Snowflake Time Travel?
- What Is the Difference Between Time Travel and Fail-Safe Snowflake?
- How Long Is the Data Retention Period in Snowflake Time Travel?
- How to Set Data Retention Period for Snowflake Time Travel?
- How to Enable or Disable Snowflake Time Travel?
- How to Disable Snowflake Time Travel for the Account Level?
- How to Disable Snowflake Time Travel for Individual Db, Schemas and Tables?
- How Snowflake Time Travel Works in Snowflake Backup and Recovery?
- Step-By-Step Guide to Query Historical Data in Snowflake
- Cloning Objects with Snowflake Time Travel
- Recovering Objects with Snowflake Time Travel
- Snowflake Time Travel Best Practices
...and so much more!
Time Travel in Snowflake is like having a wizard at your fingertips—a time-traveling data wizard—but without the wand or a hat. Simply put, it's a magical way to restore your data and turn back the clock on any mistakes, and it's as easy as saying "ABRACADABRA".
FAQs
Is Time Travel possible in Snowflake?
Yes, Time Travel is possible in Snowflake.
How long is the default Time Travel period in Snowflake?
Default Time Travel period in Snowflake is 1 day for all objects.
Can the Time Travel period be extended?
Yes, the Time Travel period can be extended up to 90 days for Enterprise and Business-Critical editions of Snowflake.
What is the purpose of Snowflake Time Travel?
Snowflake Time Travel allows accessing historical data, restoring data-related objects, and recovering accidentally or intentionally removed data.
Which Snowflake edition provides Time Travel?
Time Travel is available in all Snowflake editions, including Standard Edition, Enterprise Edition, and higher editions. But, the maximum data retention period varies between editions.
What is the max Time Travel for Snowflake?
For Snowflake Enterprise Edition and higher, the maximum data retention period for Time Travel is 90 days.
Do I need to enable Time Travel in Snowflake?
No, Time Travel is automatically enabled with a standard 1-day retention period. But, longer retention periods can be configured with Snowflake Enterprise Edition.
Can Time Travel be disabled in Snowflake?
Time Travel cannot be disabled entirely at the account level, but you can set the DATA_RETENTION_TIME_IN_DAYS parameter to 0 for individual databases, schemas, and tables to effectively disable Time Travel for those objects.
Can you Time Travel a view in Snowflake?
No, Time Travel is not supported for views in Snowflake. Time Travel operates on tables, schemas, and databases.
What actions can be performed using Snowflake Time Travel?
- Query data in the past that has since been updated or deleted.
- Create clones of entire tables, schemas, and databases at or before specific points in the past.
- Restore tables, schemas, and databases that have been dropped.
How can dropped objects be restored using Snowflake Time Travel?
Dropped objects can be restored within the retention period using the "UNDROP" command. For example, to restore a dropped table: UNDROP TABLE table_name.
How can historical data be queried using Snowflake Time Travel?
You can use the AT | BEFORE clause with the SELECT statement to query historical data. The clause specifies the point in the past from which you want to retrieve the data. You can use OFFSET, TIMESTAMP, or STATEMENT to determine the historical data.
What is the data retention period in Snowflake Time Travel?
- Temporary Table: 0 or 1 day (default: 1 day)
- Transient Table: 0 or 1 day (default: 1 day)
- Permanent (Standard Edition): 0 or 1 day
- Permanent (Enterprise Edition or higher): 0 to 90 days
What table types are available for Time Travel in Snowflake?
Time Travel is available for all table types in Snowflake, including temporary, transient, and permanent tables.
What are the 3 types of tables in Snowflake?
The three types of tables in Snowflake are:
- Temporary tables
- Transient tables
- Permanent tables
What happens when the retention period ends?
After the retention period ends, the historical data is moved into Snowflake Fail-safe.
What is the Fail-Safe period for permanent objects?
For permanent objects, the Fail-Safe period is 7 days regardless of the retention period.


