


Effective security monitoring and alerting in Snowflake are similar to like having a vigilant guardian, ensuring the seamless operation of data workflows. Among the trusty tools available in the market, SnowAlert—an open-source security analytics framework—shines bright. It's like your data buddy, always keeping an eye out for you, making sure everything's running as it should.
In this article, we’ll cover everything you need to know to get started from absolute scratch with SnowAlert—from a basic introduction, a step-by-step setup guide, managing alert rules, creating custom alerts, to setting up SnowAlert WebUI authentication for active monitoring and alerting of your Snowflake environment.
Why Does Effective Security Alerting and Monitoring Matter in Snowflake?
Snowflake is becoming the backbone for critical business data. Businesses and companies rely on it to power key operations and derive insightful analytics. But with sensitive information at play, it's not a "set it and forget it" scenario. So, without active monitoring and alerting, security incidents may either go undetected or be discovered too late. Therefore, active alerting and monitoring are essential in helping users keep their Snowflake environment secure, compliant—and running smoothly. Here are some key reasons alerting and monitoring are essential:
- Faster threat detection: Security alerts triggered on suspicious activity help detect attacks and breaches much quicker. Rapid incident response can greatly mitigate damage.
- Compliance: Many regulations and standards like HIPAA require controls like audit logging, monitoring, and alerting. Custom SnowAlert alerts can help meet compliance needs.
- Lens to Your Operations: Detailed monitoring provides visibility into usage patterns, workloads, and performance. Helps optimize operations.
- Your Policy Patrol: Every place has its set of dos and don’ts. And in the data world, it’s about security policies, access rules, or acceptable use policies. Alerts act like vigilant guards ensuring that the rules of the land are followed.
Implementing effective security monitoring and alerting has often been challenging, requiring significant investment in specialized security platforms. SnowAlert provides a purpose-built open-source solution optimized for monitoring Snowflake.
What Is Snowflake Snowalert?
SnowAlert is an open-source security analytics framework developed by Snowflake’s own security team. It leverages the Snowflake cloud data platform to analyze account activity and configurations to detect potential security incidents and policy violations.
Key points to remember about SnowAlert:
- Developed by Snowflake's own security team to monitor threats against their systems
- Leverages Snowflake's scalable cloud data platform to store and analyze large volumes of log data
- Runs scheduled queries on the log data to identify security issues
- Triggers alerts and actions when threats are detected
- Aims to make security analytics accessible without needing large dedicated teams or infrastructure
- Open source framework designed to be easy to use and extend
- Requires no additional servers or infrastructure beyond Snowflake
- Stores all data within Snowflake as the sole data source
SnowAlert provides a simple and scalable way to set up security monitoring for any Snowflake deployment, without the overhead of a large SIEM platform.
How does SnowAlert work?
SnowAlert utilizes Snowflake's cloud data platform to execute scheduled SQL queries on logs and event data stored within Snowflake. It is packaged with a Docker container, making it deployable across various environments. SnowAlert offers prebuilt query packs while also providing the flexibility for users to craft custom queries. When these queries identify matching criteria, alerts are generated. These alerts are then stored in Snowflake, de-duplicated, and filtered through suppression rules. Following this, they are correlated and dispatched to handlers( like Slack or Jira) for final review. Users can act upon these alerts to resolve issues and also refine the queries and rules that drive SnowAlert. Also, SnowAlert tracks violations over time, such as insecure configurations, allowing for visualization in tools like Sigma or Looker.
TLDR; SnowAlert provides automated scanning of Snowflake log data with queries, alert generation, filtering, and workflows to enable security teams to detect and respond to threats. Its key capabilities come from scheduled SQL queries, alert creation, suppression rules, dispatcher integrations, and storing results in Snowflake for further analysis.
Now let’s go through how to install, configure, and use SnowAlert.
Step-By-Step Guide to Install and Configure Snowalert
Before we delve into the step-by-step guide to install and configure SnowAlert, let's first explore the prerequisites and requirements needed to get started with SnowAlert.
Prerequisites and Requirements
SnowAlert has a few key requirements to be aware of before deploying:
- Snowflake account: You will need an account provisioned, with the role you use for setup having ACCOUNTADMIN privileges. SnowAlert will create objects within your account.
- Docker: SnowAlert is packaged as a Docker image that needs to be downloaded and run. Docker installation is required.
- Container orchestration: For scheduling the SnowAlert container on an ongoing basis, you will need a platform like Kubernetes, AWS Fargate, etc.
- Snowflake CLI client (SnowSQL): Snowflake CLI client is optional but helpful for some administration tasks.
With these prerequisites requirements met, you can now proceed to install SnowAlert using the following steps:
Step 1—Login to Snowflake With ACCOUNTADMIN Access
Login to Snowflake as a user with ACCOUNTADMIN privilege and create a 'snowalert_user' user:
CREATE USER snowalert_user PASSWORD = 'Pa$$word123'
LOGIN_NAME = 'snowalert_user' DISPLAY_NAME = 'snowalert_user'
FIRST_NAME = 'SnowAlert' LAST_NAME = 'User'
DEFAULT_ROLE = "ACCOUNTADMIN" MUST_CHANGE_PASSWORD = FALSE;
-- Grant Role
GRANT ROLE "ACCOUNTADMIN" TO USER snowalert_user;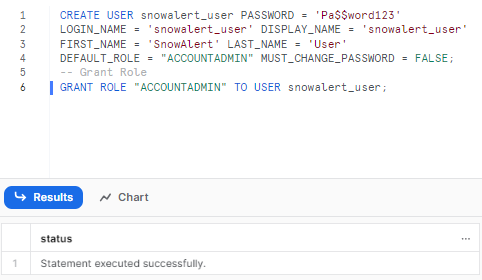
Step 2—Download the SnowAlert Docker Image
Since SnowAlert is distributed via DockerHub, we first pull down the image using the docker pull command:
docker pull snowsec/snowalert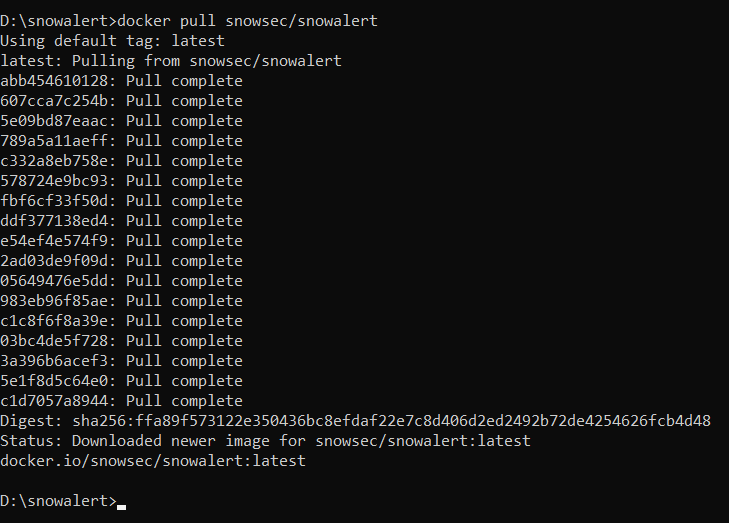
This will download the latest SnowAlert image locally so it can then be executed. If you wish to build the image yourself instead of the pre-built, you can clone the SnowAlert Git repository and run a docker build command:
git clone https://github.com/snowflakedb/SnowAlert.git
cd SnowAlert
docker build -t snowsec/snowalert .
1) Build the SnowAlert Docker Image:
Use the Dockerfile.snowalert to build the SnowAlert Docker image.
docker build -t snowsec/snowalert -f Dockerfile.snowalert .2) Run the SnowAlert Docker Container:
Now run the SnowAlert Docker container.
docker run -it snowsec/snowalert3) Build the WebUI Docker Image
Use the Dockerfile.webui to build the WebUI Docker image.
docker build -t snowsec/snowalert-webui -f Dockerfile.webui .4) Run the WebUI Docker Container
Now run the WebUI Docker container.
docker run -it snowsec/snowalert-webuiBut for most purposes, the pre-built image is sufficient and easier to get started with.
Step 3—Run the SnowAlert Installer
SnowAlert includes an installer script that sets up the necessary database objects, schemas, tables, roles, and warehouses within Snowflake to get started. When running the installer, make sure the user has the ACCOUNTADMIN role so it has privileges to create these objects
The simplest way to run the installer(skipping KMS installation) is:
docker run -it snowsec/snowalert ./install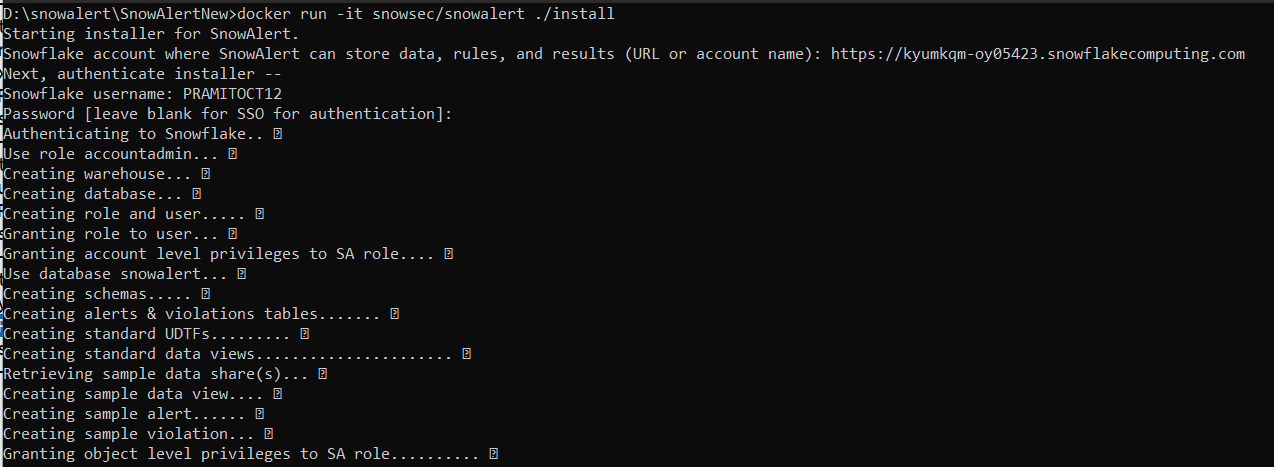
Starting installer for SnowAlert.
Snowflake account where SnowAlert can store data, rules, and results (URL or account name): https://<account_identifier>.snowflakecomputing.com
Once you have added the account identifier you need to, authenticate installer with user with “ACCOUNTADMIN” role.
Snowflake username: snowalert_user
Password [leave blank for SSO for authentication]:
Authenticating to Snowflake.. ✓
Use role accountadmin... ✓
Creating and setting default warehouse... ✓
Creating database... ✓
Creating schemas..... ✓
Creating alerts & violations tables...... ✓
Creating standard UDTFs...... ✓
Creating data view.... ✓
Creating sample alert.... ✓
Creating sample violation.... ✓
Creating role and user..... ✓
Granting role to user... ✓
Granting privileges to role............ ✓
As you can see, the above command will prompt you for:
- Snowflake account identifier
- Region of your Snowflake account
- Username/password of admin user
- Default warehouse for SnowAlert usage
The installer will create:
- A SnowAlert database, schema, and tables
- A SnowAlert user and role with permissions
- A private key for the user to authenticate
- Sample alert definitions for testing
Step 4—Setting up Jira (Optinal) for Snowalert
Now, let's set up a Jira account. Note that this is an optional step; if you don't want to set it up, you can simply prompt “n" and the installation will be automatically completed. But, for the purposes of this article, we will set up Jira.
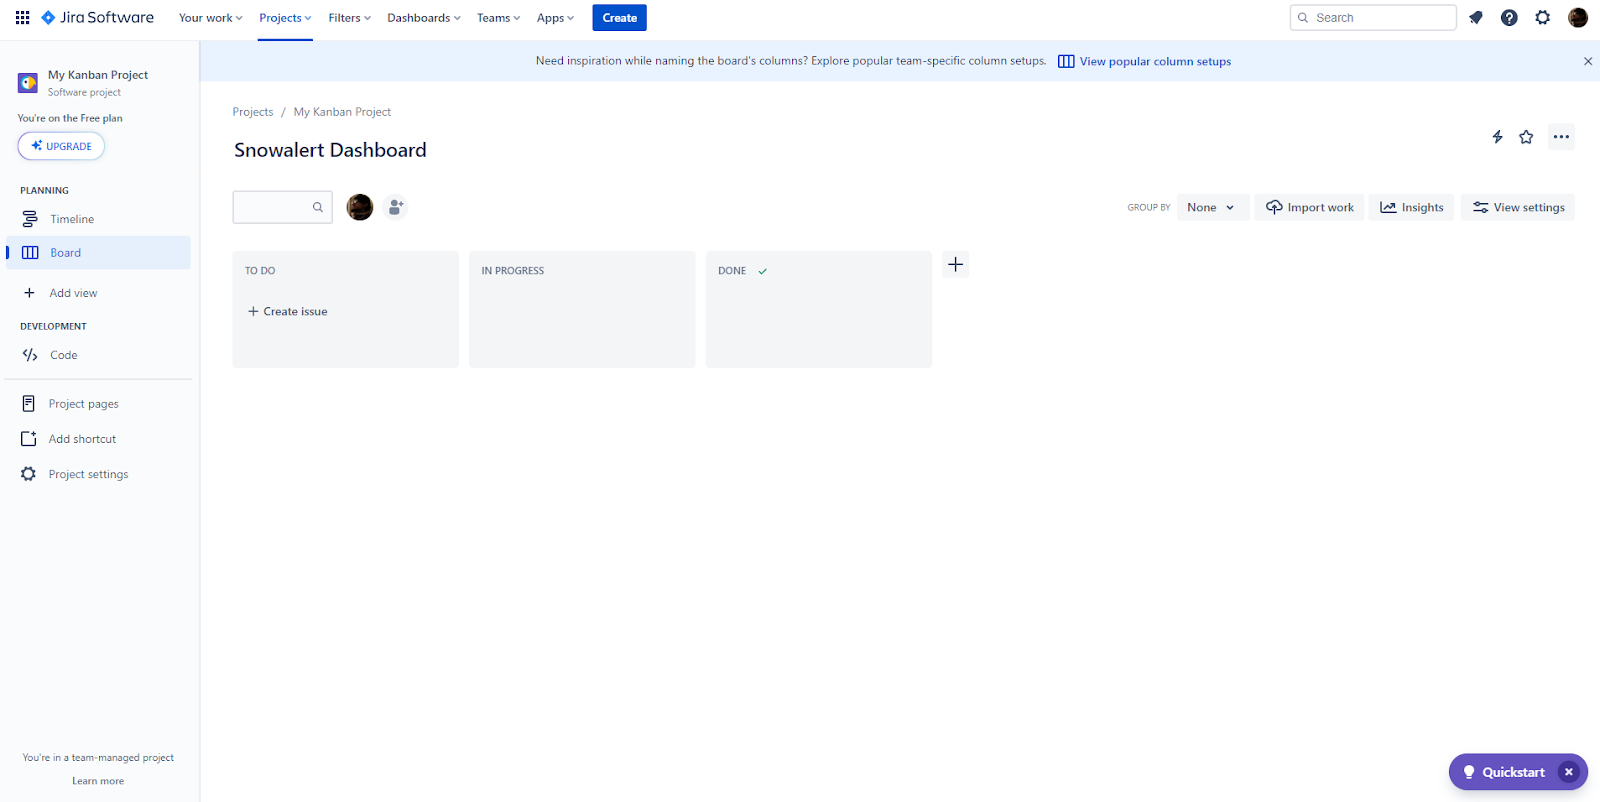
Next, create an account or sign in to a Jira account and enter your Jira account URL, your account name, and the password.
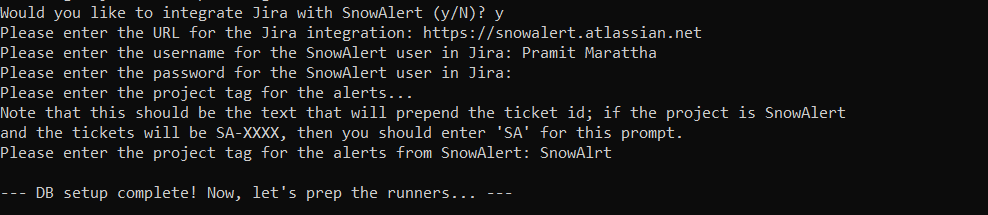
Now, you will be asked to enter the access key for SnowAlert's Snowflake account. If you wish, this key can have a passphrase. For the RSA key passphrase, you'll see a prompt that shows [blank for none, '.' for random]. You can simply hit Enter to continue, and then you'll see something like this.
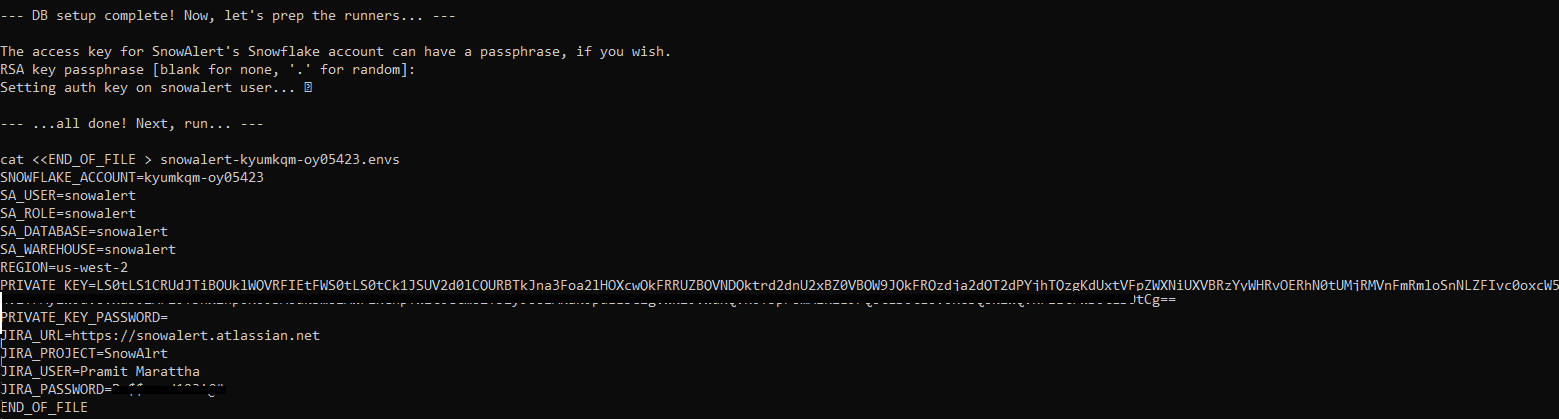
SNOWFLAKE_ACCOUNT=<account-identifier>
SA_USER=snowalert
SA_ROLE=snowalert
SA_DATABASE=snowalert
SA_WAREHOUSE=snowalert
REGION=us-west-2
PRIVATE_KEY=---------
PRIVATE_KEY_PASSWORD=
JIRA_URL=https://<jira-url>.atlassian.net
JIRA_PROJECT=<tag-name>
JIRA_USER=Pramit
JIRA_PASSWORD=<password>
Make note of the generated snowalert-<account>.envs file output by the installer—this will be used to set environment variables when running SnowAlert.
Finally, initiate the SnowAlert runner to view the sample alert and violation by running the following command, and your SnowAlert configuration and installation should be completed.
docker run --env-file snowalert-<account>.envs snowsec/snowalert ./run all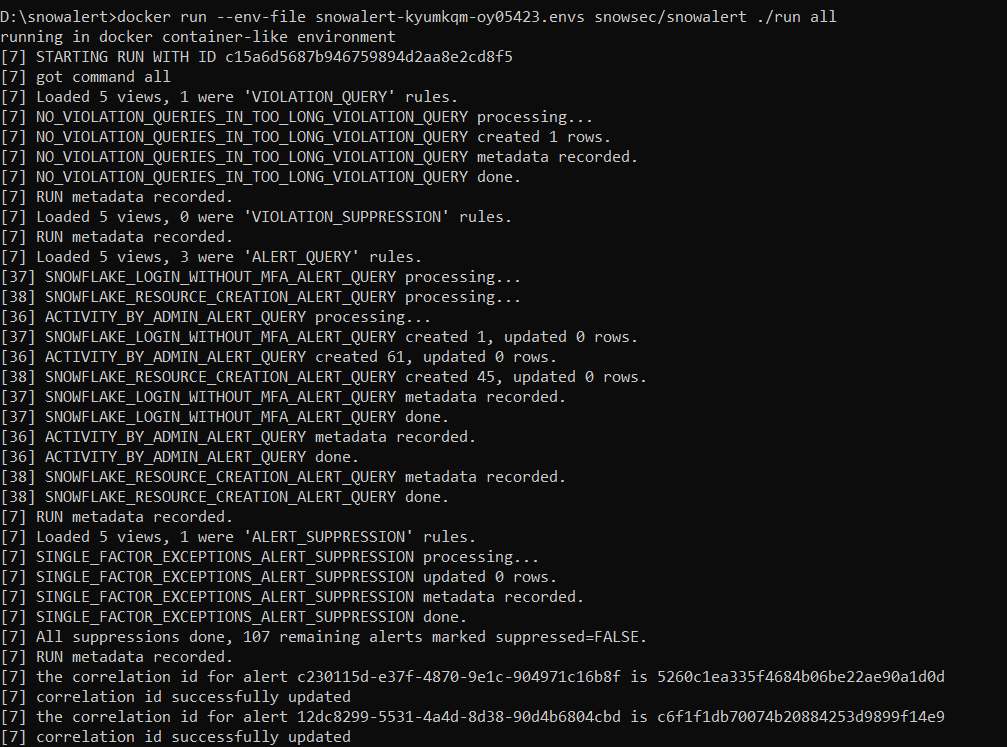
Step 4—Verify SnowAlert Configuration
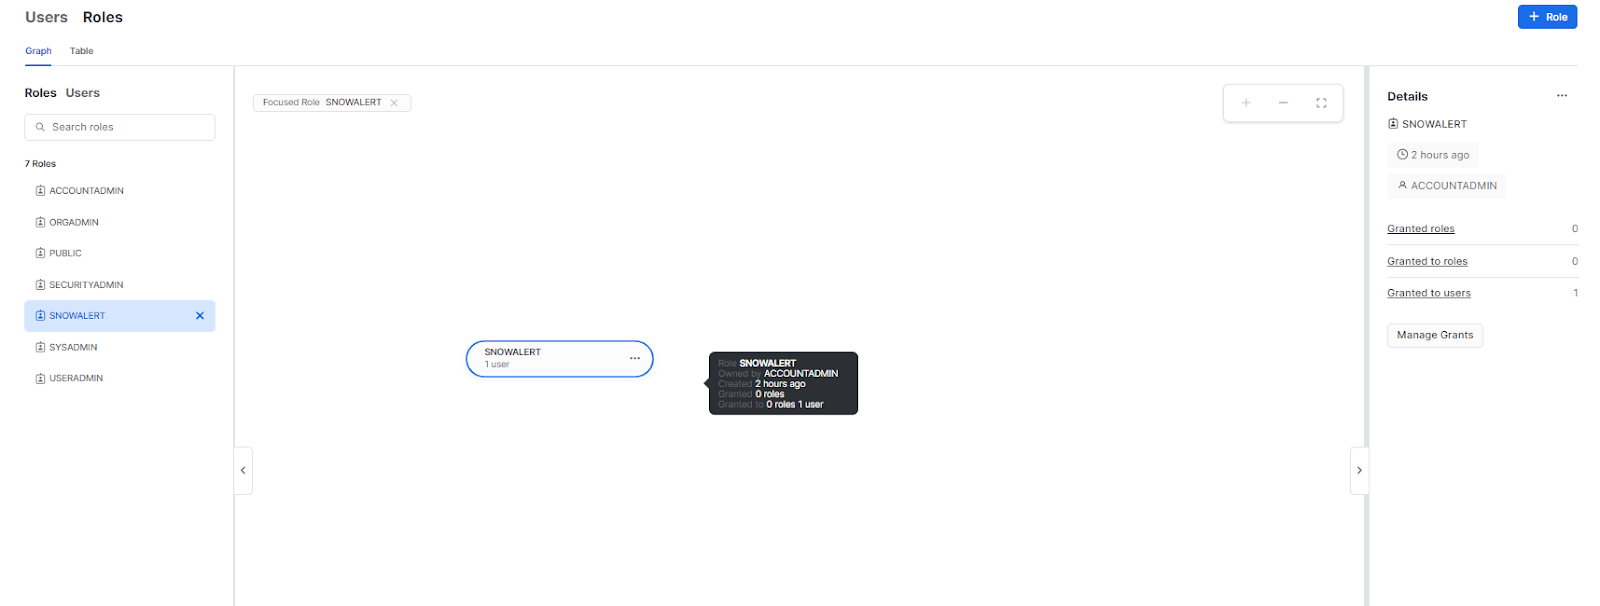
Once the SnowAlert configuration and installation are complete, head over to your Snowflake account and check whether a new user, role, warehouse, and database named Snowalert have been created. If not, you need to repeat from step 3. If yes, then you have successfully configured and installed SnowAlert. Here's how it should look; check out the screenshots below.
Snowalert User:

Snowalert Role:
Snowalert Warehouse:

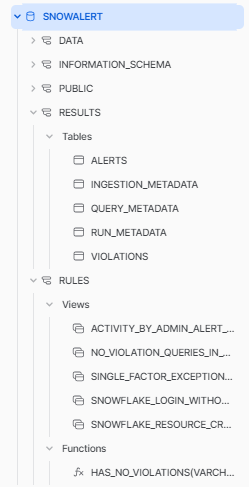
Snowalert Database:
Step 5—Schedule the SnowAlert Container (Optional)
To operate continuously, SnowAlert needs to run periodically to execute the defined alert rules against your Snowflake account usage and log data. This is achieved by scheduling the SnowAlert Docker container using your desired orchestration platform. Some options:
- Kubernetes: Use Kubernetes cron jobs or another scheduler to run the container. This is a great option for teams already using Kubernetes.
- AWS Fargate: Schedule Fargate tasks to regularly invoke the SnowAlert container. Simple AWS native option.
- Azure Container Instances: For Azure environments, use ACI scheduled jobs.
- Apache Airflow: Use an Airflow DAG to trigger SnowAlert on a fixed schedule.
The frequency can vary based on your needs, but running every hour or 30 minutes is reasonable in most cases. This will allow SnowAlert to process the latest account data and generate any applicable alerts.
How to Manage Alert Rules in Snowalert?
Now that SnowAlert is installed and scheduled, let’s take a look at how alert rules are defined and how the alert lifecycle works when the container runs.
There are two types of alert rules:
1) Query Rules
These define the SQL query that identifies events or account state changes to generate alerts on. The output result rows that turn into alerts.
2) Suppression Rules
These define SQL queries that filter alerts generated by query rules to suppress expected or allowlisted events.
Both query and suppression rules are created as views within Snowflake. When SnowAlert runs, it executes the SQL views in order to populate the alerts table with any new alerts found.
When SnowAlert runs, it:
- Executes all defined query rule views to populate alert results
- Deduplicates alerts
- Applies suppression rules to filter alerts
- Inserts the final set into the results.alerts table
- Dispatches non-suppressed alerts to notification channels
This allows tailoring the types of alerts generated and reducing noise. Admins can analyze alerts and tune rules over time.
Trying Out the Sample Alerts
To easily demonstrate SnowAlert in action, the installer configures some sample alert rules and a Jira ticket handler as we have already set up in the above steps.
Let’s walk through testing these out to see how the end-to-end flow works:
1) After running the installer, execute the provided command to run a SnowAlert container with the generated env file:
docker run -it --env-file snowalert-<account>.envs snowsec/snowalert ./run all
2) This will execute the sample login and query monitoring alert rules against your account’s audit logs.
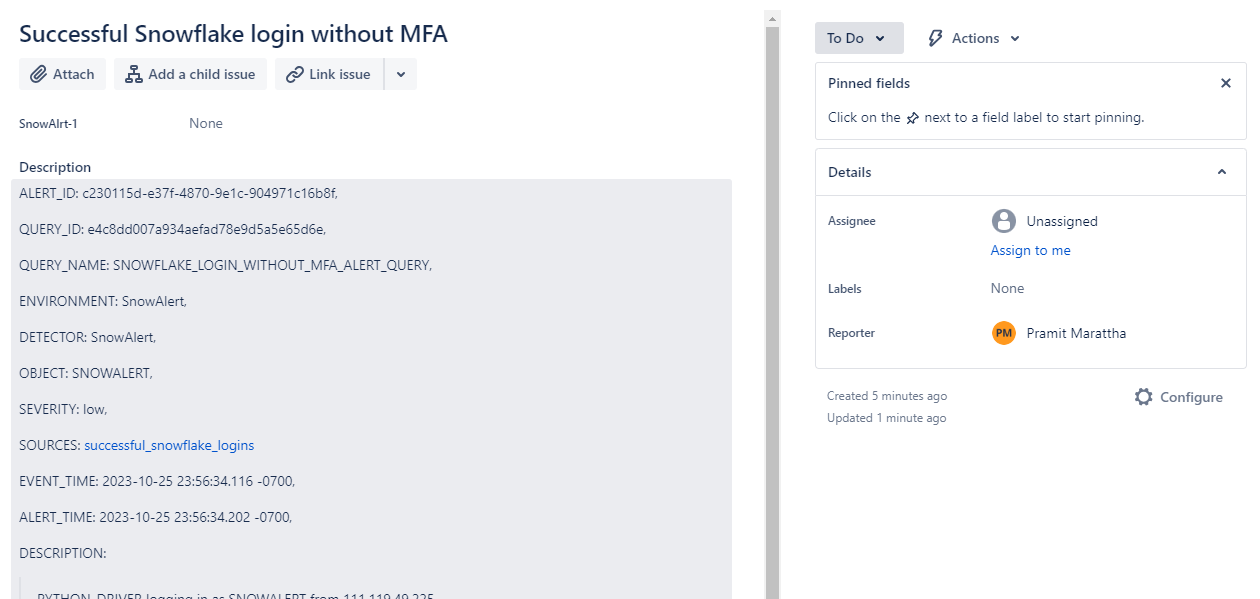
3) You should see an output indicating a successful Snowflake login without MFA was detected, generating a sample alert. Check the SnowAlert alerts table in Snowflake to see the rows populated from the alerts generated.
There are two ways to access these details: either you can go to the Results.alerts tables via Snowsight.
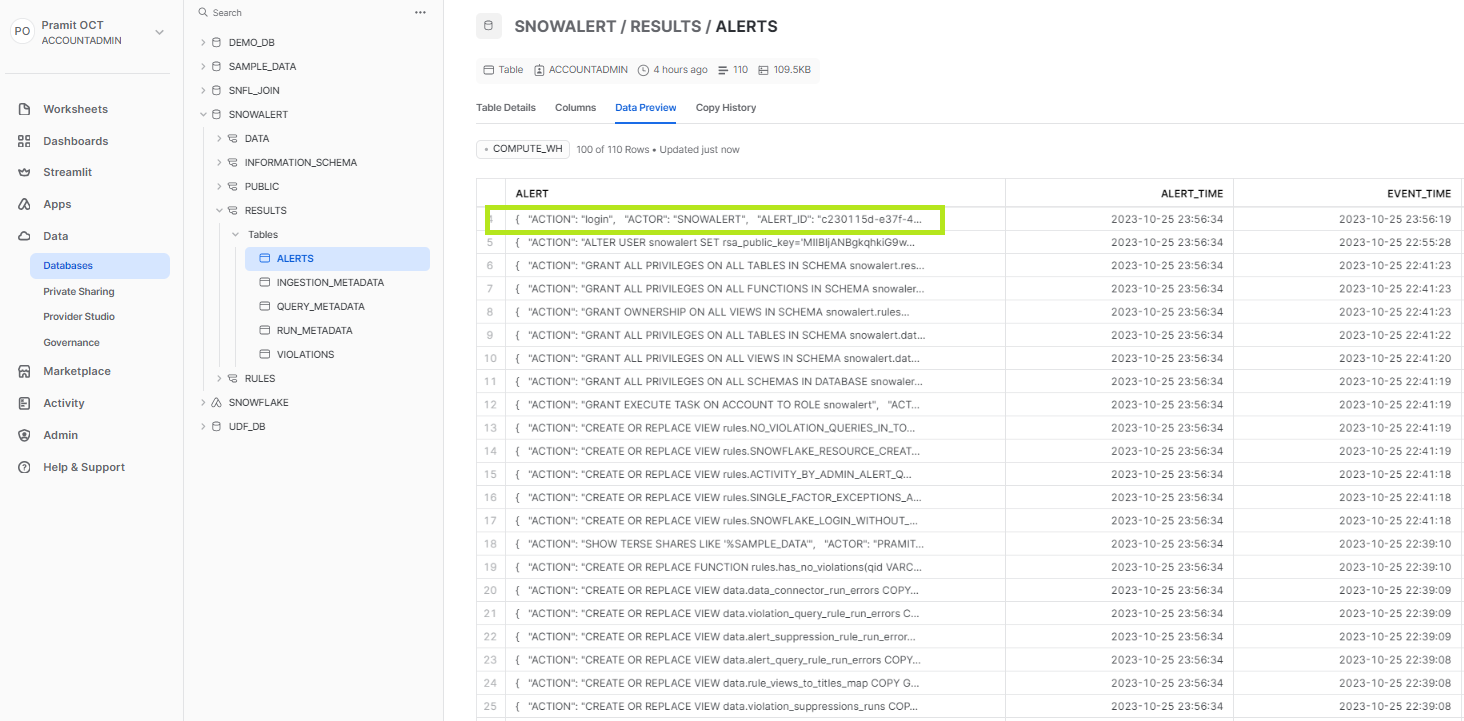
OR you can simply query the entire result and open the details in the worksheet itself.
use database snowalert;
use schema results;
select * from alerts;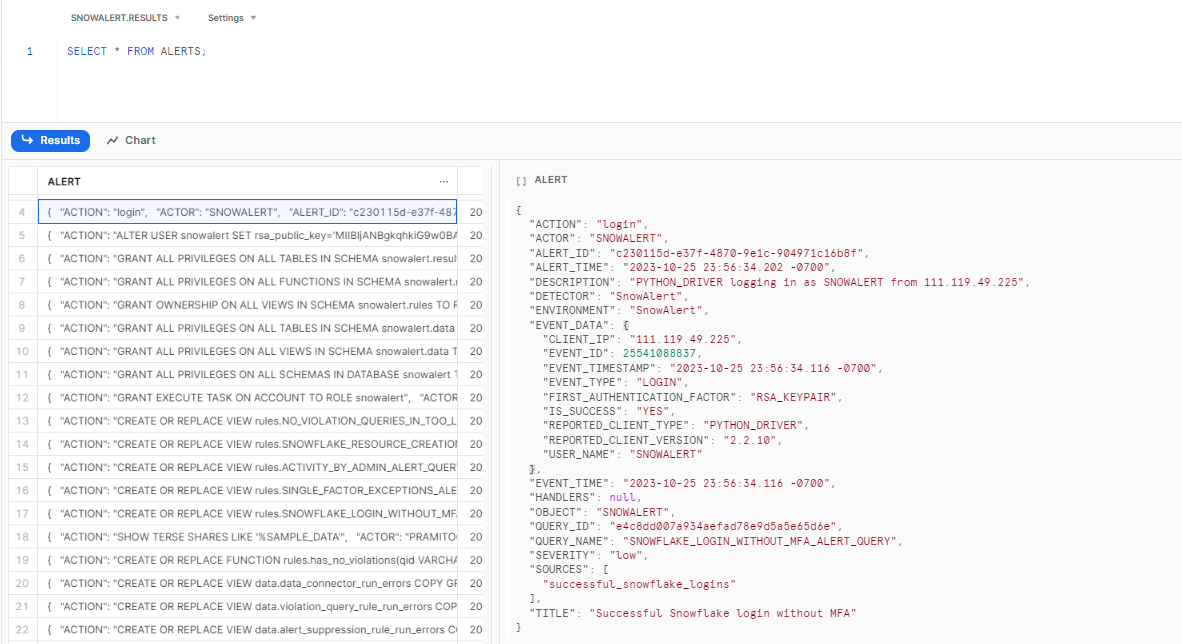
As you can see, you will get the complete details of the alert:
{
  "ACTION": "login",
  "ACTOR": "SNOWALERT",
  "ALERT_ID": "c230115d-e37f-4870-9e1c-904971c16b8f",
  "ALERT_TIME": "2023-10-25 23:56:34.202 -0700",
  "DESCRIPTION": "PYTHON_DRIVER logging in as SNOWALERT from 111.119.49.225",
  "DETECTOR": "SnowAlert",
  "ENVIRONMENT": "SnowAlert",
  "EVENT_DATA": {
    "CLIENT_IP": "111.119.49.225",
    "EVENT_ID": 25541088837,
    "EVENT_TIMESTAMP": "2023-10-25 23:56:34.116 -0700",
    "EVENT_TYPE": "LOGIN",
    "FIRST_AUTHENTICATION_FACTOR": "RSA_KEYPAIR",
    "IS_SUCCESS": "YES",
    "REPORTED_CLIENT_TYPE": "PYTHON_DRIVER",
    "REPORTED_CLIENT_VERSION": "2.2.10",
    "USER_NAME": "SNOWALERT"
  },
  "EVENT_TIME": "2023-10-25 23:56:34.116 -0700",
  "HANDLERS": null,
  "OBJECT": "SNOWALERT",
  "QUERY_ID": "e4c8dd007a934aefad78e9d5a5e65d6e",
  "QUERY_NAME": "SNOWFLAKE_LOGIN_WITHOUT_MFA_ALERT_QUERY",
  "SEVERITY": "low",
  "SOURCES": [
    "successful_snowflake_logins"
  ],
  "TITLE": "Successful Snowflake login without MFA"
}
4) As we have also previously configured Jira, the Jira alert handler should run and create a ticket in the Jira project for the alert.
This provides a simple starting point to understand the end-to-end alerting workflow in Snowalert before creating your own custom alerts.
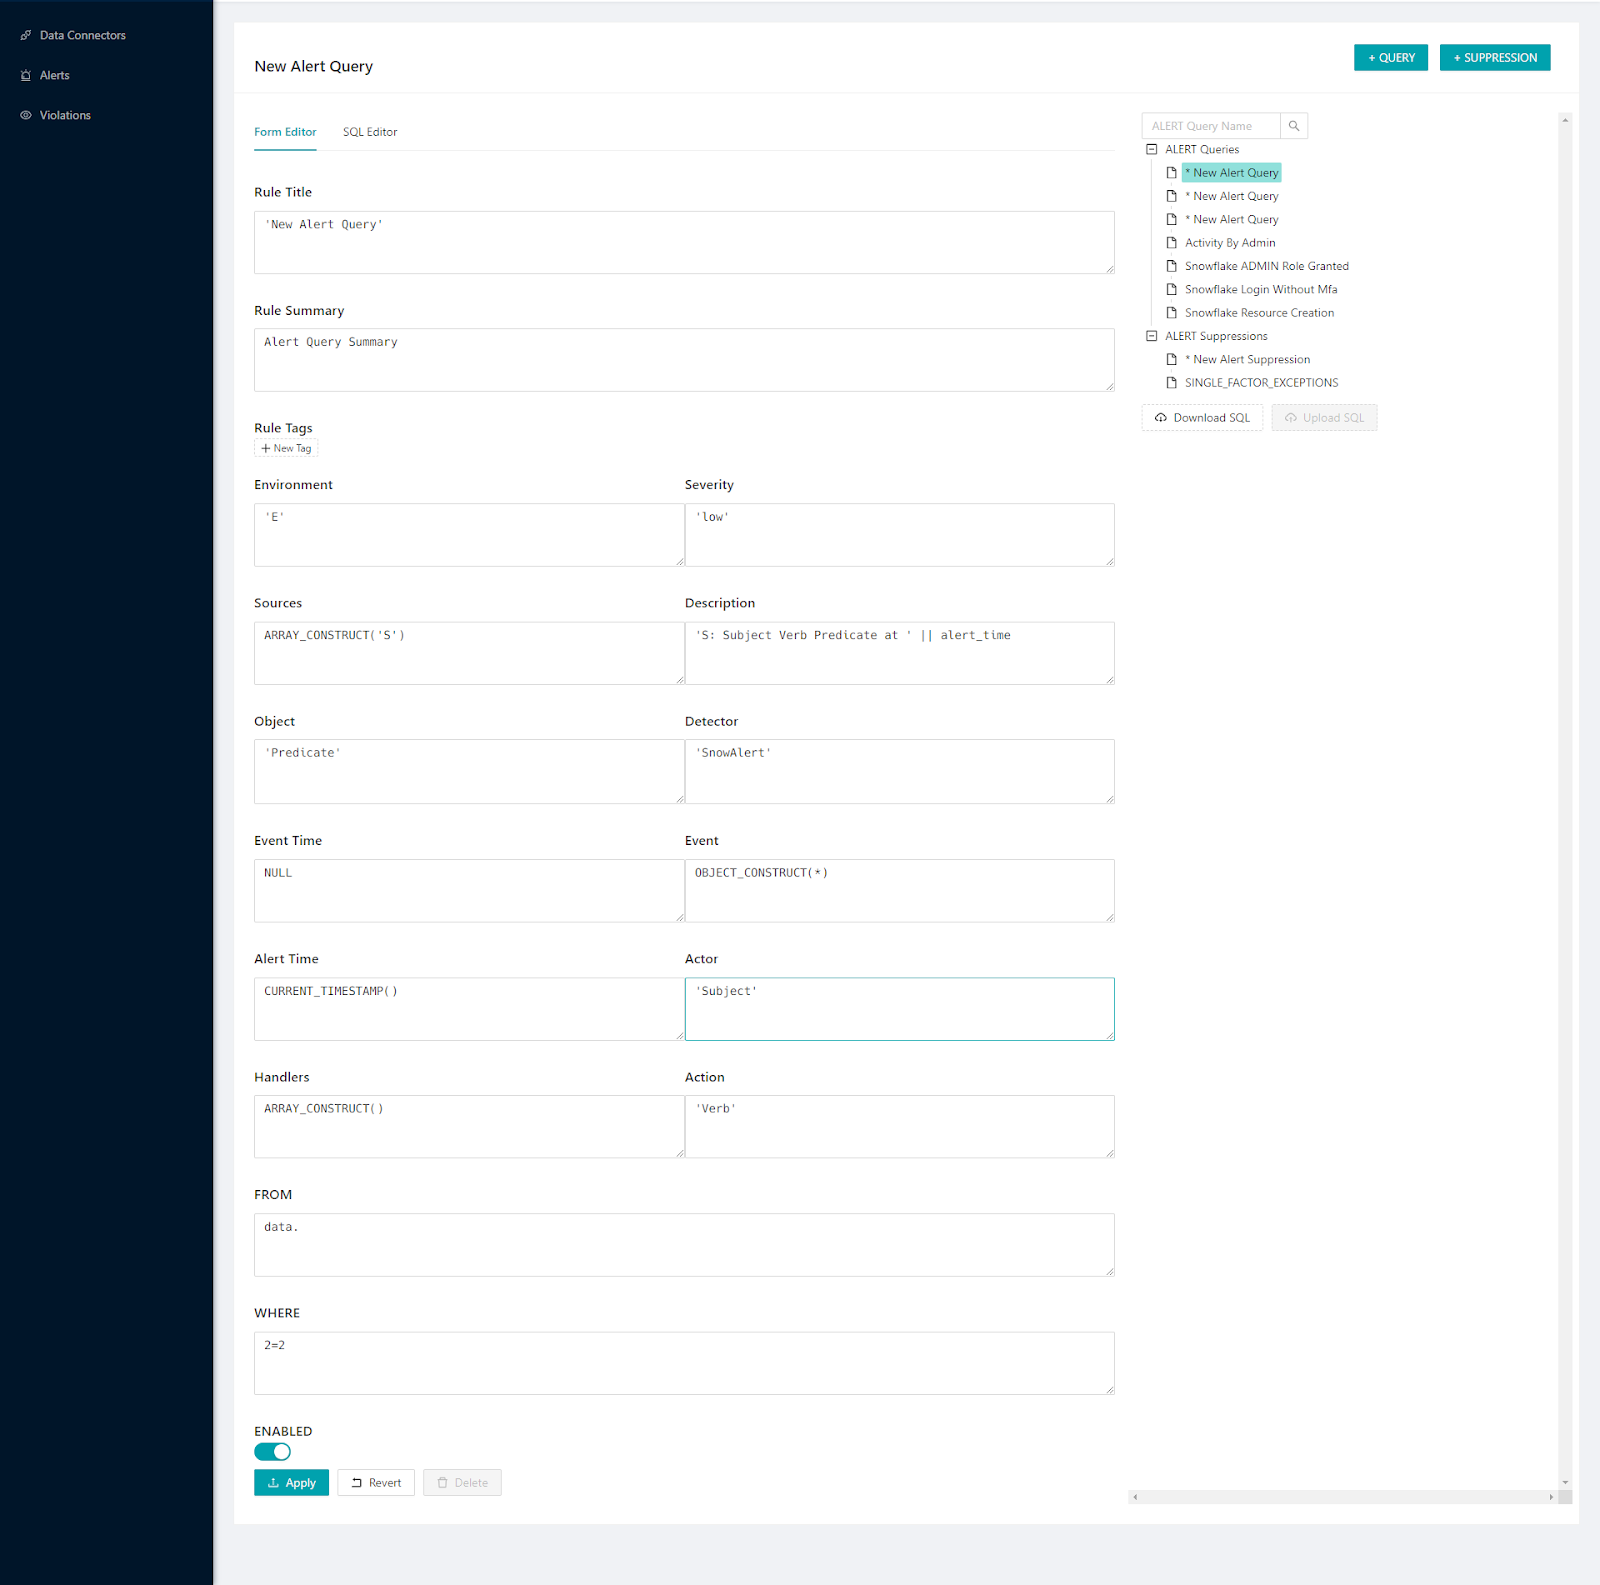
Creating a New Custom Alert Using Snowalert
The real power of SnowAlert comes from creating custom alert rules tailored to your account and security needs. Snowalert provides users have the flexibility to tailor alert detection rules according to their specific needs through several interfaces—the Snowflake's worksheet, SnowSQL, or the SnowAlert WebUI. Each of ‘em offers a unique way to interact with and modify the alerting rules to better monitor and respond to events within your Snowflake environment.
Let’s walk through an example of creating a new alert from scratch:
This time, we'll illustrate a simple scenario where we will create a rule to monitor and alert on admin role grants, using a template from the SnowAlert query pack. This pack, available on GitHub, provides a set of pre-defined queries to help kickstart your monitoring and alerting setup in Snowflake.
Here's how to proceed:
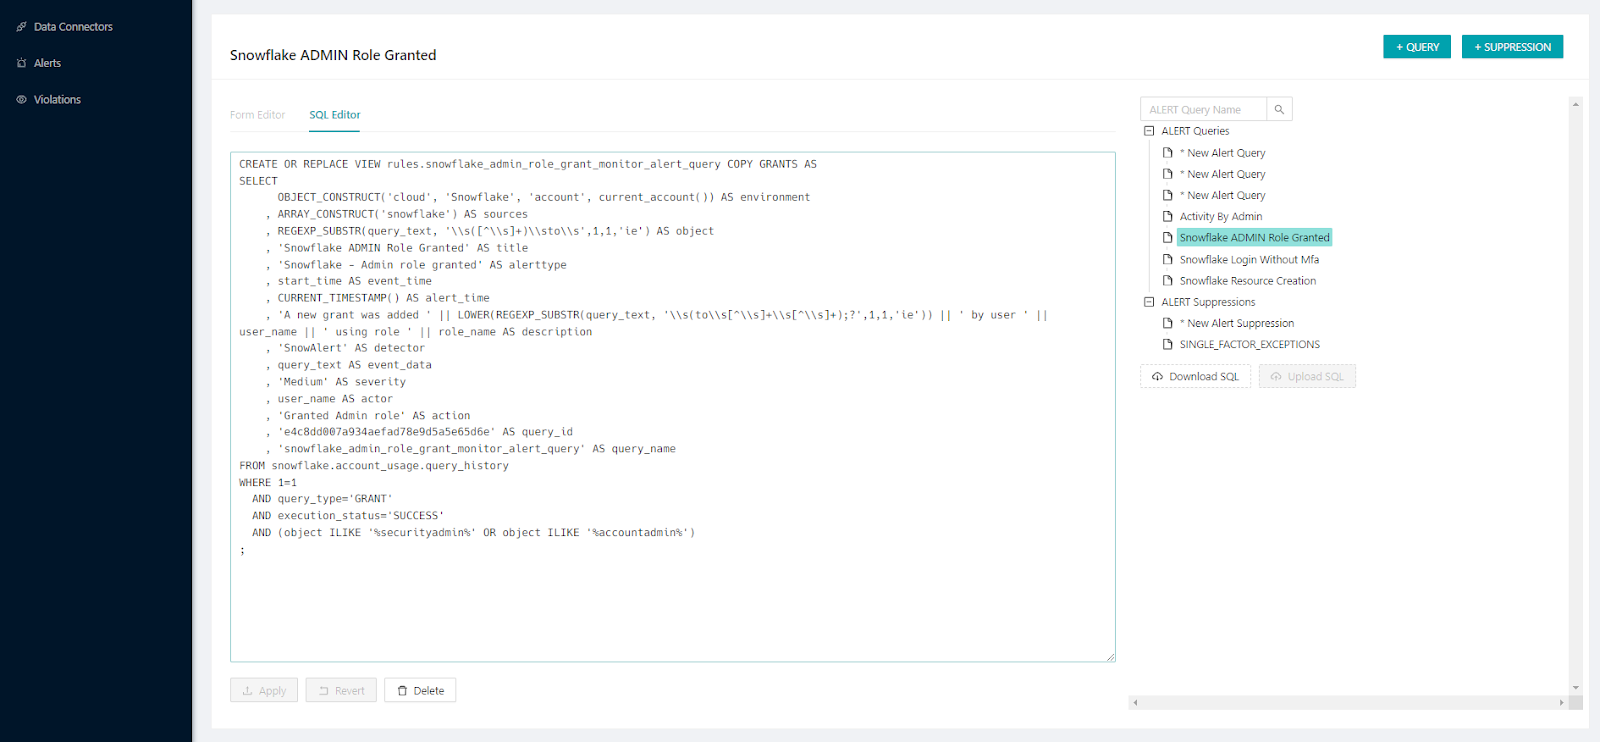
1) Navigate to your Snowflake worksheet.
2) Now, to create a rule for monitoring admin role grants, run the following query within the worksheet:
CREATE OR REPLACE VIEW rules.snowflake_admin_role_grant_monitor_alert_query COPY GRANTS AS
SELECT
      OBJECT_CONSTRUCT('cloud', 'Snowflake', 'account', current_account()) AS environment
    , ARRAY_CONSTRUCT('snowflake') AS sources
    , REGEXP_SUBSTR(query_text, '\\s([^\\s]+)\\sto\\s',1,1,'ie') AS object
    , 'Snowflake ADMIN Role Granted' AS title
    , 'Snowflake - Admin role granted' AS alerttype
    , start_time AS event_time
    , CURRENT_TIMESTAMP() AS alert_time
    , 'A new grant was added ' || LOWER(REGEXP_SUBSTR(query_text, '\\s(to\\s[^\\s]+\\s[^\\s]+);?',1,1,'ie')) || ' by user ' || user_name || ' using role ' || role_name AS description
    , 'SnowAlert' AS detector
    , query_text AS event_data
    , 'Medium' AS severity
    , user_name AS actor
    , 'Granted Admin role' AS action
    , 'e4c8dd007a934aefad78e9d5a5e65d6e' AS query_id
    , 'snowflake_admin_role_grant_monitor_alert_query' AS query_name
FROM snowflake.account_usage.query_history
WHERE 1=1
  AND query_type='GRANT'
  AND execution_status='SUCCESS'
  AND (object ILIKE '%securityadmin%' OR object ILIKE '%accountadmin%')
;

GRANT SELECT ON VIEW rules.snowflake_admin_role_grant_monitor_alert_query TO ROLE snowalert;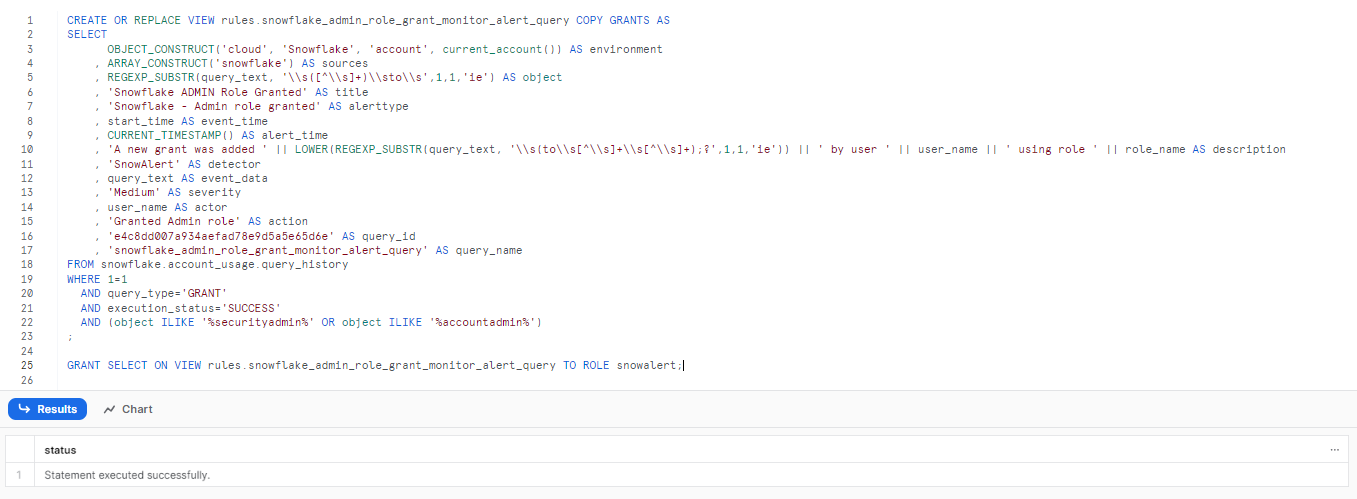
Now, to verify whether the rule has been created or not head over to the
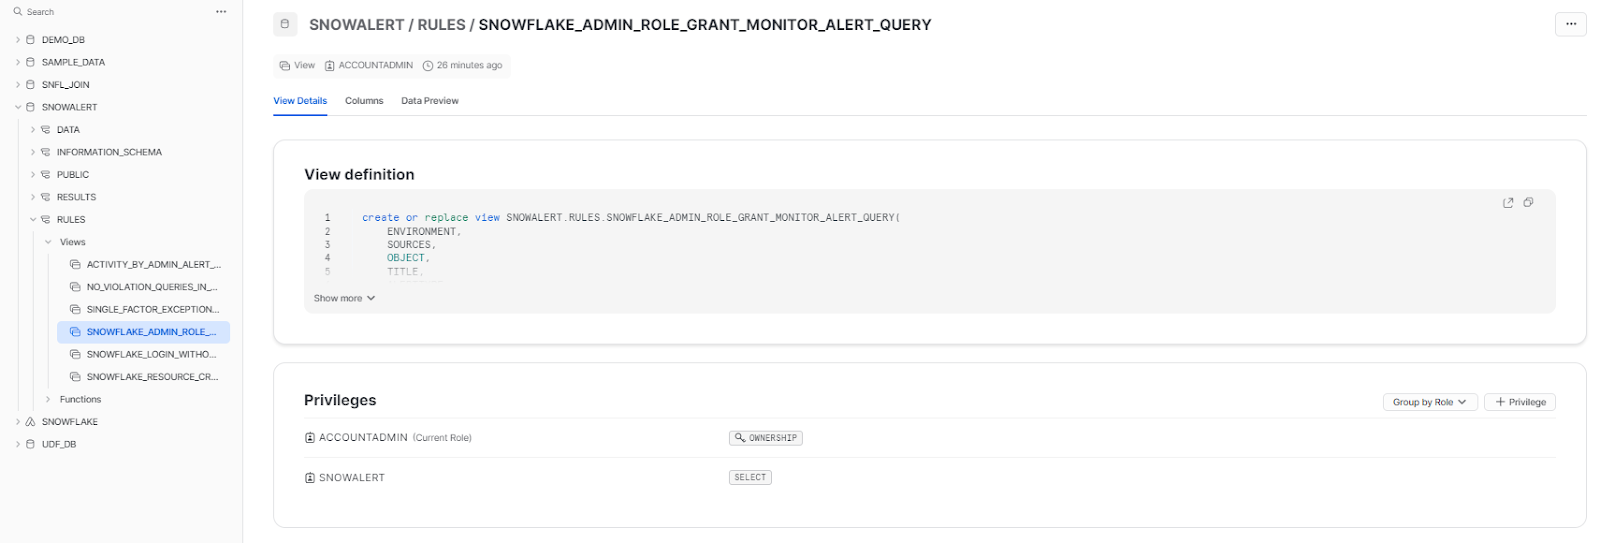
3) Rerun the SnowAlert container to execute this new rule.
docker run -it --env-file snowalert-<account>.envs snowsec/snowalert ./run all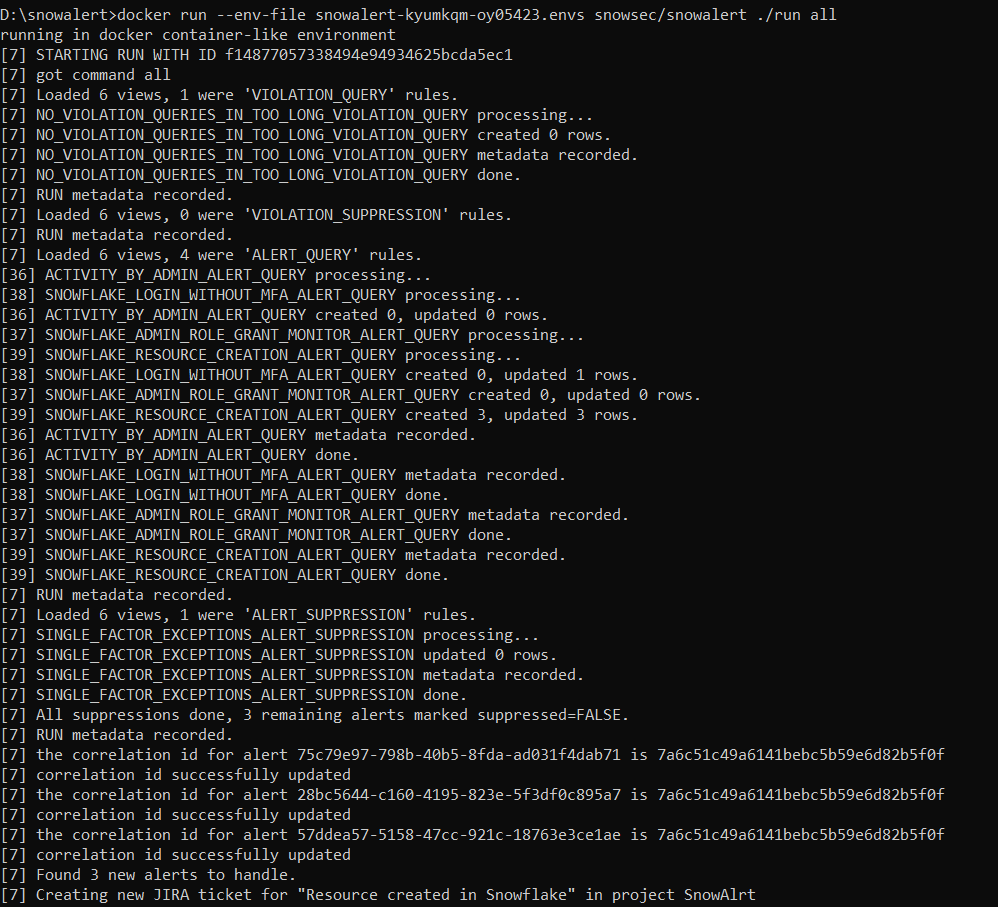
4) Check that any qualifying queries correctly trigger an alert in the alerts table.
CREATE USER demo_admin_user PASSWORD = 'Pa$$word123'
LOGIN_NAME = 'demo_admin_user' DISPLAY_NAME = 'demo_admin_user'
FIRST_NAME = 'demo_admin' LAST_NAME = 'User'
DEFAULT_ROLE = "ACCOUNTADMIN" MUST_CHANGE_PASSWORD = FALSE;
-- Grant Role
GRANT ROLE "ACCOUNTADMIN" TO USER demo_admin_user;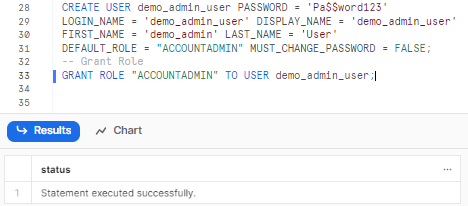
As we have already discussed, there are two ways to access these details: you can either go to the alerts tables via Snowsight.

OR you can simply query the entire result and open the details in the worksheet itself.
use database snowalert;
use schema results;
select * from alerts;
As you can see, you will get the complete details of the alert:
{
  "ACTION": "Granted Admin role",
  "ACTOR": "PRAMITOCT12",
  "ALERT_ID": "c73570fe-8601-4fe1-a006-65342fdecdb3",
  "ALERT_TIME": "2023-10-26 03:12:02.838 -0700",
  "DESCRIPTION": "A new grant was added to user demo_admin_user; by user PRAMITOCT12 using role ACCOUNTADMIN",
  "DETECTOR": "SnowAlert",
  "ENVIRONMENT": {
    "account": "BB34330",
    "cloud": "Snowflake"
  },
  "EVENT_DATA": "GRANT ROLE \"ACCOUNTADMIN\" TO USER demo_admin_user;",
  "EVENT_TIME": "2023-10-26 03:02:34.661 -0700",
  "HANDLERS": null,
  "OBJECT": "\"ACCOUNTADMIN\"",
  "QUERY_ID": "e4c8dd007a934aefad78e9d5a5e65d6e",
  "QUERY_NAME": "SNOWFLAKE_ADMIN_ROLE_GRANT_MONITOR_ALERT_QUERY",
  "SEVERITY": "Medium",
  "SOURCES": [
    "snowflake"
  ],
  "TITLE": "Snowflake ADMIN Role Granted"
}
5) Finally, you can tune the threshold or logic of the view over time to generate the desired alerts.
The same process can be followed to create any type of custom alert scenarios based on Snowflake account activity audit logs, configuration checks, or even external data sources loaded into Snowflake.
Sample alert rule ideas:
- Queries run by blacklisted users
- Changes to security settings or access controls
- Logins from unknown IP addresses
- Spike in data transfer out of Snowflake
- Users enabling external S3 stage access
The possibilities are endless!!
Step-By-Step Guide to Setup Snowalert Web UI Authentication
SnowAlert also provides an optional web UI currently under development to simplify management and alert analysis. Let’s go through how to set up and configure the SnowAlert web application.
The UI is distributed as a separate Docker container. Pull the image:
docker pull snowsec/snowalert-webui
Now, run the docker image that you just pulled. To do so, paste the following command:
docker run -it -d -p 8000:8000 --env-file snowalert-kyumkqm-oy05423.envs snowsec/snowalert-webui
Setting Up Authentication
For authentication into the web UI, Snowflake OAuth is the recommended approach. This has the user authenticate through Snowflake rather than a direct login.
Here are the steps to enable OAuth:
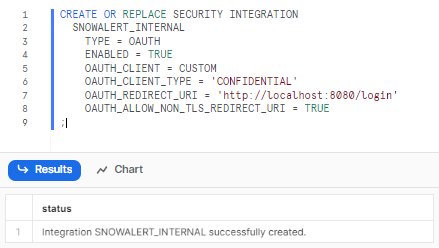
1) In Snowflake, create a security integration:
2) Configure OAuth parameters like the callback URL and allowed domains.
To do so, execute the following command in Snowflake
CREATE OR REPLACE SECURITY INTEGRATION
  SNOWALERT_INTERNAL
    TYPE = OAUTH
    ENABLED = TRUE
    OAUTH_CLIENT = CUSTOM
    OAUTH_CLIENT_TYPE = 'CONFIDENTIAL'
    OAUTH_REDIRECT_URI = 'http://localhost:8000/login'
    OAUTH_ALLOW_NON_TLS_REDIRECT_URI = TRUE
;
3) Get Client ID and Secret:
Run the following query to get the Client ID and Secret:
SELECT SYSTEM$SHOW_OAUTH_CLIENT_SECRETS('SNOWALERT_INTERNAL');
This outputs a JSON document with the Client ID and 2 Client Secrets (choose the first secret for the next step).
4) Configure Environment Variables on SnowAlert WebUI Server:
Set these two variables where your SnowAlert WebUI is running:
"OAUTH_CLIENT_" + account.toUpperCase()
"OAUTH_SECRET_" + account.toUpperCase()
For example , if your Snowflake URL is: 'https://accountidentifier.snowflakecomputing.com', set:
OAUTH_CLIENT_ACCOUNTIDENTIFIER
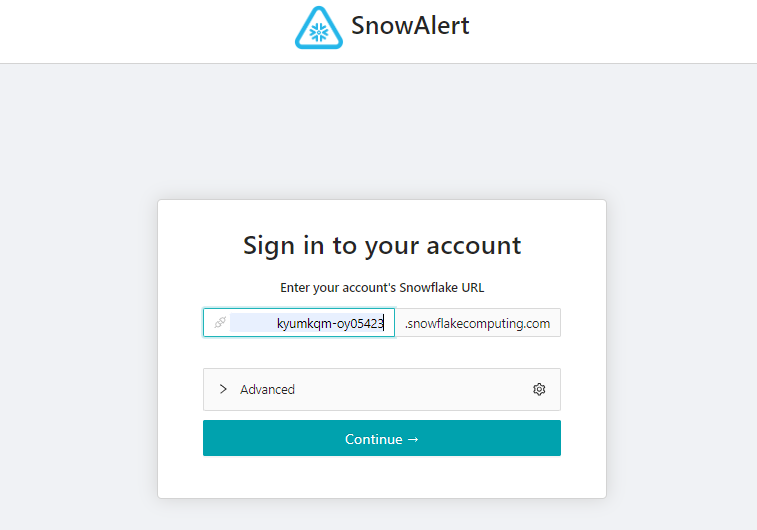
OAUTH_SECRET_ACCOUNTIDENTIFIER5) Sign in to your SnowAlert account; to do so, enter your Snowflake account identifier.
Customizing Snowalert Environment Variables
There are some additional environment variables that can customize the behavior of the SnowAlert UI container:
- OAUTH_CONNECTION_ROLE: Specify the role to view Rules.
- OAUTH_CONNECTION_DATABASE: Specify the database to manage Rules.
- OAUTH_CONNECTION_WAREHOUSE: Specify the warehouse for WebUI data loading.
- SA_REGION (default “us-west-2”): Specify the default region for connectors.
- SA_KMS_KEY (optional): ARN of a key for WebUI to encrypt secrets like connection passwords.
- OAUTH_{{type}}_{{account}}: Enables server authentication.
Set these appropriately to override the defaults as needed for your account.
Accessing the Snowalert Web UI
Once the container is running, navigate to the exposed port in your browser (localhost:8000) and you should see the SnowAlert dashboard. This allows managing alerts, rules, notifications channels—and more through a graphical interface. Explore the interface and customize alerts for your use cases.
Navigate to the Alert section, which is situated on the left sidebar of the interface. Here, you have the opportunity to begin crafting your own custom alerts along with their respective rules directly from the Snowalert Web UI. This intuitive interface provides a streamlined process for setting up alerts tailored to your specific needs.
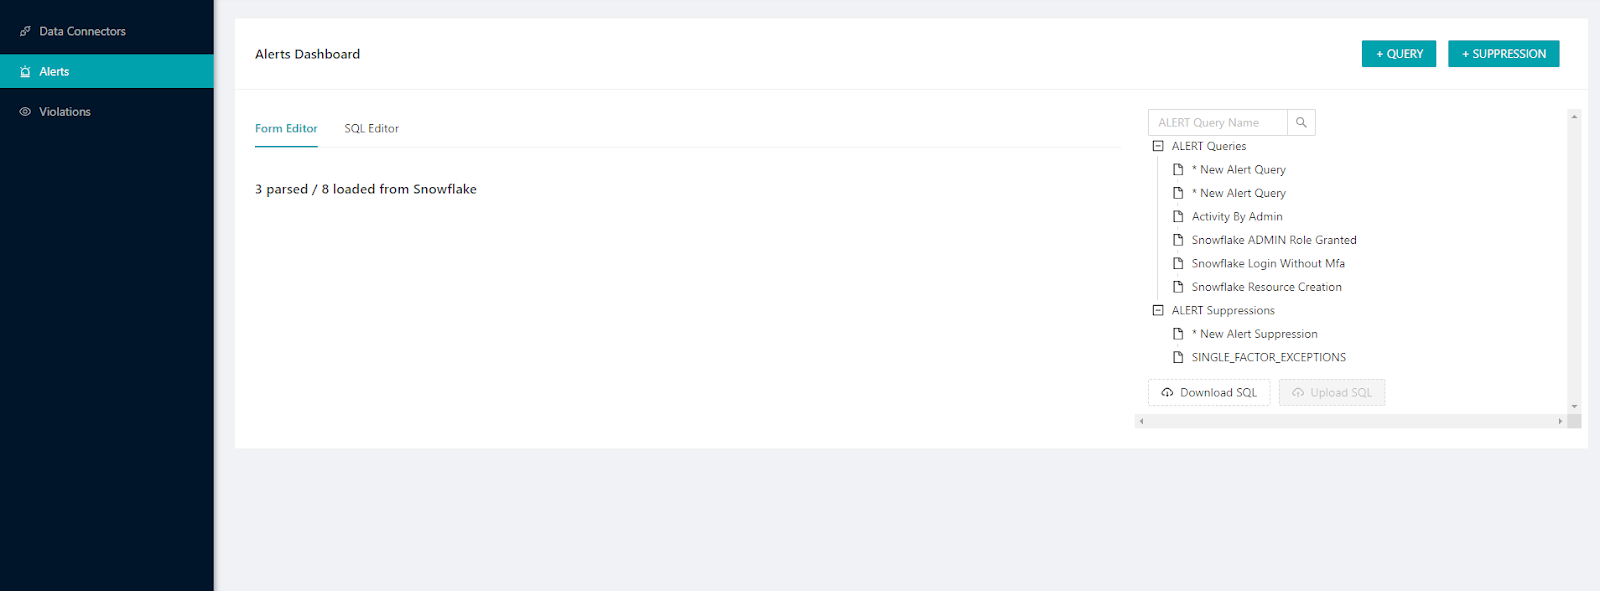
If you've already set up some alerts, this section also allows for easy modifications. You have the ability to edit the queries of existing alerts, making adjustments as necessary to ensure they align with your monitoring objectives.
Conclusion
And that's a wrap, folks! SnowAlert really stands out as an awesome open-source tool compared to clunky expensive SIEM options. It's totally free and makes it super easy to create detailed detection rules using basic SQL and familiarity with Snowflake's Information Schema and Account Usage system-defined tables and views—no expert required! In this article, we covered:
- Importance of monitoring and alerting your Snowflake.
- What is SnowAlert and how SnowAlert give you a tailored solution built just for monitoring Snowflake?
- Installing, configuring, and running SnowAlert.
- Seeing sample SnowAlert rules and alert handling in action.
- Creating custom alert rules tailored to your use cases.
- Leveraging the SnowAlert web UI for simplified alert management.
SnowAlert packs a ton of power to help any Snowflake user implement rock-solid monitoring and alerts without extra costs or hardware. Give it a spin today by following the steps here to make SnowAlert's awesome features start working for you!!!
FAQs
What is SnowAlert?
SnowAlert is an open-source security analytics framework developed by Snowflake to monitor activity and configurations to detect potential security incidents and policy violations.
How does SnowAlert work?
SnowAlert runs scheduled SQL queries on logs/data in Snowflake to generate alerts. It has suppression rules to filter alerts, insert them into results tables, and dispatch them to notification channels.
What are the benefits of using SnowAlert?
Faster threat detection, improved compliance, operational visibility, and policy enforcement without added infrastructure costs.
How can SnowAlert improve security training and awareness?
SnowAlert can automate outreach to users, thus reducing manual efforts while maintaining personalized follow-up approaches, helping to bolster security training and awareness.
What is alert in Snowflake?
Snowflake alert is a schema-level object that triggers specified actions (e.g., sending an email notification) when certain conditions are met within the database.
What are the prerequisites to use SnowAlert?
A Snowflake account, Docker, and a container orchestration platform like Kubernetes or AWS Fargate.
How do you set up the SnowAlert Web UI?
Pull the WebUI Docker image, run the container with env variables, and enable Snowflake OAuth for authentication.
What can you do in the SnowAlert Web UI?
Manage alerts, rules, notifications, analyze alerts visually, and create custom alerts directly through the interface.
How do you schedule the SnowAlert container?
Use orchestrators like Kubernetes, AWS Fargate, Azure ACI, or Apache Airflow to run on a fixed schedule.
What permissions does the SnowAlert user need?
ACCOUNTADMIN role is recommended so SnowAlert can create objects and access audit logs.
Where does SnowAlert store the data?
All data including alerts is stored within tables and views in your Snowflake account.
Does SnowAlert connect to external systems?
SnowAlert can ingest data from external sources into Snowflake. It dispatches alerts to tools like Jira or Slack.
Can you use SnowAlert without the Web UI?
Yes, the core alerting functionality works via the Docker container and Snowflake rules.
Does SnowAlert provide prebuilt alert rules/queries?
Yes, it includes sample rules and a GitHub query pack to accelerate setup.


