


Snowflake Cortex made its grand entrance in November 2023 during Snowflake's Snowday 2023 event, unveiling a groundbreaking service that integrates the power of AI and ML into the Snowflake Data Cloud. This groundbreaking service allows users to explore their data within Snowflake like never before. Snowflake Cortex offers two core capabilities: ML Functions and LLM Functions. ML functions enable users to harness pre-trained machine learning models for predictions, pattern identification, and data classification without requiring extensive data science expertise. LLM functions, on the other hand, utilize large language models to provide various capabilities for textual data, including translation, summarization, sentiment analysis, answer extraction, and free-form text generation. Together, these functions help users to transform even the most complex data into meaningful insights.
In this article, we will cover everything about Snowflake Cortex, with a particular focus on its large language model (LLM) functions. We'll cover what Snowflake Cortex is, its core capabilities, the benefits it offers, and how you can leverage its LLM functions to extract insights from data stored in unstructured and semi-structured formats.
What is Snowflake Cortex?
Snowflake Cortex is a fully managed service that brings state-of-the-art AI and ML solutions directly to your data within your Snowflake environment. What's great about Cortex is that it gives full power to users like you to unleash the full potential of your data, whether structured or unstructured, by harnessing cutting-edge AI and ML technologies. With Snowflake Cortex at your fingertips, you can dive deep into your data, seamlessly analyze it, and build powerful AI applications with pre-built, industry-leading models and vector search capabilities, all within Snowflake.
Snowflake Cortex brings cutting-edge AI and ML capabilities straight to your data within Snowflake! And that means you get some pretty awesome benefits, like:
- Easy Integration: Snowflake Cortex is designed to seamlessly integrate with Snowflake Data Cloud, enabling users to take advantage of its AI and ML capabilities without requiring complex setup procedures or the need to move data between systems.
- Turbocharged performance: Snowflake Cortex uses Snowflake's scalable architecture to handle even the most demanding AI and ML workloads efficiently.
- Security + Governance: Your data remains within Snowflake's secure perimeter, benefiting from the platform's robust security features, governance controls, and data protection measures.
- Budget-Friendly Benefits: Snowflake Cortex uses the pay-per-use pricing model, so you only pay for what you use. Advanced AI and ML features become more affordable and within reach for everyone!
- Lightning-fast insights: Snowflake Cortex helps you get valuable insights from your data faster than ever, skipping the hassle of building and managing complex AI and ML infrastructure. That means more time to focus on what really matters.
What Are the Capabilities of Snowflake Cortex?
Snowflake Cortex offers two main capabilities that help users to extract valuable insights from their data:
- Snowflake Cortex LLM functions provide instant access to industry-leading large language models (LLMs) such as mistral-large, mixtral-8x7b, llama2-70b-chat, and gemma-7b. These models enable various natural language processing (NLP) tasks like text generation, classification, and translation. We will dive into more depth in later sections.
- Snowflake Cortex ML functions leverage machine learning algorithms to detect patterns in data and generate predictions. These functions cover a range of use cases, including forecasting, anomaly detection, and text analysis. We will dive into more depth in the next sections.
Now, we'll mostly focus on the Snowflake Cortex’s LLM functions in this article, but don't forget that Snowflake Cortex also packs powerful ML functions for data analysis.
What Are Snowflake Cortex ML Functions?
Snowflake Cortex ML functions are a set of pre-built machine learning functions that can be used within Snowflake's SQL queries to analyze data and build intelligent applications. These functions allow data analysts and developers to incorporate machine learning capabilities into their data pipelines without needing specialized expertise or separate tools.
Snowflake Cortex ML functions can automatically spot patterns and trends in your data, making advanced analytics accessible to anyone working with data. All you need to do is provide the data and let Cortex ML work its magic to help you make smarter data-driven decisions.
The available Snowflake Cortex ML functions can be broadly categorized into two groups:
- Time-Series Functions (Forecasting | Anomaly Detection | Contribution Explorer)
- Analysis Functions (Classification)
1) Time-Series Functions
Time-series functions train machine learning models on your time-series data to understand how a specific metric, changes over time and in relation to other features in your data. These models then offer valuable insights and predictions based on the detected trends. The three main Time-Series Functions are:
- Forecasting: Determines the factors influencing a value of interest and predicts future values based on those factors.
- Anomaly Detection: Identifies potential outliers in your data by comparing them to a forecast for the same time period.
- Contribution Explorer: Helps determine the factors that influence a value of interest.
2) Other Analysis Functions
These functions don't require time-series data. Instead, they train machine learning models to recognize different entities within your data. The primary Analysis Function is:
- Classification: Sorts records into two or more classes based on automatically detected explanatory factors.
Snowflake Cortex ML functions make it easy for anyone to unravel the hidden patterns and valuable insights from their structured data. You don't need to have specialized knowledge of machine learning algorithms. These powerful functions simplify the process, allowing you to analyze and learn from your data without complex workflows or extensive expertise, just by writing simple SQL commands.
What Are Snowflake Cortex LLM Functions?
Snowflake CORTEX's LLM (Large Language Model) functions leverage the power of state-of-the-art language models, including models developed by big companies like Mistral, Meta, and Google. Some examples of these models are mistral-large, mixtral-8x7b, llama2-70b-chat, and gemma-7b. These functions are designed to extract insights from unstructured and semi-structured data. They enable users to perform complex reasoning tasks, extract relevant information, analyze sentiment, summarize text, and translate documents directly within the Snowflake environment, eliminating the need to use external tools or platforms.
Snowflake Cortex offers various functions that can be used via SQL or Python. These functions are designed to simplify and streamline tasks related to data analysis, text processing, and language understanding:
- COMPLETE
- EXTRACT_ANSWER
- SENTIMENT
- SUMMARIZE
- TRANSLATE
Each of these functions offers unique capabilities and use cases, allowing you to unlock the full potential of your unstructured or semi-structured data. Let's take a closer look at each function, its syntax, and its applications:
1) COMPLETE
COMPLETE function is powerful for generating text based on a given prompt or conversation. It leverages advanced language models to understand the context and produce relevant, coherent responses.
Here are some of the use cases for the COMPLETE function:
- Generate high-quality content such as articles, reports, or marketing materials based on initial prompts or outlines.
- Build interactive chatbots or virtual assistants that can engage in natural, context-aware dialogues.
- Get help with creative writing tasks like story creation, character development, or dialogue generation.
- Generate code snippets or complete programs based on natural language descriptions or specifications.
… and so much more!
COMPLETE function supports the following models.
Full Syntax:
SNOWFLAKE.CORTEX.COMPLETE(<model>, <prompt_or_history> [ , <options> ] )Arguments:
- <model>: String specifying the language model (“mistral-large”, “mixtral-8x7b”, “llama2-70b-chat”, “mistral-7b”, “gemma-7b”).
- <prompt_or_history>: Prompt or conversation history as a string or array of objects (if <options> present) with the role (“system”, “user”, “assistant”) and content keys.
- <options> (Optional): Object containing temperature (0-1), top_p (0-1), and max_tokens to control model output. Affects interpretation of <prompt_or_history> and response formatting.
Example:
Here's an example of using the COMPLETE function in SQL:
SELECT SNOWFLAKE.CORTEX.COMPLETE('llama2-70b-chat', 'Define Snowflake Cortex');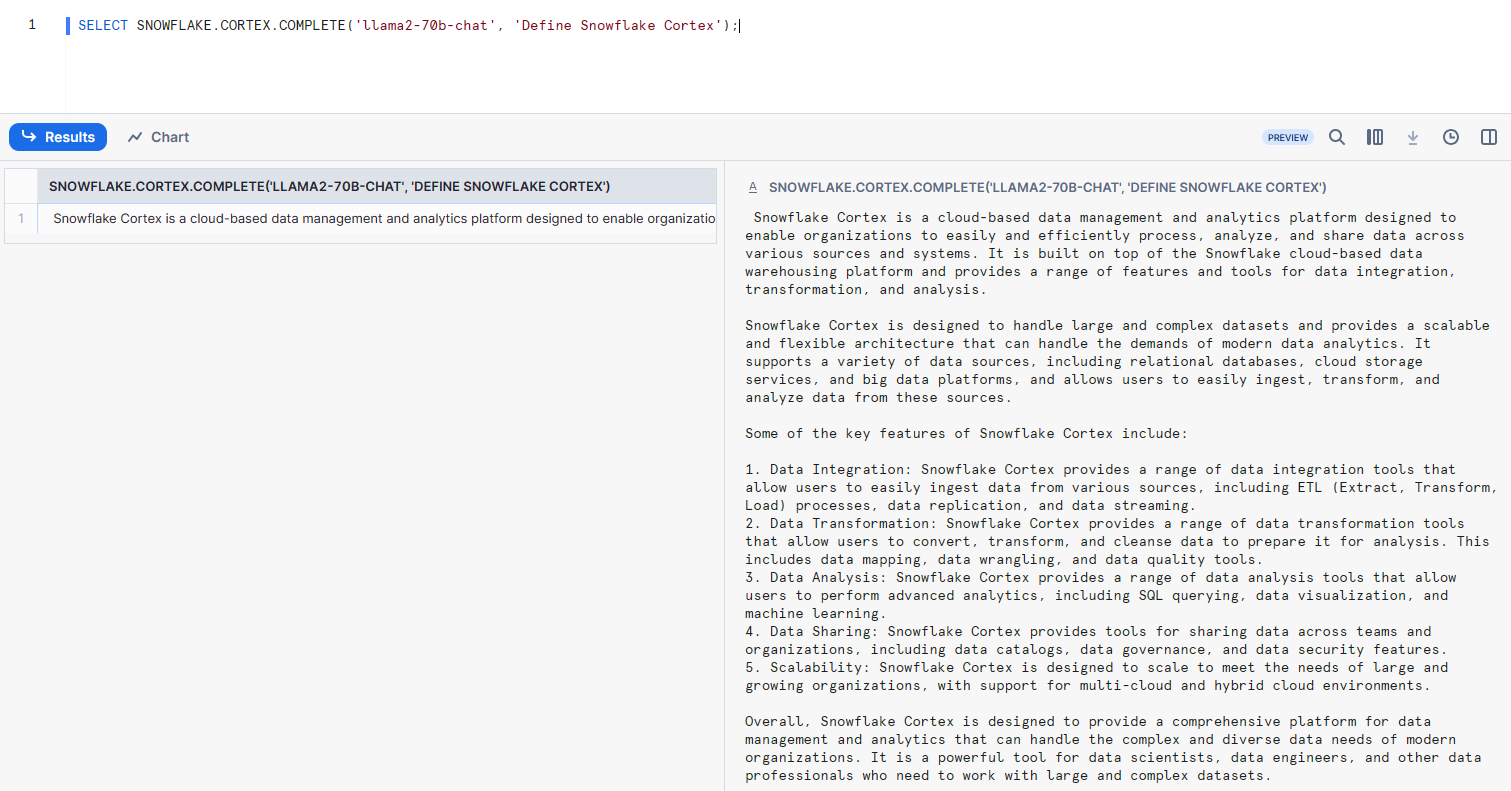
As you can see, this query will generate a definition of what Snowflake Cortex is using the llama2-70b-chat model.
2) EXTRACT_ANSWER
EXTRACT_ANSWER function is designed to extract relevant information from unstructured or semi-structured data sources based on a provided question. It can be extremely valuable for extracting specific insights from large datasets or document repositories.
Note: Document can be a plain English document or a string representation of a semi-structured (JSON) data object.
Here are some of the use cases for the EXTRACT_ANSWER function:
- Extract relevant information from technical documentation, manuals, or knowledge bases based on user queries.
- Quickly find answers to customer inquiries by searching through support documentation or ticket repositories.
- Extract specific data points or insights from unstructured data sources to support further analysis or reporting.
… and so much more!
Full Syntax:
SNOWFLAKE.CORTEX.EXTRACT_ANSWER(<source_document>, <question>)Arguments:
- <source_document>: String containing a plain-text or JSON document that contains the answer to the question.
- <question>: String containing the question to be answered from the source_document.
Example:
Here's an example of using the EXTRACT_ANSWER function in SQL:
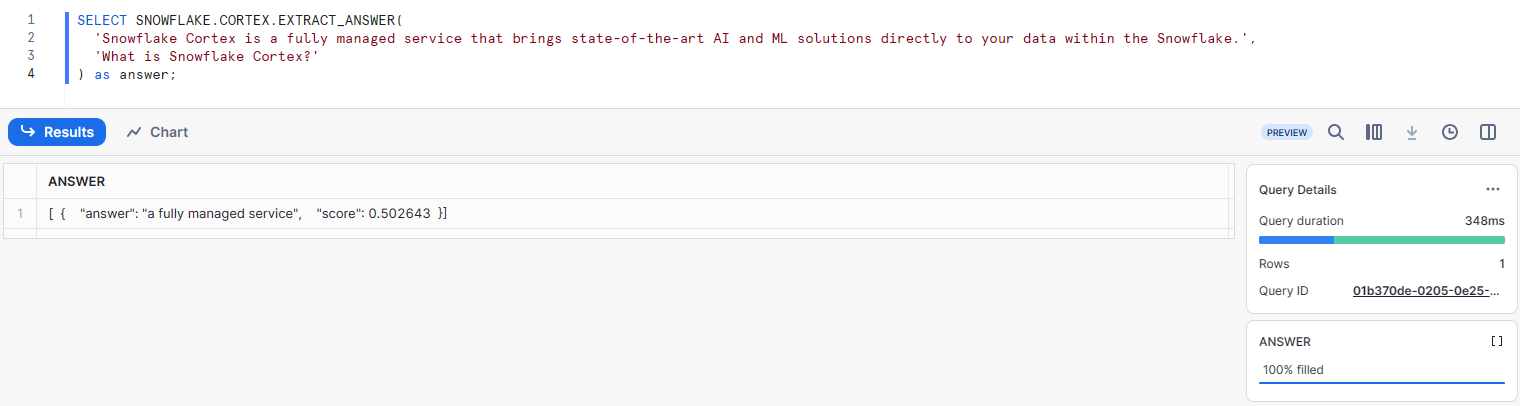
SELECT SNOWFLAKE.CORTEX.EXTRACT_ANSWER(
  'Snowflake Cortex is a fully managed service that brings state-of-the-art AI and ML solutions directly to your data within the Snowflake.',
  'What is Snowflake Cortex?'
);
OR
SELECT SNOWFLAKE.CORTEX.EXTRACT_ANSWER(review_content,
    'What is Snowflake Cortex?')
FROM reviews LIMIT 10;
As you can see, this query will extract the relevant information about what Snowflake Cortex is from the provided text or JSON document.
3) SENTIMENT
SENTIMENT function analyzes the sentiment or emotional tone of English text, providing a score ranging from -1 (negative) to 1 (positive), with values around 0 indicating a neutral sentiment. This can be valuable for understanding customer feedback, monitoring social media sentiment, or analyzing any text-based data with emotional context.
Here are some of the use cases for the SENTIMENT function:
- Analyze customer reviews, support tickets, or survey responses to gauge sentiment and identify areas for improvement.
- Monitor social media channels and online discussions to understand public sentiment towards your brand or products.
- Automatically detect and flag potentially harmful or offensive content based on sentiment analysis.
… and so much more!
Full Syntax:
SNOWFLAKE.CORTEX.SENTIMENT(<text>)Arguments:
- <text>: String containing the text for which a sentiment score should be calculated.
Example:
Here's an example of using the SENTIMENT function in SQL:
SELECT SNOWFLAKE.CORTEX.SENTIMENT('I really enjoyed this Snowflake Cortex article. Fantastic Article!')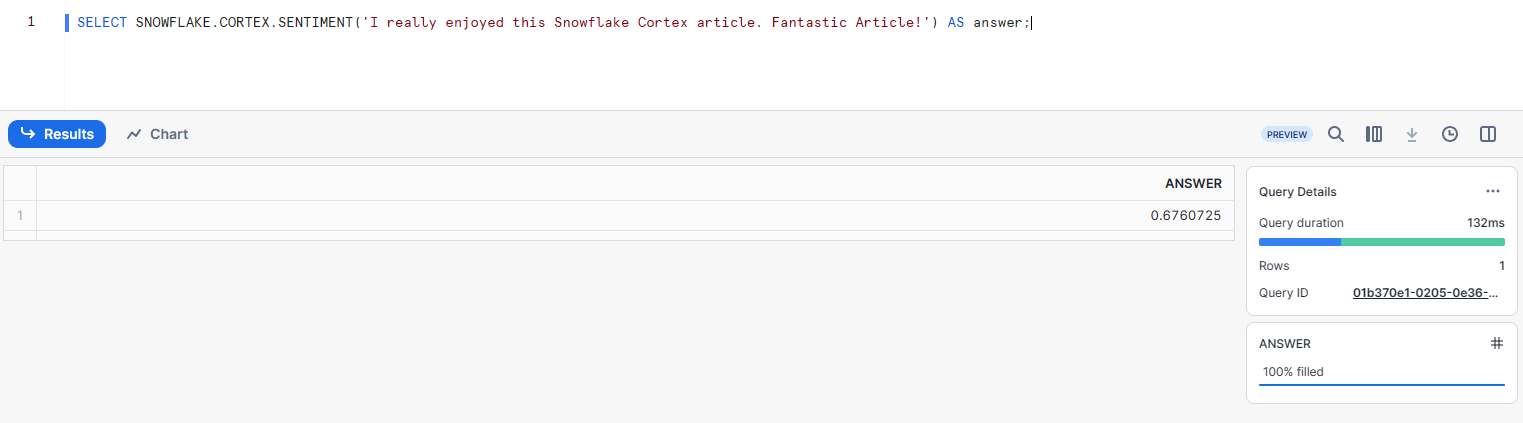
As you can see, this query will extract and analyze the sentiment or emotional tone from the provided text.
OR
SELECT SNOWFLAKE.CORTEX.SENTIMENT(review_content), review_content FROM reviews LIMIT 10;4) SUMMARIZE
SUMMARIZE function generates a concise summary of the provided English text, capturing the key points and essential information. This can be particularly useful for quickly understanding the main ideas or concepts within large documents, reports, or articles.
Here are some of the use cases for the SUMMARIZE function:
- Quickly summarize lengthy documents, research papers, or reports to extract the main takeaways.
- Automatically generate summaries of online articles or news stories for content curation and distribution.
- Extract the key information from unstructured data sources to support further analysis or decision-making.
… and so much more!
Full Syntax:
SNOWFLAKE.CORTEX.SUMMARIZE(<text>)Arguments:
- <text>: String containing the English text from which a summary should be generated.
Example:
Here's an example of using the SUMMARIZE function in SQL:
SELECT SNOWFLAKE.CORTEX.SUMMARIZE(
  'Snowflake Cortex is a fully managed service that brings state-of-the-art AI and ML solutions directly to your data within the Snowflake Data Cloud. It empowers organizations to unlock the full potential of their data, whether structured or unstructured, by leveraging cutting-edge AI and ML technologies. The core capabilities of Snowflake Cortex revolve around two main areas: LLM Functions and ML Functions.'
);
As you can see, this query will generate a concise summary of the provided text about Snowflake Cortex.
5) TRANSLATE
TRANSLATE function enables multi-language processing and analysis by translating text from any supported source language to any other supported target language. This can be invaluable for organizations operating in multiple regions or catering to a global customer base.
Here are some of the use cases for the SUMMARIZE function:
- Analyze and extract insights from text data in various languages, such as customer feedback, social media posts, or market research.
- Facilitate communication and collaboration across language barriers by translating documents, emails, or messages.
- Translate product descriptions, marketing materials, or website content for localization and global reach.
… and so much more!
Full Syntax:
SNOWFLAKE.CORTEX.TRANSLATE(<text>, <source_language>, <target_language>)Arguments:
- <text>: String containing the text to be translated.
- <source_language>:String specifying the language code for the language the <text> is currently in. If the source language code is an empty string, '', the source language is automatically detected.
- <target_language>: String specifying the language code into which the <text> should be translated.
Here is the list of supported languages and their corresponding codes for use with the Snowflake CORTEX TRANSLATE function:
- English: "en"
- French: "fr"
- German: "de"
- Italian: "it"
- Japanese: "ja"
- Korean: "ko"
- Polish: "pl"
- Portuguese: "pt"
- Russian: "ru"
- Spanish: "es"
- Swedish: "sv"
Example:
Here's an example of using the TRANSLATE function in SQL:
SELECT SNOWFLAKE.CORTEX.TRANSLATE(
  'Snowflake Cortex is powerful.',
  'en',
  'fr'
);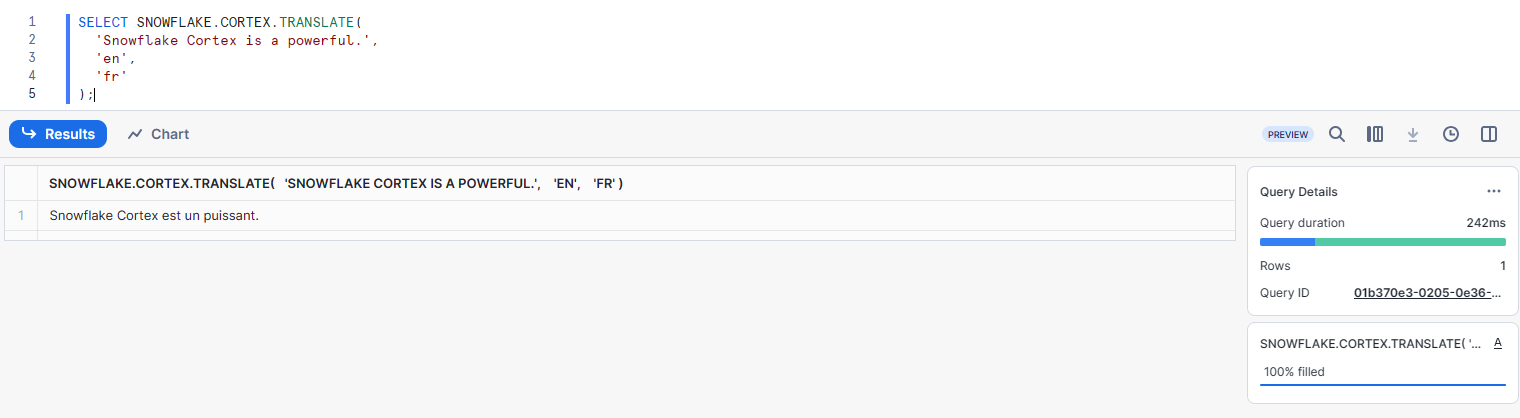
As you can see, this query will translate the provided English text to French.
If you know how to fully utilize these Snowflake Cortex LLM functions, you can unlock the full potential of your unstructured data, enabling advanced text analysis, language processing, and content generation capabilities, all within Snowflake.
Where Are Snowflake Cortex LLM Functions Available?
Snowflake Cortex LLM functions are accessible in various regions for different language models:
- AWS US East (N. Virginia): All models available.
- AWS US West (Oregon): All models available.
- AWS Europe (Frankfurt): All models available except mistral-large and mixtral-8x7b.
- Azure East US 2 (Virginia): All models available except mistral-large.
- Azure West Europe (Netherlands): All models available except mistral-large and mixtral-8x7b.
Note: EXTRACT_ANSWER, SENTIMENT, SUMMARIZE, and TRANSLATE functions are available in all listed regions.
What Are the Required Privileges and Roles for Accessing Snowflake Cortex LLM Functions?
To make sure proper access control and governance, Snowflake Cortex LLM functions require specific privileges and roles to be granted to users or roles within your Snowflake account. Let's explore the necessary steps to enable access to these powerful functions.
CORTEX_USER Role
The CORTEX_USER database role in the SNOWFLAKE database is the primary role that grants the necessary privileges to call Snowflake Cortex LLM functions.
Note: CORTEX_USER role is granted to the ACCOUNTADMIN by default
Step-By-Step Guide to Grant the Necessary Privileges and Roles
To allow users or other roles within your account to access Snowflake Cortex LLM functions, the ACCOUNTADMIN must propagate the CORTEX_USER role to the appropriate roles or users. This step is crucial for maintaining proper access control and ensuring that only authorized individuals or groups can leverage these advanced capabilities.
Here is the step-by-step guide to granting the necessary permissions:
Step 1—Use the ACCOUNTADMIN role
First, you'll need to use/switch to the ACCOUNTADMIN role, which has the highest level of privileges within your Snowflake account.
USE ROLE ACCOUNTADMIN;Step 2—Create a New Role for Cortex Access
Create a new role specifically for granting access to Snowflake Cortex LLM functions. This role can be named according to your organization's naming conventions.
CREATE ROLE cortex_user_role;Step 3—Grant CORTEX_USER to the New Role
Grant the CORTEX_USER database role to the newly created role.
GRANT DATABASE ROLE SNOWFLAKE.CORTEX_USER TO ROLE cortex_user_role;Step 4—Grant the New Role to Users
Finally, grant the newly created role (cortex_user_role) to the individual users or existing roles that require access to Snowflake Cortex LLM functions.
GRANT ROLE cortex_user_role TO USER <user>;OR
You can grant the CORTEX_USER role to existing roles within your organization, if you want to provide access to Snowflake Cortex LLM functions to an entire group of users.
GRANT DATABASE ROLE SNOWFLAKE.CORTEX_USER TO ROLE <user or group>;Follow these steps very carefully to make sure that only authorized users or roles within your Snowflake account can access and leverage the powerful capabilities of Snowflake Cortex LLM functions while maintaining proper governance and access control.
Cost Considerations and Usage Quotas for Snowflake Cortex LLM Functions
Although Snowflake Cortex LLM functions offer robust capabilities for deriving valuable insights from structured and unstructured data, it is crucial to be aware of the cost implications and usage quotas associated with these functions.
Snowflake Cortex LLM functions incur compute costs based on the number of tokens processed. A token is the smallest unit of text processed by these functions, approximately equal to four characters of text. The cost per million tokens varies depending on the specific LLM function and the model used.
Here's an overview of the cost in Snowflake credits per million tokens for each LLM function:
- COMPLETE (mistral-large): 5.10 credits
- COMPLETE (mixtral-8x7b): 0.50 credits
- COMPLETE (llama2-70b-chat): 0.45 credits
- COMPLETE (mistral-7b): 0.12 credits
- COMPLETE (gemma-7b): 0.12 credits
- EXTRACT_ANSWER: 0.08 credits
- SENTIMENT: 0.08 credits
- SUMMARIZE: 0.10 credits
- TRANSLATE: 0.33 credits
It's important to note that for functions that generate new text in the response (COMPLETE, SUMMARIZE, and TRANSLATE), both input and output tokens are counted. For functions that only extract information from the input (EXTRACT_ANSWER and SENTIMENT), only input tokens are counted.
To monitor and track the credit consumption for AI services, including Snowflake Cortex LLM functions, you can query the METERING_DAILY_HISTORY view, filtering for the “ai_services” service type.
SELECT * FROM SNOWFLAKE.ORGANIZATION_USAGE.METERING_DAILY_HISTORY WHERE service_type ILIKE '%ai_services%';Usage Quotas and Throttling
To make sure a high standard of performance and fair resource allocation for all Snowflake users, Snowflake Cortex LLM functions are subject to usage quotas. These quotas define the maximum number of tokens processed per minute (TPM) and rows processed per minute (RPM) for each function and model.
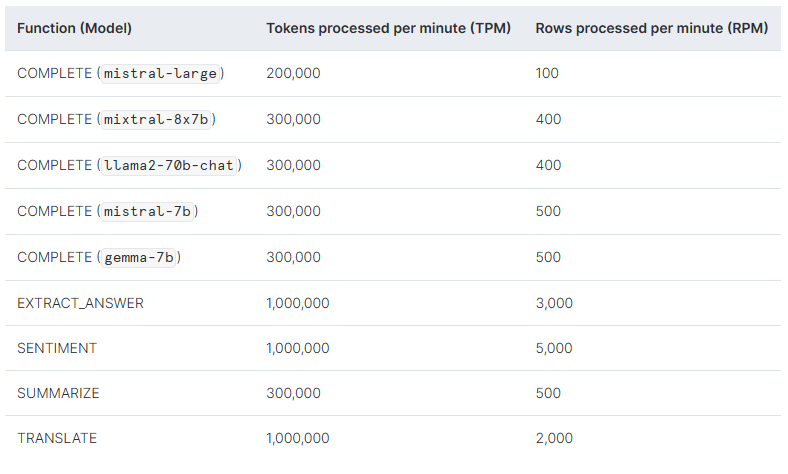
If your usage exceeds these quotas, your requests may be throttled or rejected to prevent system overload. Snowflake may adjust these quotas periodically to maintain optimal performance and resource allocation.
It's important to be aware of these usage quotas and plan your workloads accordingly, especially for high-volume or mission-critical use cases.
To manage costs and avoid potential throttling when using Snowflake Cortex LLM functions, consider the following tips:
- Select the most appropriate LLM model based on your specific use case and requirements, balancing performance and cost.
- Regularly monitor your usage of Snowflake Cortex LLM functions to identify potential cost spikes or excessive consumption patterns.
- Snowflake recommends using a warehouse size no larger than MEDIUM when calling Snowflake Cortex LLM functions.
How to Choose the Right LLM Model?
Snowflake Cortex's COMPLETE function supports multiple large language models (LLMs) with varying capabilities, latency, and cost profiles. Choosing the right model is crucial for optimizing performance, cost-effectiveness, and aligning with your specific use case. Here's an overview of the available LLM models and guidance on selecting the most suitable one.
The LLM models available in the Snowflake Cortex COMPLETE function are:
- mistral-large: Top-tier, scores well on various metrics; context window of 32,000 tokens; compute-intensive and costly.
- mixtral-8x7b: Low latency, high-quality results; supports 32,000 tokens; balances performance and cost.
- llama2-70b-chat: Suitable for complex tasks; context window of 4,096 tokens; handles significant context with moderate reasoning.
- mistral-7b: Ideal for simpler summarization and classification tasks; 32,000 token limit; suitable for document analysis and content summarization.
- gemma-7b: Well-suited for simple code and text completion tasks; 8,000 token context window; cost-effective for tasks not requiring extensive reasoning or context.
To help you decide which model to choose, the following screenshot provides information on how these models perform on various benchmarks, including reasoning, instruction following, coding, and SQL understanding:

If you're new to LLMs or not sure where to start, try the mistral-large model first. It is the most broadly capable model offered by Snowflake Cortex and will give you a good baseline for evaluating the other models' performance and capabilities.
For simple tasks or cost-sensitive use cases, consider the gemma-7b or mistral-7b models, as they offer a good balance between performance and cost-effectiveness within their respective context window limits.
If your use case requires complex reasoning, instruction following, or coding capabilities, the mixtral-8x7b or llama2-70b-chat models may be more suitable, depending on the specific requirements and context window needed.
The choice of the LLM model will depend on your specific use case, performance requirements, and budget constraints. It's recommended to evaluate multiple models and benchmark their performance on representative data to determine the most suitable option.
Step-by-Step Guide to Use Snowflake Cortex LLM Functions
Snowflake Cortex LLM functions are accessible not only through SQL but also can be leveraged in Python using the Snowpark ML library. In this step-by-step guide, we will use both SQL and Python to utilize these LLM functions, enabling you to integrate them into your data science workflows and applications.
Prerequisites:
- Snowflake account and access credentials: You'll need a Snowflake account and the corresponding access credentials (username, password, account identifier, etc.) to connect to your Snowflake instance and leverage Snowflake Cortex LLM functions.
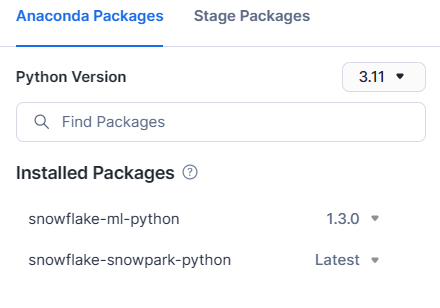
- Snowpark ML version 1.1.2 or later (For Python): Make sure that you have installed the latest version of Snowpark ML, which includes support for Snowflake Cortex LLM functions.
- Supported Region : Snowflake Cortex LLM functions are currently available in the following regions:
- AWS US East (N. Virginia)
- AWS US West (Oregon)
- AWS Europe (Frankfurt)
- Azure East US 2 (Virginia)
- Azure West Europe (Netherlands)
Make sure that your Snowflake account is provisioned in one of these supported regions to access the Snowflake Cortex LLM functions.
- Python environment setup (For Python): To use Snowflake Cortex LLM functions with Python, you'll need to set up a Python environment with the necessary dependencies installed.
- Required Privileges: To access Snowflake Cortex LLM functions, you must have the necessary privileges granted by an account administrator.
- Familiarity with Python and SQL: Basic knowledge of SQL and Python programming is required to follow the examples and integrate the LLM functions into your workflows.
Snowflake Cortex LLM Functions—using SQL
Step 1—Login to Snowflake
First, sign up or log in to your Snowflake account.
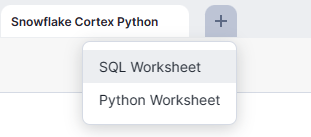
Step 2—Create a New SQL Worksheet
Open a new SQL worksheet to write and execute your code.
Step 3—Create Database and Schema
If you haven't already, create a new database and schema to work with Snowflake Cortex LLM functions.
CREATE DATABASE IF NOT EXISTS cortex_demo
CREATE SCHEMA IF NOT EXISTS cortex_schema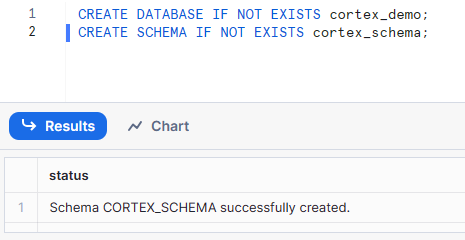
Step 4—Switch to the Desired Role
Make sure that you have the necessary privileges to access Snowflake Cortex LLM functions. This typically involves switching to a role that has been granted the CORTEX_USER database role. For example:
USE ROLE cortex_user_role;OR
USE ROLE ACCOUNTADMIN;See “What Are the Required Privileges and Roles for Accessing Snowflake Cortex LLM functions” section to grant the necessary privilege and roles.
Once you have the appropriate role activated, you can call Snowflake Cortex LLM functions directly within your SQL queries. Each function has its own syntax and parameters.
Step 5—Generate Text Using Complete Function
COMPLETE function generates text based on a given prompt or conversation. It supports multiple language models, such as llama2-70b-chat, mistral-large, and gemma-7b. You specify the model and the prompt as arguments.
SELECT SNOWFLAKE.CORTEX.COMPLETE('llama2-70b-chat', 'Write a brief introduction about Snowflake Cortex');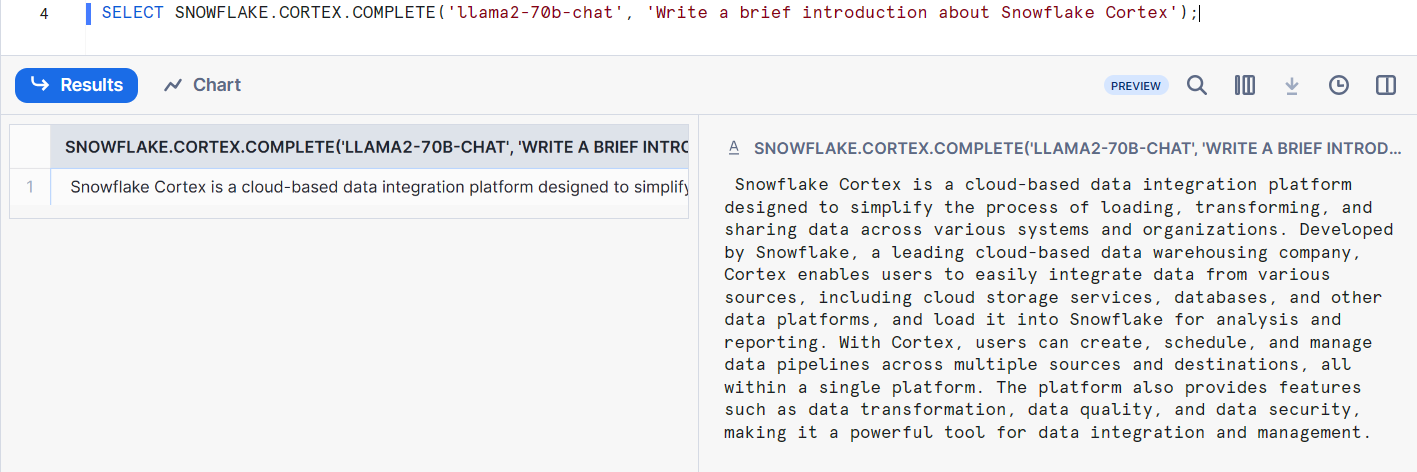
Step 6—Extract Answer Using ExtractAnswer Function
EXTRACT_ANSWER function extracts an answer to a given question from unstructured or semi-structured text data. It takes two arguments: the text to search and the question.
SELECT SNOWFLAKE.CORTEX.EXTRACT_ANSWER(
  'Snowflake Cortex is a fully managed service that brings state-of-the-art AI and ML solutions directly to your data within the Snowflake Data Cloud.',
  'What is Snowflake Cortex?'
) AS extracted_answer;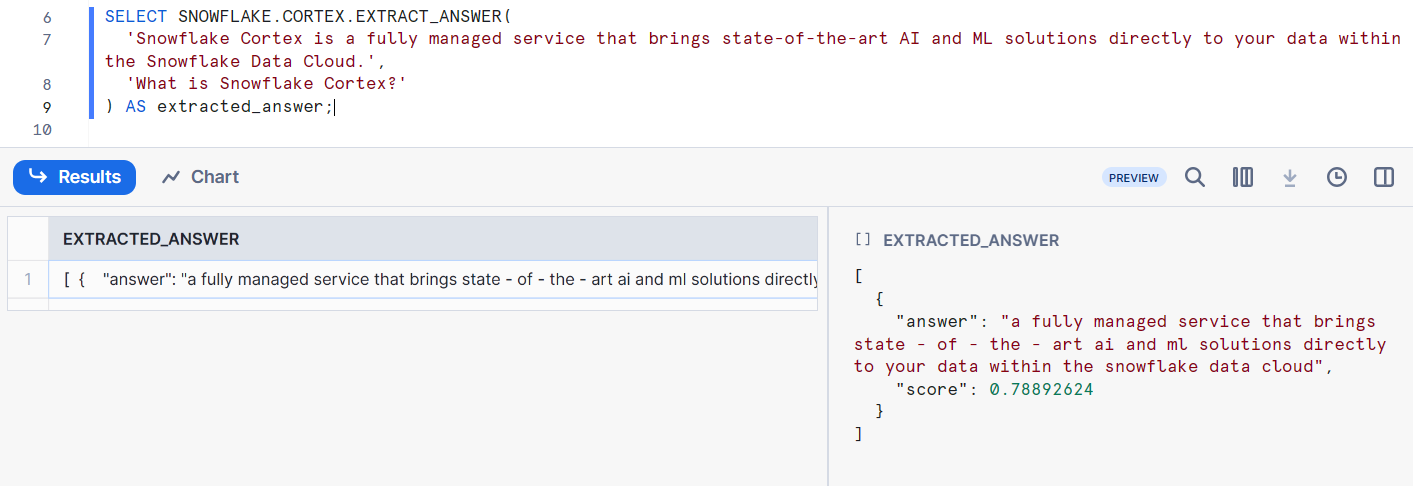
Step 7—Perform Sentiment Analysis Using Sentiment Function
SENTIMENT function analyzes the sentiment or emotional tone of English text and returns a score between -1 (negative) and 1 (positive), with 0 being neutral.
SELECT SNOWFLAKE.CORTEX.SENTIMENT('I really enjoyed this restaurant. Fantastic service!');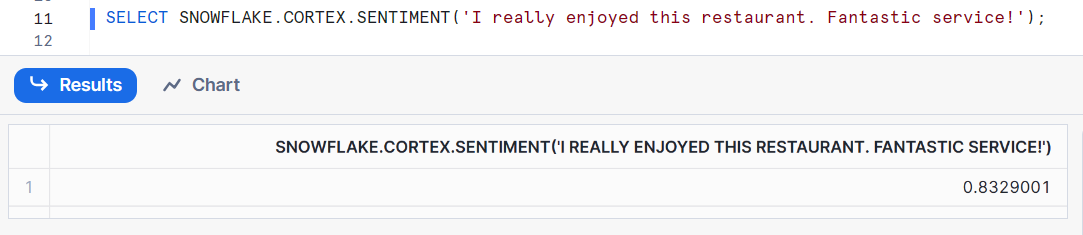
Step 8—Summarize Text Using Summarize Function
SUMMARIZE function generates a concise summary of the provided English text, capturing the key points and essential information.
SELECT SNOWFLAKE.CORTEX.SUMMARIZE(
  'Snowflake Cortex is a fully managed service that brings state-of-the-art AI and ML solutions directly to your data within the Snowflake Data Cloud. It empowers organizations to unlock the full potential of their data, whether structured or unstructured, by leveraging cutting-edge AI and ML technologies.'
) AS summary;
Step 9—Translate Text Using Translate Function
TRANSLATE function translates text from a specified source language to a target language.
SELECT SNOWFLAKE.CORTEX.TRANSLATE('Snowflake Cortex is a powerful service.', 'en', 'fr') AS translation;
Snowflake Cortex LLM Functions—using Python
Step 1—Login to Snowflake
First, sign up or log in to your Snowflake account.
Step 2—Create a New Python Worksheet
Open a new SQL worksheet to write and execute your code.

Step 3—Set up Python Environment
Before using Snowflake Cortex LLM functions with Python, you'll need to set up a Python environment with the necessary dependencies installed.
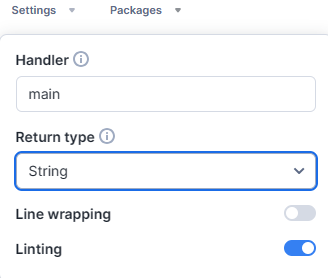
Step 4—Configure Return Type
Navigate to the settings drop-down menu in the Snowflake Python worksheet, located next to db/schema and to the left of the Packages menu. You will find an option called Handler, which you can customize to your preference. The handler is simply a function that gets called whenever the worksheet is executed. Below the Handler option, you will see a drop-down menu containing options like table, variants, and strings. Select the return type as String.
Step 5—Import Necessary Libraries
Now, let’s import snowflake.snowpark module provides the necessary functionality to interact with Snowflake's data processing engine, which allows us to create and manipulate DataFrames.
import snowflake.snowpark as snowparkTo use the Snowflake Cortex LLM Functions in your Python code, you'll need to import the required functions from the snowflake.cortex module.
from snowflake.cortex import Complete, ExtractAnswer, Sentiment, Summarize, TranslateAs you can see, this imports the Complete, ExtractAnswer, Sentiment, Summarize, and Translate functions from the snowflake.cortex module, allowing you to call them directly in your Python code.
Step 6—Define the main function
Define the main function, which takes a snowpark.Session object as an argument. This function serves as the entry point for our code. The session argument is a Snowpark session object, which establishes a connection to the Snowflake database and allows us to execute SQL queries and perform data operations within the Snowflake environment.
def main(session: snowpark.Session):
    # Your code goes here
Note that all the code that you want to execute should be inside this handler.
Step 7—Initialize Input Text
Inside the main handler, define the input text or data that you want to process using the LLM functions.
text = """
    Snowflake Cortex is a fully managed service that brings state-of-the-art AI and ML solutions directly to your data within the Snowflake Data Cloud.
    """
Step 8—Generate Text Using Complete Function
Use the Complete function to generate text based on a given prompt or conversation.
import snowflake.snowpark as snowpark
from snowflake.cortex import Complete, ExtractAnswer, Sentiment, Summarize, Translate

def main(session: snowpark.Session):
    text = """
        Snowflake Cortex is a fully managed service that brings state-of-the-art AI and ML solutions directly to your data within the Snowflake Data Cloud.
    """
    return Complete("llama2-70b-chat", "Write a brief introduction about Snowflake Cortex")
Step 9—Extract Answer Using ExtractAnswer Function
Extract relevant information from the input text using the ExtractAnswer function.
import snowflake.snowpark as snowpark
from snowflake.cortex import Complete, ExtractAnswer, Sentiment, Summarize, Translate

def main(session: snowpark.Session):
    text = """
        Snowflake Cortex is a fully managed service that brings state-of-the-art AI and ML solutions directly to your data within the Snowflake Data Cloud.
    """
    return ExtractAnswer(text, "What is Snowflake Cortex?")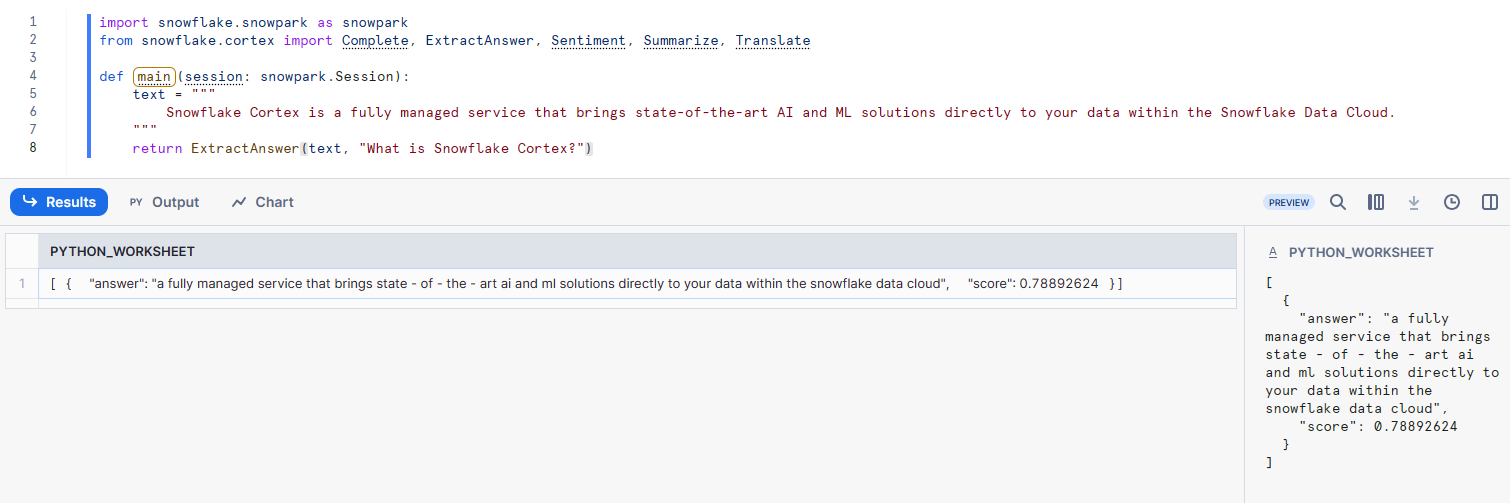
Step 10—Perform Sentiment Analysis Using Sentiment Function
Analyze the sentiment of text using the Sentiment function.
import snowflake.snowpark as snowpark
from snowflake.cortex import Complete, ExtractAnswer, Sentiment, Summarize, Translate

def main(session: snowpark.Session):
    text = """
        Snowflake Cortex is a fully managed service that brings state-of-the-art AI and ML solutions directly to your data within the Snowflake Data Cloud.
    """
    return Sentiment("I really enjoyed this restaurant. Fantastic service!")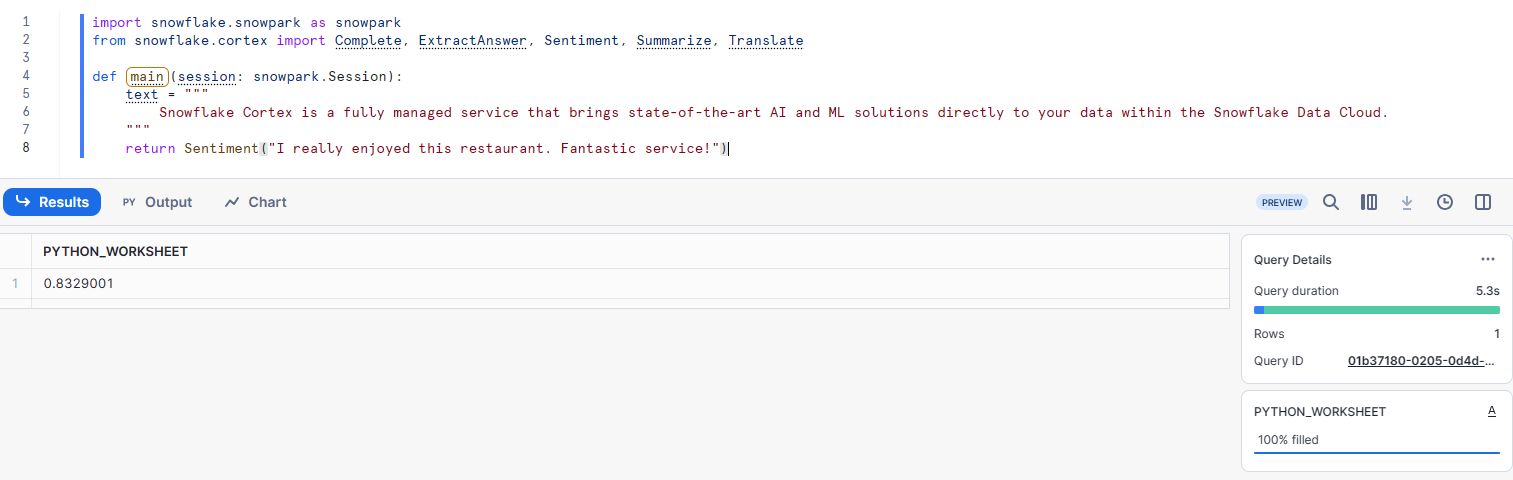
Step 11—Summarize Text Using Summarize Function
Generate a concise summary of the input text using the Summarize function.
import snowflake.snowpark as snowpark
from snowflake.cortex import Complete, ExtractAnswer, Sentiment, Summarize, Translate

def main(session: snowpark.Session):
    text = """
        Snowflake Cortex is a fully managed service that brings state-of-the-art AI and ML solutions directly to your data within the Snowflake Data Cloud.
    """
    return Summarize(text)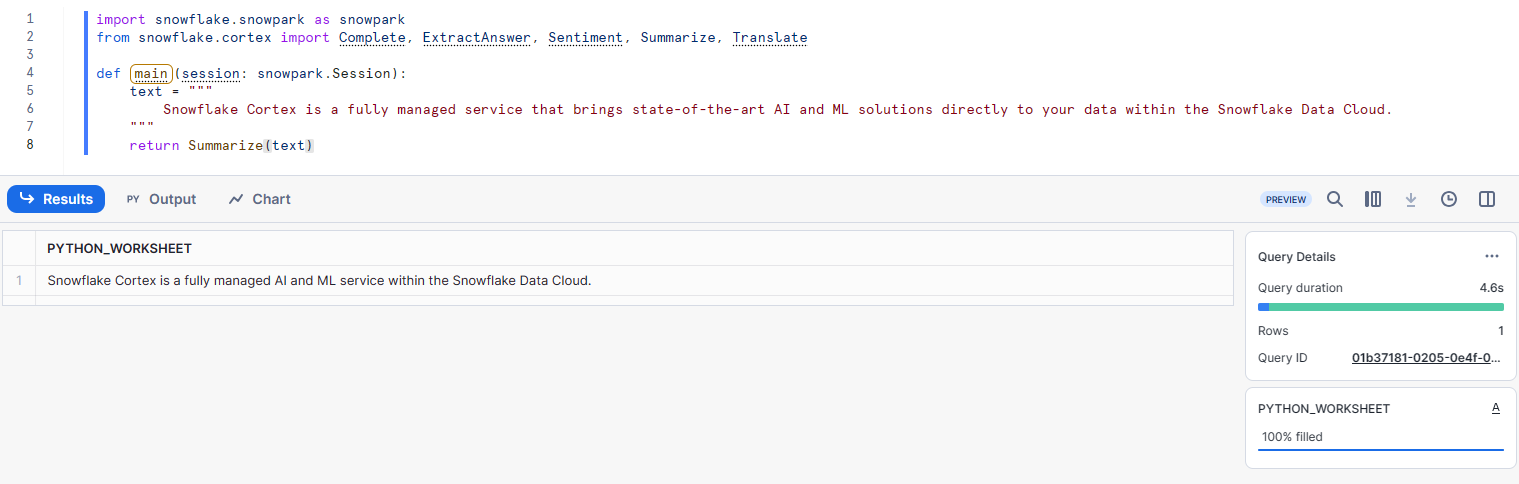
Step 12—Translate Text Using Translate Function
Translate text from one language to another using the Translate function.
import snowflake.snowpark as snowpark
from snowflake.cortex import Complete, ExtractAnswer, Sentiment, Summarize, Translate

def main(session: snowpark.Session):
    text = """
        Snowflake Cortex is a fully managed service that brings state-of-the-art AI and ML solutions directly to your data within the Snowflake Data Cloud.
    """
    return Translate(text, "en", "fr")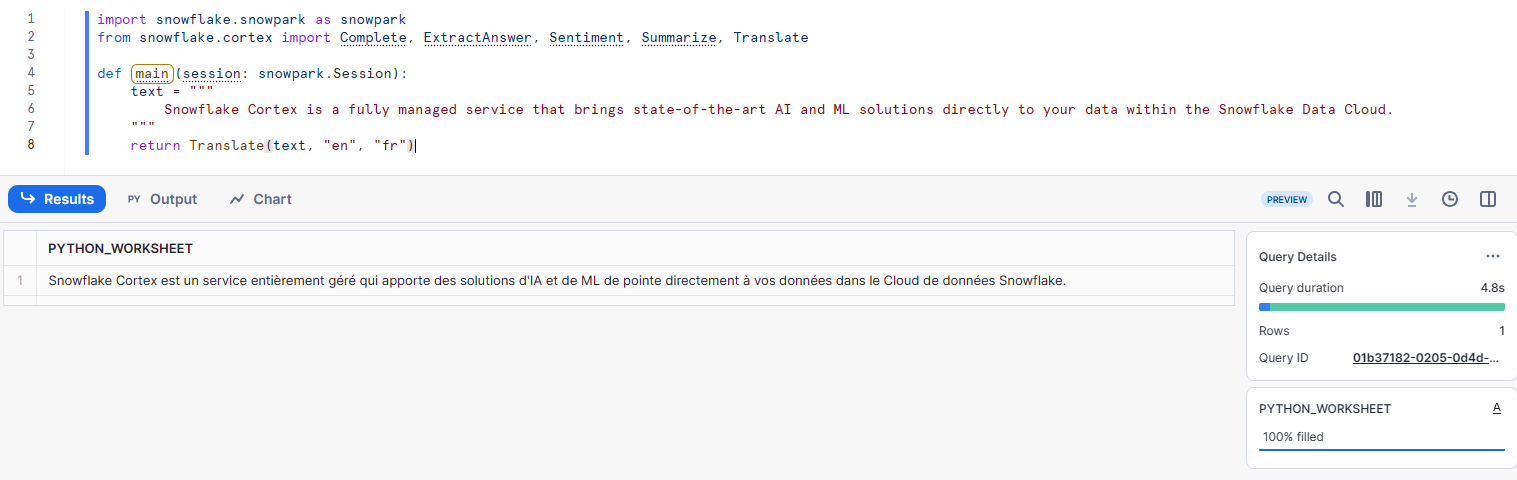
On top of calling the LLM functions on single values, you can also apply them to entire columns of a Snowflake table. This can be particularly useful when working with large datasets or integrating the LLM functions into your data pipelines.
For example, let's say you have a table named students with a column students_info containing students information. You can create a new column student_summary containing a summary of each student using the Summarize function:
from snowflake.cortex import Summarize
from snowflake.snowpark.functions import col

def main(session: snowpark.Session):
student_df = session.table("students")
student_df = article_df.withColumn(
    "students_info",
    Summarize(col("student_summary"))
)
student_df.collect()
If you integrate Snowflake Cortex LLM functions into your Python workflows, you can unlock the true power of advanced language models and apply them to a wide range of tasks, from text generation and summarization to sentiment analysis and information extraction.
Note that while this guide provides a basic overview and examples, the specific implementation details and integration strategies may vary depending on your use case and project requirements.
Check out the official Snowflake documentation for more advanced usage scenarios and best practices.
Conclusion
And that’s a wrap! Snowflake Cortex is completely changing the way we interact with data in the Snowflake by bringing the power of AI and machine learning right to your fingertips. Its Large Language Model (LLM) functions are particularly impressive, opening up a whole new realm of possibilities. With the help of these functions, you can easily analyze unstructured data, generate content, understand sentiment behind text, and even translate languages, all within a Snowflake environment.
In this article, we have covered:
- What is a snowflake cortex ?
- What are the capabilities of the snowflake cortex?
- What are snowflake cortex ML functions?
- What are the snowflake cortex LLM functions ?
- What are the required privileges and roles for accessing snowflake cortex LLM functions ?
- Cost considerations and usage quotas for snowflake cortex LLM functions
- How to choose the right LLM model ?
- Step-by-step guide to use snowflake cortex LLM functions using SQL and Python
FAQs
What is Snowflake Cortex?
Snowflake Cortex is a fully managed service that brings state-of-the-art AI and ML solutions directly to your data within the Snowflake Data Cloud.
What are the core capabilities of Snowflake Cortex?
The core capabilities of Snowflake Cortex revolve around two main areas: LLM functions and ML functions.
What are Snowflake Cortex ML Functions?
Snowflake Cortex ML functions allow users to perform various machine learning tasks directly within Snowflake using SQL commands.
What are the categories of Snowflake Cortex ML Functions?
The available Snowflake Cortex ML functions can be broadly categorized into two groups: Time-Series Functions (Forecasting, Anomaly Detection, Contribution Explorer) and Analysis Functions (Classification).
What are Snowflake Cortex LLM Functions?
Snowflake Cortex LLM (Large Language Model) Functions leverage the power of state-of-the-art language models to extract insights from unstructured and semi-structured data.
What are the different Snowflake Cortex LLM Functions?
Snowflake Cortex offers various LLM functions. They are: COMPLETE, EXTRACT_ANSWER, SENTIMENT, SUMMARIZE, and TRANSLATE.
What is the purpose of the COMPLETE function?
COMPLETE function is used for generating text based on a given prompt or conversation.
What is the purpose of the EXTRACT_ANSWER function?
EXTRACT_ANSWER function is designed to extract relevant information from unstructured or semi-structured data sources based on a provided question.
What is the purpose of the SENTIMENT function?
SENTIMENT function analyzes the sentiment or emotional tone of English text, providing a score ranging from -1 (negative) to 1 (positive).
What is the purpose of the SUMMARIZE function?
SUMMARIZE function generates a concise summary of the provided English text, capturing the key points and essential information.
What is the purpose of the TRANSLATE function?
TRANSLATE function enables multi-language processing and analysis by translating text from any supported source language to any other supported target language.
What are the required privileges and roles for accessing Snowflake Cortex LLM Functions?
To access Snowflake Cortex LLM functions, users or roles must be granted the CORTEX_USER database role in the SNOWFLAKE database.
How are Snowflake Cortex LLM Functions priced?
Snowflake Cortex LLM functions incur compute costs based on the number of tokens processed. The cost per million tokens varies depending on the specific LLM function and the model used.
Are there usage quotas for Snowflake Cortex LLM Functions?
Yes, Snowflake Cortex LLM functions are subject to usage quotas that define the maximum number of tokens processed per minute (TPM) and rows processed per minute (RPM) for each function and model.
What are the factors to consider when choosing an LLM model for Snowflake Cortex?
When choosing an LLM model, you should consider factors such as the model's capabilities, performance on various benchmarks, latency, context window, and cost.
Can Snowflake Cortex LLM Functions be used with SQL and Python?
Yes, Snowflake Cortex LLM functions can be accessed and utilized through both SQL and Python (using the Snowpark ML library).
Can Snowflake Cortex LLM Functions be applied to entire columns of a Snowflake table?
Yes, Snowflake Cortex LLM functions can be applied to entire columns of a Snowflake table, making it useful for working with large datasets or integrating the LLM Functions into data pipelines.
What are the supported regions for Snowflake Cortex LLM Functions?
Snowflake Cortex LLM functions are currently available in AWS US East (N. Virginia), AWS US West (Oregon), AWS Europe (Frankfurt), Azure East US 2 (Virginia), Azure West Europe (Netherlands).


