


Snowpipe (a serverless data ingestion service) automates loading data into Snowflake from sources like S3, Google Cloud Storage, and Azure Blob Storage. Snowpipe supports continuous, real-time, or batch loading. This eliminates manual data loading and keeps your data up-to-date.
In this article, we will explore Snowpipe capabilities and components. Through hands-on examples, you'll learn how to use Snowpipe to easily and effectively load continuous data into Snowflake. By the end, you will have a solid understanding of how to use Snowpipe to easily and effectively load continuous data into the platform.
What is Snowpipe in Snowflake?
Snowpipe is a serverless service offered by Snowflake, designed to facilitate rapid and automated data ingestion into Snowflake tables. It allows for immediate data loading from files as soon as they become available in a designated stage. This approach allows for data loading in micro-batches and providing users with access to the data in matter of minutes, eliminating the need for manual execution of COPY statements on a predetermined schedule to load larger batches.
To create a Snowpipe, users can use the "CREATE PIPE" syntax to define a database object that contains the COPY INTO command used to load the data. Once created, the Snowpipe exists within the database and can be used to load data in real-time.
Snowpipe is especially useful for frequent data ingestion scenarios like data streaming, business analysis, or IoT real-time data processing. Snowpipe does not require the specification of a warehouse, as Snowflake automatically provides the necessary resources for its execution. This serverless approach means that Snowpipe can load data quickly and efficiently without users having to manage or provision additional Snowflake compute resources. But Snowpipe still consumes credits based on ingestion volume, frequency, and processing complexity.
Snowpipe leverages file-loading metadata associated with each pipe object to optimize the loading process and eliminate redundant file loading. It provides efficient data ingestion by intelligently handling file copies made by the source team to an S3 bucket and subsequent loading into a Snowflake table within a minute. However, remember that if the same team copies another file to the same bucket, Snowpipe is designed to prevent duplicate loading of both files. This prevents redundant data while ensuring unique files are processed in subsequent runs.
The use of file-loading metadata also enables Snowpipe to resume loading data from where it left off in case of disruptions such as network failures or system errors. The metadata ensures that the data ingestion process is efficient and streamlined, reducing the need for manual intervention and improving the reliability and accuracy of data processing.
Check out this video if you want to learn more in-depth about the Snowflake Snowpipe.
Want to take Chaos Genius for a spin?
It takes less than 5 minutes.

What Are the Best Practices for Loading Data in Snowflake?
Here are the essential best practices for Snowflake Snowpipe to optimize your data loading process:
1) File Sizing Recommendations:
- Aim to produce data files that are approximately 100-250 MB (or larger) in size when compressed. This size allows for efficient parallel loading operations.
- Avoid loading huge files (e.g., 100 GB or larger), as it is not recommended due to potential delays and resource consumption.
- Aggregate smaller files to minimize processing overhead, and split larger files into smaller ones to distribute the load among compute resources.
2) Semi-structured Data Size Limitations:
- The VARIANT data type has a size limit of 16 MB per individual row.
- When working with JSON data sets, it is recommended to enable the STRIP_OUTER_ARRAY file format option when using the COPY INTO command to remove the outer array structure and load records into separate table rows.
3) Continuous Data Loading Latency:
- Snowpipe is designed to load new data within a minute after a file notification is sent. However, loading can take longer for really large files or when significant compute resources are required for processing.
- To achieve an efficient and cost-effective load experience, follow the file sizing recommendations mentioned earlier (100-250 MB or larger).
- If it takes longer than one minute to accumulate data in your source application, consider creating new (potentially smaller) data files once per minute to strike a perfect balance between cost and performance.
4) Preparing Delimited Text Files:
- Use UTF-8 as the default character set for delimited text (CSV) files. You can specify a different character set using the ENCODING file format option.
- Fields containing delimiter characters should be enclosed in quotes (single or double); if those quotes are present in the data, they must be escaped.
- Fields that contain carriage returns should also be enclosed in quotes.
- Make sure the number of columns in each row is consistent.
5) Semi-structured Data Files and Columnarization:
- Snowflake automatically extracts semi-structured data into a columnar form based on certain rules. However, there are cases where extraction may not occur.
- Elements that contain "null" values or multiple data types are not extracted into separate columns.
- To improve performance, extract semi-structured data elements containing "null" values into relational columns before loading them. Alternatively, use the STRIP_NULL_VALUES file format option to remove object or array elements with "null" values.
6) Numeric and Date/Timestamp Data Guidelines:
- Avoid embedded characters, such as commas.
- Refer to the official Snowflake documentation for supported formats of date, time, and timestamp data.
Learn more about the best practices from official Snowflake documentation
What are the differences between continuous and bulk data loading?
Bulk loading is the process of loading large amounts of data into Snowflake all at once. Bulk loading is a good option for loading large amounts of data that do not need to be available immediately.
Continuous loading is the process of loading data into Snowflake in small batches over time. This can be done using Snowpipe. Continuous loading is a good option for loading data that needs to be available as soon as it is created.
Here is a table that summarizes the main key differences between ‘em:
| Feature | Continuous | Bulk |
| Data load frequency | Continuous ( It is best for small volumes of data i.e less than 100 GB per day.) |
In batches (It is best for large volumes of data i.e. more than 100 GB per day.) |
| Data load size | Small batches | Large batches |
| Data loading time | Varies depending on the size of the data | Typically takes longer than continuous data loading |
| Data availability | Data is available as soon as it is loaded | Data is available after the entire batch has been loaded |
| Data load History | Stores the pipe's history in the pipe's metadata for 14 days. The history can be requested from a REST endpoint using ACCOUNT USAGE view or SQL table function. | Stores the load history in the target table's metadata for 64 days. |
| Compute Power | Utilizes Snowflake resources | Requires specifying the warehouse to execute the COPY command. |
| Costs | Charges are based on the compute resources used in the Snowpipe warehouse while loading data | Costs are generated based on the duration for which each virtual warehouse is operational |
| Use cases | Real-time data analysis, small to medium amounts of data | Batch data analysis, large amounts of data |
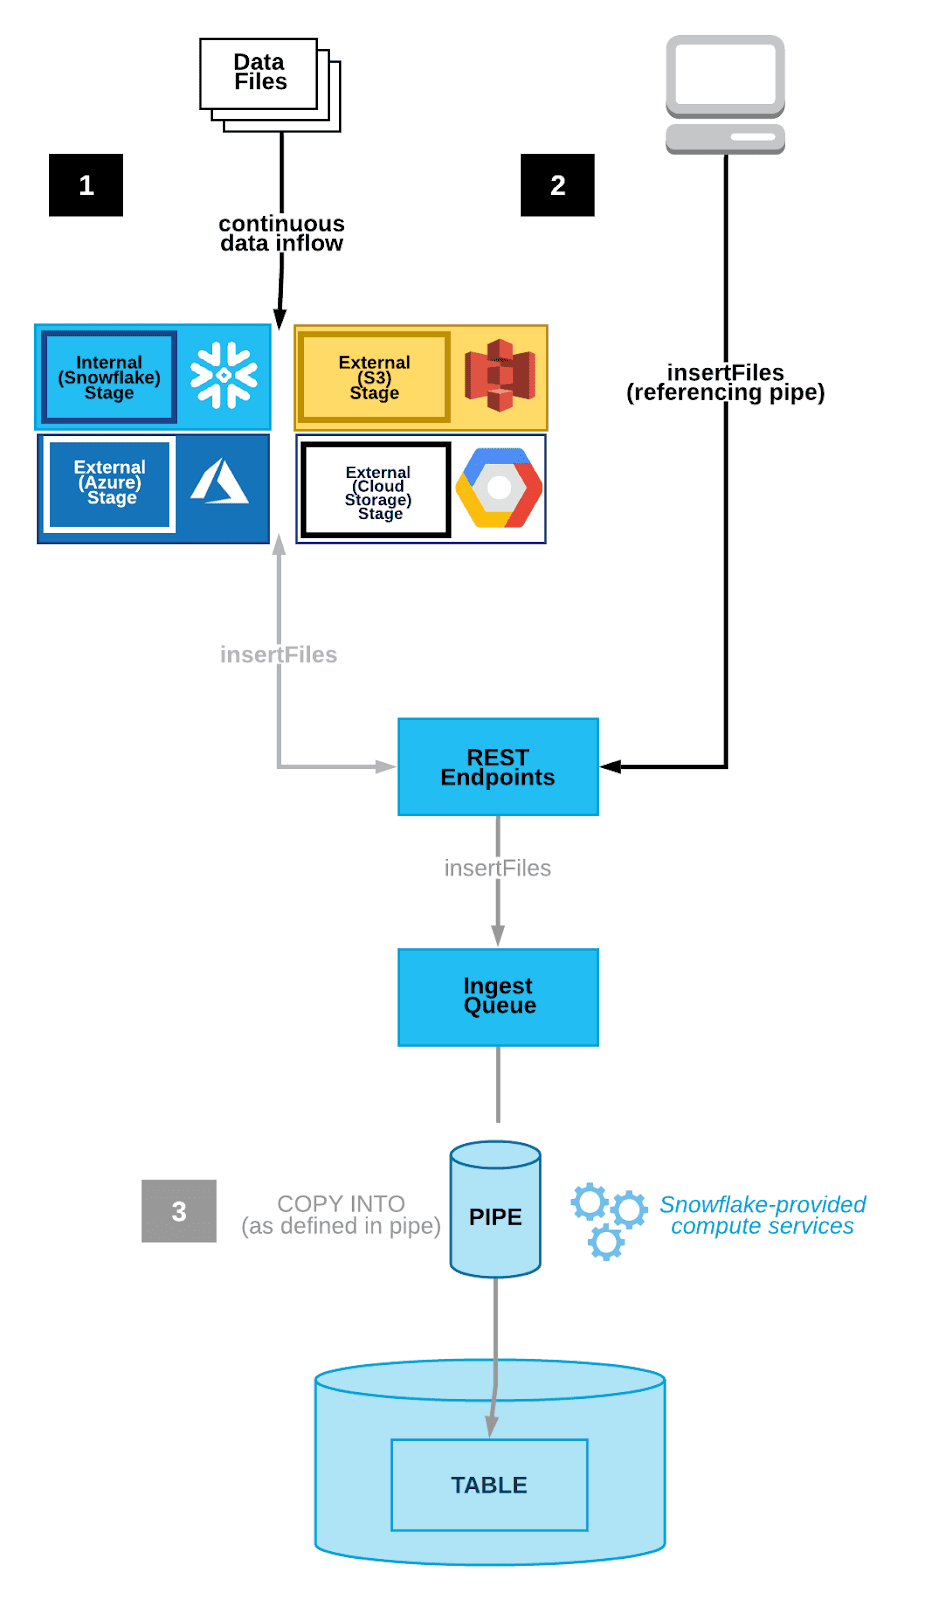
How does Snowpipe in Snowflake work?
To understand how Snowpipe works, first, we need a storage integration object to connect external cloud storage providers with Snowflake. Once this object is set up, we need to set up cloud storage notification services, which AWS, Azure, and GCP offer. In this example, we will use AWS S3 as our external cloud storage.
Whenever the user copies files to the AWS S3 bucket, the cloud storage notification service triggers a notification to the Snowflake Snowpipe object we created in our Snowflake account. This notification informs Snowpipe that a new file has been added to the S3 bucket and is ready to be loaded into the Snowflake table.
When Snowpipe receives this trigger, it extracts the data file from the AWS S3 bucket and loads it into the table. BUT, Snowpipe uses file-loading metadata associated with each pipe object to prevent loading the same files again. So, if the same file appears in the S3 bucket, Snowpipe will not reload it.
How to Create a Snowflake Snowpipe?
CREATE PIPE my_pipe
AUTO_INGEST = TRUE
AS COPY INTO my_table
FROM @my_stage
FILE_FORMAT = my_format;
In the example above, we created a new Snowpipe named my_pipe. The AUTO_INGEST parameter is set to TRUE, meaning that Snowpipe will automatically start processing files as soon as they are added to the @my_stage external stage. The COPY INTO clause specifies that the data should be copied into the my_table table, and the FILE_FORMAT parameter specifies the file format of the data being ingested
Note: There are many other options that can be specified when creating a Snowpipe, such as specifying a notification integration for handling failed ingestion events, setting a maximum file size limit, and configuring automatic schema and table creation.
Step-by-Step Guide to Create a Snowflake Snowpipe
Selecting the Data Ingestion Method
Snowflake Snowpipe is a tool used for event-based data ingestion. It offers two primary methods to trigger data loading events:
- Cloud storage notifications: This method involves receiving notifications from cloud storage services such as S3, Google Cloud Storage, and Azure Blob Storage. These notifications can be triggered when events like AWS S3 ObjectCreated occur.
- Snowpipe's REST API: This method involves directly calling the Snowpipe insertFiles REST API to trigger data loading events.
For this tutorial, we will focus on Cloud Storage Event Notifications on AWS S3.
Configure Cloud Storage Event Notifications
To trigger Snowflake Snowpipe for continuous loading, you can utilize notifications from your cloud storage infrastructure.
Follow the steps below to configure cloud storage event notifications.
Step 1: Determine the Supported Cloud Storage Platforms
Snowpipe supports the following cloud storage platforms for event notifications:
- Google Cloud Storage
- Microsoft Azure Blob Storage
- AWS S3
This tutorial will focus on using AWS S3 buckets with Snowpipe. Refer to the official Snowflake documentation to learn more in depth about connecting Snowpipe to Google Cloud Storage or Microsoft Azure Blob Storage.
Step 3: Choose AWS S3 Integration with Snowpipe
By selecting AWS S3 with Snowflake Snowpipe integration, you can use either an S3 event notification or Amazon's Simple Notification Service (SNS) to stage data for integration.
Consider the following factors before making a choice:
- Check for existing S3 event notifications: If you currently have S3 event notifications in place that may conflict with a new notification, it is recommended to opt for SNS notifications instead.
- Trigger continuous integration with S3 event notifications: If there are no conflicting S3 event notifications, you can simply choose to trigger continuous integration using S3 event notifications.
- Consider security implications: Remember that SNS network traffic travels outside Amazon's VPC. If potential security risks are a concern, you may consider utilizing AWS's PrivateLink service.
Note: Before using S3 event notifications to seamlessly load new data in micro-batches, make sure you have the necessary access requirements.
Setting up Cloud Storage Permissions
Step 1: Create IAM Policy for Snowflake's S3 Access
- Log into your AWS console and navigate to the IAM service.
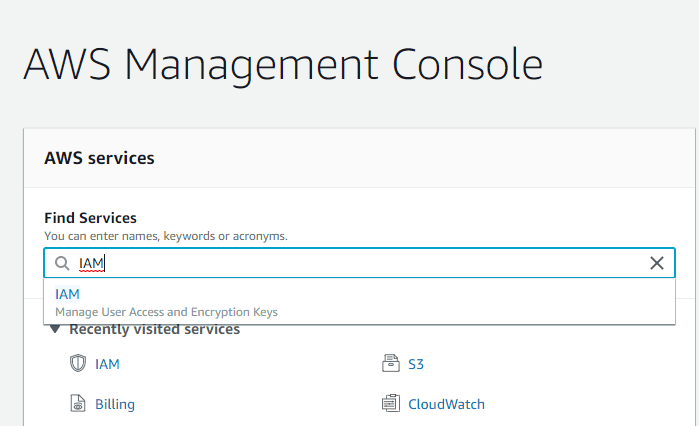
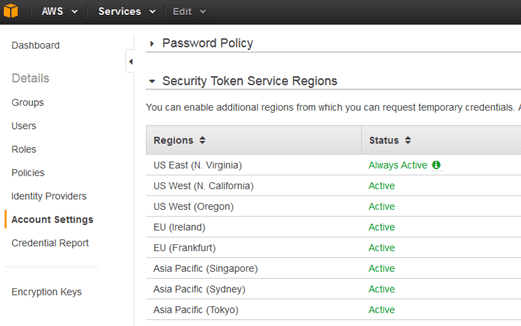
- Confirm that the Security Token Service lists your account's region as Active within the Account settings.
- Navigate to Policies and create a new IAM policy named 'snowflake_access' and paste the JSON code mentioned below.
{
    "Version": "2012-10-17",
    "Statement": [
        {
            "Effect": "Allow",
            "Action": [
                "s3:GetObject",
                "s3:GetObjectVersion"
            ],
            "Resource": "arn:aws:s3:::<bucket>/<prefix>/*"
        },
        {
            "Effect": "Allow",
            "Action": "s3:ListBucket",
            "Resource": "arn:aws:s3:::<bucket>",
            "Condition": {
                "StringLike": {
                    "s3:prefix": [
                        "*"
                    ]
                }
            }
        }
    ]
}
Note: Replace the <bucket> and <prefix> placeholders with your AWS S3 bucket name and folder path prefix.
Step 2: Create a New IAM Role
- Add a new IAM role tied to the 'snowflake_access' IAM policy on the AWS IAM console.
- Configure the role with the necessary settings, including Trusted Entity, Account ID, External ID, Role Name, Role Description, and Policies.
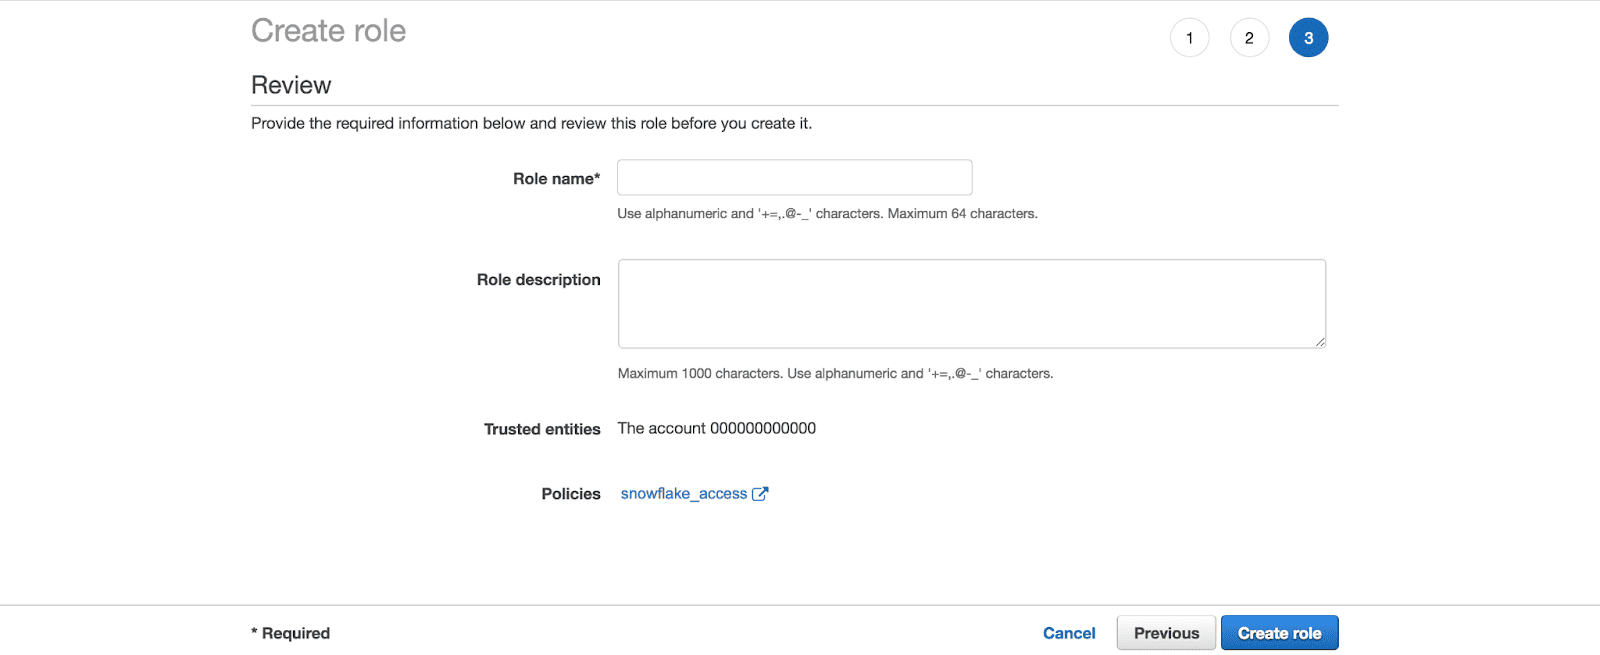
- Copy the Role ARN and keep it somewhere safe
Step 3: Integrate IAM User with Snowflake Storage
- In the Snowflake web console, execute the CREATE STORAGE INTEGRATION command on a worksheet.
CREATE OR REPLACE STORAGE INTEGRATION S3_ROLE
  TYPE = EXTERNAL_STAGE
  STORAGE_PROVIDER = S3
  ENABLED = TRUE
  STORAGE_AWS_ROLE_ARN = "arn:aws:iam::<role_account_id>:role/snowflake_role"
STORAGE_ALLOWED_LOCATIONS = ("s3://<bucket>/<path>/");Note: Replace <role_account_id>, <bucket>, and <path> with your IAM role account ID, AWS S3 bucket name, and folder path prefix.
- Confirm the successful creation of the integration.

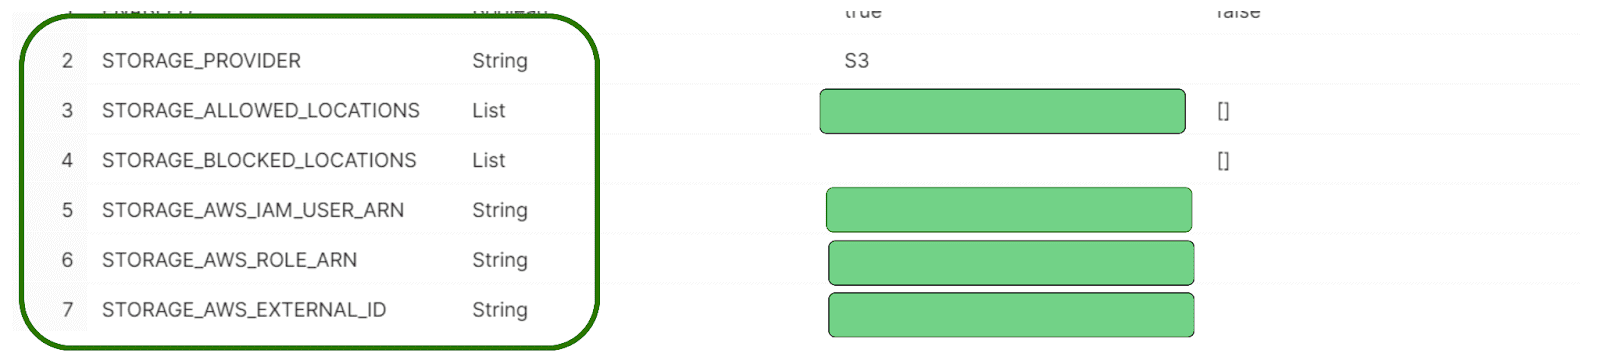
Step 4: Run Storage Integration Description Command
Run the following command to retrieve the description of your new integration.
desc integration S3_ROLE;Finally, copy the displayed values for STORAGE_AWS_IAM_USER_ARN and STORAGE_AWS_EXTERNAL_ID.
Step 5: Configure IAM User Permissions
- Return to the AWS IAM service console and access the 'snowflake_role' under Roles.
- Edit the trust relationship, replacing <STORAGE_AWS_IAM_USER_ARN> and <STORAGE_AWS_EXTERNAL_ID> with the respective values obtained in the previous step.
{
  "Version": "2012-10-17",
  "Statement": [
    {
      "Effect": "Allow",
      "Principal": {
        "AWS": "<STORAGE_AWS_IAM_USER_ARN>"
      },
      "Action": "sts:AssumeRole",
      "Condition": {
        "StringEquals": {
          "sts:ExternalId": "<STORAGE_AWS_EXTERNAL_ID>"
        }
      }
    }
  ]
}- Click and Update trust policy.
Now, let's get into the juice of the article
Creating a Snowflake Snowpipe
Step 1: Create Database, Table, Stage, and Pipe
Navigate to the Snowflake web console worksheet, and execute the following commands to create the necessary objects:
- Create Database:
create or replace database S3_integration_db;- Create Table
create or replace table S3_integration_table(files string);- Create Stage:
use schema S3_integration_db.public;
create or replace stage S3_integration_stage
  url = ('s3://<bucket>/<path>/')
storage_integration = S3_ROLE;- Create Snowpipe:
create or replace pipe S3_integration_db.public.S3_integration_pipe auto_ingest=true as
  copy into S3_integration_db.public.S3_integration_table
  from @S3_integration_db.public.S3_integration_stage;
Step 2: Configure Snowpipe User Permissions
Now, it time to create a unique role to manage Snowpipe security privileges by executing the following commands:
-- Create Role
use role securityadmin;
create or replace role S3_integration_role;

-- Grant Object Access and Insert Permission
grant usage on database S3_integration_db to role S3_integration_role;
grant usage on schema S3_integration_db.public to role S3_integration_role;
grant insert, select on S3_integration_db.public.S3_integration_table to role S3_integration_role;
grant usage on stage S3_integration_db.public.S3_integration_stage to role S3_integration_role;

-- S3_integration_db Ownership
grant ownership on pipe S3_integration_db.public.S3_integration_pipe to role S3_integration_role;

-- Grant S3_integration_role
grant role S3_integration_role to user pramit;
alter user pramit set default_role = S3_integration_role;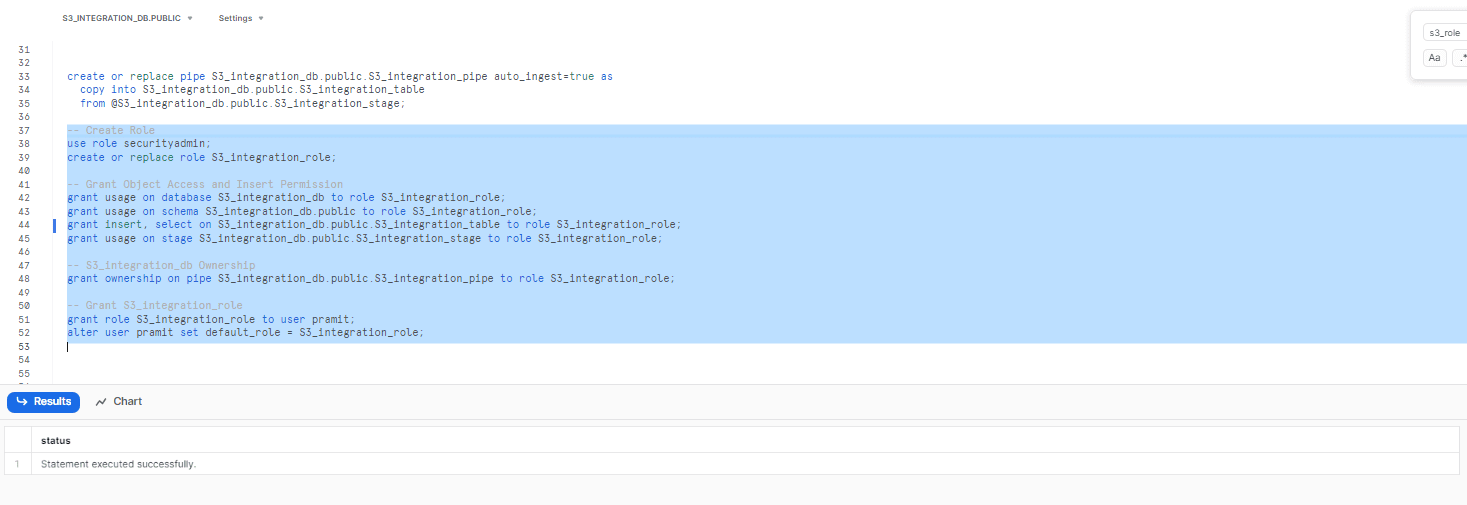
Step 3: Copy ARN for S3 Pipe
Run the following command and copy the ARN listed in the 'notification_channel' column. This ARN will be needed for configuring the S3 event notification.
show pipes;
Step 4: Configure S3 Event Notification
Finally, sign in to your AWS account, go to the S3 service console, select the bucket used for Snowpipe, and navigate to the Properties tab. There, you should be able to see the event card. In the Events card, click on 'Add notification' and configure the notification with the following values:
- Name: <whatever you prefer>
- Events: All objects create events
- Send to: SQS Queue
- SQS: Add SQS queue ARN
- SQS queue ARN: <S3_pipe_ARN> (paste the ARN copied in the previous step)
Once you complete these steps, Snowpipe's automated micro-batching will be active.
Managing and Removing Snowpipe in Snowflake
Managing Snowpipe
Pausing and resuming a Snowpipe is useful for managing data loads in Snowflake. By pausing a snowpipe, the data ingestion process is halted, allowing for changes to be made to the system, such as altering the schema or making changes to the data pipeline. Once the changes are complete, the Snowpipe can be restarted to continue the data ingestion process.
To pause a snowpipe, you can use the following SQL command:
ALTER PIPELINE <pipe_name> PIPE_EXECUTION_PAUSED = TRUE Note: Replace <pipe_name> with the name of the Snowpipe that you want to pause. Once the command is executed, the Snowpipe will be paused, and no new data will be ingested.
To resume the Snowpipe, use the following SQL command:
ALTER PIPELINE <pipe_name> PIPE_EXECUTION_PAUSED = FALSENote: Replace <pipe_name> with the name of the Snowpipe that you want to resume. Once the command is executed, the Snowpipe will resume the data ingestion process from where it was paused.
Always remember that whenever a Snowpipe is paused, any files that are in the external stage will remain in the stage until the Snowpipe is resumed. If the files are deleted from the external stage while Snowpipe is paused, they will not be ingested when Snowpipe is resumed.
To check Snowpipe Status and obtain the detailed information about the current status of the Snowpipe, use the following SQL command:
SYSTEM$PIPE_STATUSRemoving Snowpipe
To remove a Snowpipe and confirm its removal, follow these steps:
Step 1: Drop the Pipe
To delete a Snowpipe, use the DROP PIPE command with the following syntax:
drop pipe S3_integration_db.public.S3_integration_pipe;Once you execute this command it will remove the specified Snowpipe, in this case, S3_integration_db.public.S3_integration_pipe. Make sure you no longer need the Snowpipe before proceeding.
Step 2: Show Pipes
To verify that the Snowpipe has been successfully removed, you can use the SHOW PIPES command. Execute the following:
show pipes;This command will display all the pipes available in your Snowflake account.
Congratulations, you have now created a Snowflake Snowpipe!
What are the benefits of Snowpipe?
Here are some key benefits of Snowpipe:
- Data duplication prevention: Snowpipe prevents the reloading of the same files and data duplication in tables, ensuring that files with the same name are not loaded even if they are modified later.
- Serverless compute model: Snowpipe provides a pipeline for loading fresh data in micro-batches as soon as it becomes available, without the need for provisioning or managing servers. You only pay for the compute resources used for data loading.
- Single queue data loading: Snowflake creates a single queue for each pipe object, ensuring the correct sequencing of data files waiting to load and avoiding conflicts between different files.
- Support for multiple cloud storage providers: Snowpipe supports loading data from Amazon S3, Microsoft Azure, and Google Cloud Storage, giving you the flexibility to choose the cloud storage provider that best suits your needs.
- Cost-effectiveness: Snowpipe offers a cost-effective solution for continuous data loading, as you only pay for the compute resources used for loading data, eliminating the need for a dedicated infrastructure for data loading.
- Real-time insights: Using Snowpipe for continuous data loading, you can gain real-time insights into your data. Data is loaded into Snowflake as soon as it arrives in the external storage provider, allowing you to make decisions based on the latest information. This can give you a competitive advantage in your business.
- Scalability: Snowpipe is highly scalable and capable of handling large volumes of data. It can be configured to run in parallel, enabling faster data loading. This scalability makes it suitable for businesses that need to load significant amounts of data regularly.
How to monitor Snowflake Snowpipe usage?
Let's dive into the details of how to monitor your Snowpipe.
To view the credit and load history of your Snowpipe, you need to switch your role to the ACCOUNTADMIN. Once you've switched roles, you can access the data explorer panel to see the copy history, load history, and other important views.
1) Using the Snowflake Information Schema
The Snowflake Information Schema provides metadata about objects, including tables, views, and pipes. To monitor Snowpipe usage using Information Schema, you can query the PIPE_USAGE_HISTORY table function. These queries provide information about the credits consumed by Snowpipe.
To view Snowpipe usage in the Snowflake Information Schema, you can use the following query:
SELECT *
FROM INFORMATION_SCHEMA.PIPE_USAGE_HISTORY
WHERE pipe_name = 'my_pipe';
This query will return a table with the following columns:
- pipe_name: The name of the Snowpipe pipe.
- start_time: The time at which the Snowpipe pipe was started.
- end_time: The time at which the Snowpipe pipe was ended.
- credits_used: The number of credits used by the Snowpipe pipe.
- bytes_processed: The number of bytes processed by the Snowpipe pipe.
Note: This function returns pipe activity within the last 14 days.
2) Using PIPE_USAGE_HISTORY View in Account Usage
To monitor Snowpipe usage using Information Schema, you can query the PIPE_USAGE_HISTORY view. The Account Usage view provides a history of data loaded into Snowflake tables using Snowpipe within the past 365 days (1 year). This view showcases the data loading history and credits billed for the entire Snowflake account.
To view Snowpipe usage using PIPE_USAGE_HISTORY View in Account Usage, you can use the following query. The following query provides a full list of pipes and the volume of credits consumed via the service over the last 30 days, broken out by day:
SELECT TO_DATE(start_time) AS date,
  pipe_name,
  SUM(credits_used) AS credits_used
FROM snowflake.account_usage.pipe_usage_history
WHERE start_time >= DATEADD(month,-1,CURRENT_TIMESTAMP())
GROUP BY 1,2
ORDER BY 3 DESC;
Learn more in-depth about PIPE_USAGE_HISTORY View from here and here.
Note: The PIPE_USAGE_HISTORY table function allows you to query the history of data loaded into Snowflake tables using Snowpipe within a specified date range, providing information on data and credits billed for your Snowflake account. On the other hand, the PIPE_USAGE_HISTORY View, enables you to query the history of data loaded into Snowflake tables using Snowpipe within the last 365 days, displaying the data and credits billed for your Snowflake account.
3) Using Third-Party Tools like Chaos Genius to Monitor Snowpipe Usage
Monitoring and managing Snowflake Snowpipe usage can be complex. Snowflake provides some built-in capabilities for monitoring Snowpipe usage, but these tools are limited in their abilities.
Third-party tools like Chaos Genius can provide additional features and insights that can help you monitor and manage Snowpipe usage more effectively. Chaos Genius offers several features that can help you improve your Snowpipe usage, including:
Credit Consumption:
Chaos Genius provides insights into credit usage over time. It allows you to track and monitor Snowpipe credit consumption patterns, providing aggregated information by name and date, which helps you understand how credits are being spent and identify any spikes or anomalies in Snowpipe credit usage.

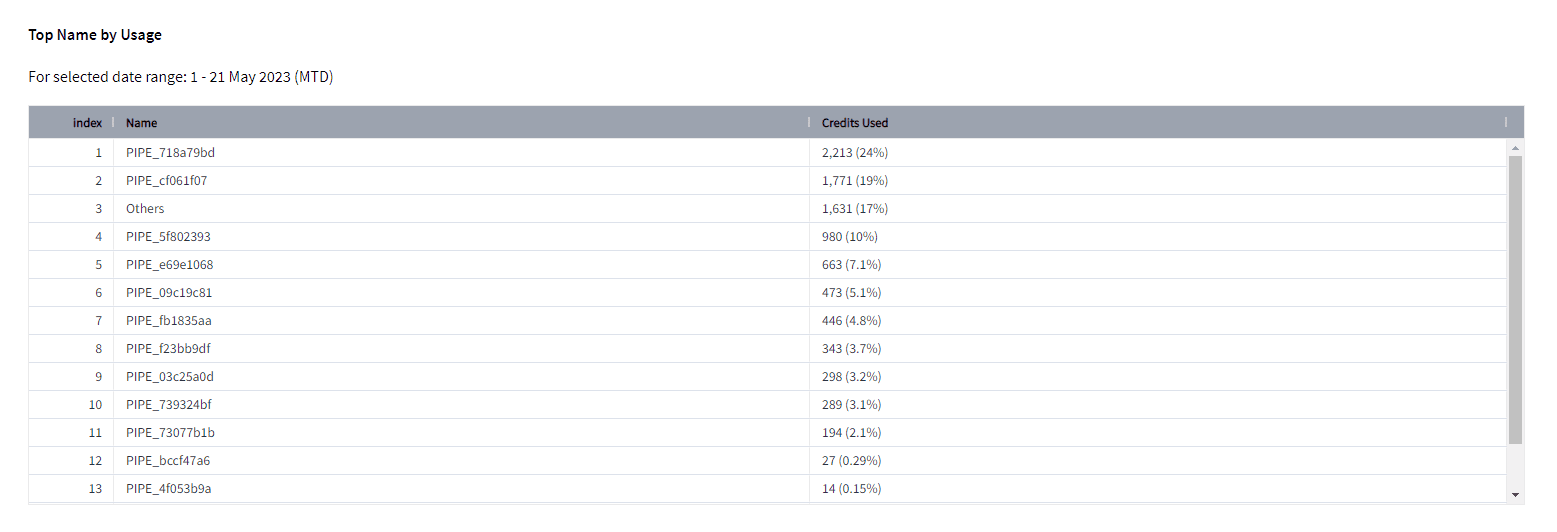
Also, you can analyze the top pipe names acc. to their usage within a selected date range, allowing you to identify which Snowpipe is consuming the most credits.
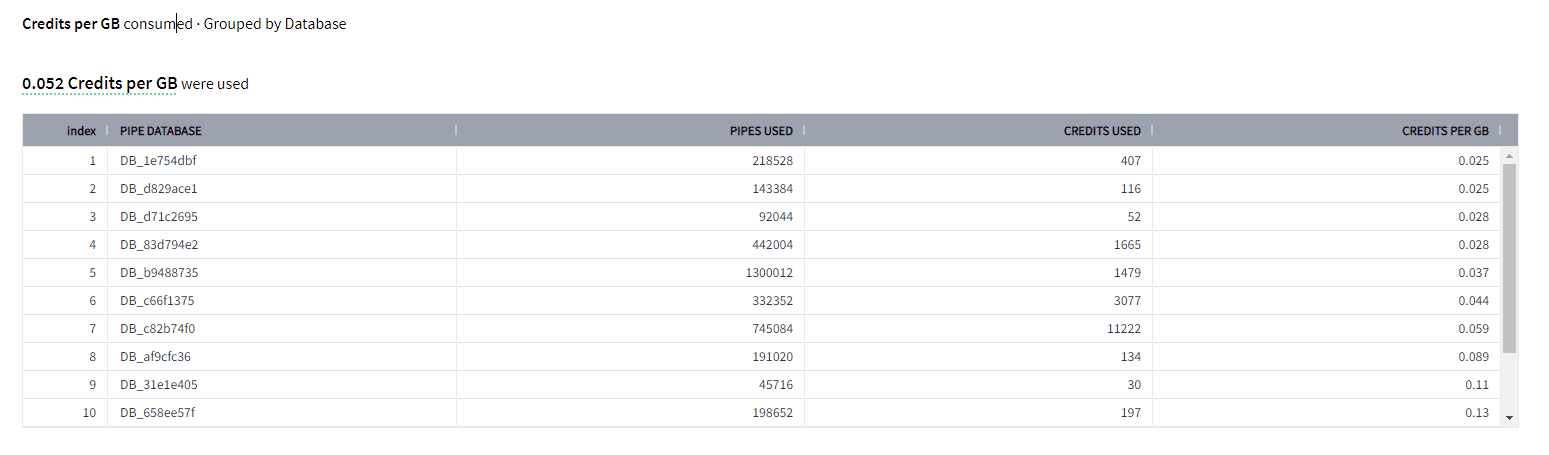
On top of that, Chaos Genius also provides metrics of credits per GB consumed, grouped by Database. This feature allows you to analyze credit consumption patterns based on the database in which the Snowpipe is operating.
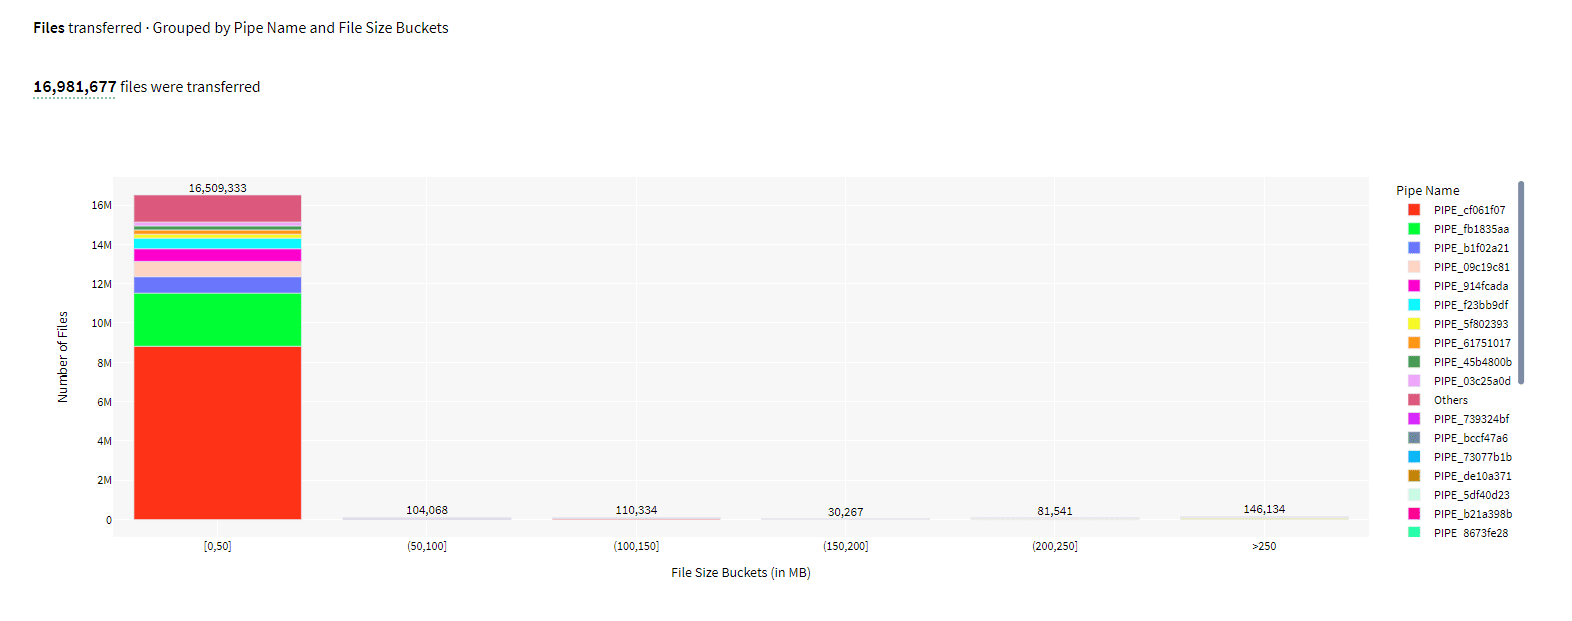
File Usage:
Chaos Genius provides detailed insights into Snowpipe file usage, including the number of files transferred, grouped by pipe name and file size buckets. This particular info can help you track the performance of your Snowpipe pipelines and identify any potential bottlenecks.
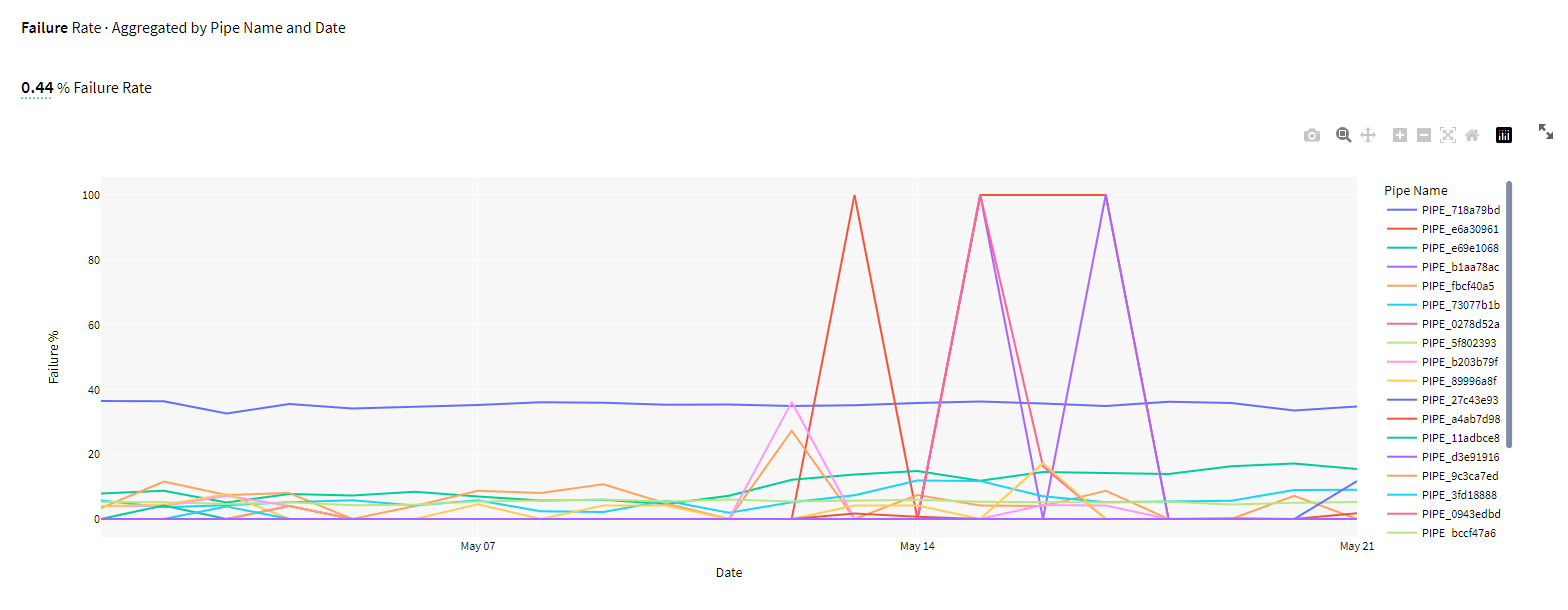
File Transfer Failures:
Snowpipe may encounter failures during the file transfer process, which can impact your data ingestion pipeline. Chaos Genius allows you to monitor and analyze these failures by providing an aggregated view of the Failure Rate, grouped by Pipe Name and Date.
Chaos Genius is a powerful tool that can help you monitor and manage Snowpipe usage more effectively. If you are looking for a tool to help you improve your Snowpipe usage, Chaos Genius is a great option.
Schedule a demo with us today and find it out by yourself !
Save up to 30% on your Snowflake spend in a few minutes!


Conclusion
Snowflake Snowpipe is a powerful tool that can help you automate data loading into Snowflake. It is a serverless service, meaning you do not need to manage any servers or infrastructure. Snowpipe can load data continuously, in real-time, or in batches. This makes it a versatile tool that can be used for various data ingestion needs. In this article, we discussed and explored Snowpipe's capabilities, its several diverse components and gave real-world examples through a hands-on guide.
Think of Snowpipe as a conveyor belt that transports data from various sources into Snowflake. It may load data continuously, in real-time, or in batches, making it a versatile tool for data ingestion.
FAQs
What are the recommended data ingestion approaches with Snowflake?
The two most widely used approaches for data ingestion with Snowflake are COPY INTO and Snowpipe.
How does Snowpipe work?
Snowpipe works by monitoring a designated data location, such as a cloud storage bucket, for new data files. Whenever a new file appears in the location, Snowpipe automatically ingests the data into Snowflake.
What is the purpose of Snowpipe in Snowflake?
The purpose of Snowpipe is to enable the automatic loading of data from files as soon as they become available in a designated stage. Snowpipe allows for loading data in micro-batches, making it rapidly available to users, without the need of any manual scheduling.
What is the recommended file size for Snowpipe, and what are the cost considerations?
Files above 10 MB in size are recommended, with the best cost-to-performance ratio observed for files in the range of 100 to 250 MB. Larger files provide higher efficiency, but it's advised not to exceed 5 GB to take advantage of parallelization and error handling capabilities. The per-file charge for Snowpipe is a small fraction of the overall cost.
Which file formats are supported for data ingestion with Snowflake?
Snowflake supports common file formats such as CSV, JSON, PARQUET, AVRO, ORC, and XML. These files can be provided compressed, and Snowflake supports various compression formats like GZIP, BZ2, BROTLI, ZSTD, SNAPPY, DEFLATE, or RAW_DEFLATE.
Can I monitor the status and the progress of data ingestion with Snowpipe?
Yes, You can use the COPY_HISTORY view to check the status of Snowpipe data ingestion. Snowpipe also provides error notifications for failed loads. For API-triggered Snowpipes, use the endpoints like insertReport and loadHistoryScan to track ingestion progress.
What sources can Snowpipe ingest data from?
Snowpipe can ingest data from various sources, includingcloud storage providers like AWS S3, GCS and Azure Blob Storage.
Is Snowpipe suitable for large-scale data ingestion?
Yes, Snowpipe is designed to handle large-scale data ingestion. It automatically scales based on the workload, which allows you to ingest large volumes of data efficiently.
What are the advantages of Snowpipe?
The main advantages of Snowpipe are:
- Automated dta loading without manual scheduling
- Serverless - No need to manage virtual warehouse
- Streaming data ingestion - Data becomes available for querying within minutes
- Deduplication - Retains file load history to prvent/avoid loading duplicates
- Scalable - Can handle very high data volumes
What are the disadvantages of Snowpipe?
Some potential downsides/disadvantages of Snowpipe are:
- Latency - Data can take few minutes to become available as it goes through staging
- Throughput limits - Extremely high concurrent loading may reduce throughput
- Cost - While it is generally cost-effecient, the cost might add up very quickly and at very high volume.
What happens when Snowpipe is re-created?
Recreating Snowpipe resets the history of loaded files, which can result in duplicated data being loaded. Be very cautious when recreating Snowpipe to avoid loading duplicates.
Does Snowpipe retain information about the loaded files?
Yes, Snowpipe uses file loading metadata to prevent the reloading of the same files, hence avoiding any kind of data duplication in a table.
Does Snowpipe require virtual warehouse?
No, Snowpipe leverages Snowflake’s serverless compute model so it does not require managing virtual warehouse.
Is it possible to create Snowpipe on an internal stage?
Yes, Snowpipe supports loading data from internal stages, which includes Snowflake named stages or table stages, but it does not support loading from user stages.


