


Snowflake is a powerful platform that can process large volumes of data and deliver insights quickly, but it can also get very expensive. This article will discuss 8 different strategies that enterprises can use to reduce Snowflake costs. By implementing these strategies, you can achieve Snowflake cost optimization while improving your Snowflake performance.
How Does Snowflake Pricing Work?
To understand the ins and outs of Snowflake cost optimization, it's important to understand how Snowflake pricing works. Snowflake pricing can be complex and hard to understand at first, which leaves many users struggling to reduce Snowflake costs.
When it comes to Snowflake costs, there are three main areas to consider: compute costs, storage costs, and data transfer costs.
Snowflake compute costs
Snowflake compute costs refer to the costs associated with using the compute resources of the virtual warehouse. A virtual warehouse is simply a cluster of compute resources, available in 10 different “T-shirt” sizes: X-Small, Small, Medium, Large, and X-Large to 6X-Large, with each tier doubling in cost and compute power. Each warehouse provides the CPU, memory, and temporary storage necessary to carry out data processing tasks. The compute costs are calculated based on the amount of time the warehouse is continually running, meaning that the longer a warehouse runs, the higher the compute costs will be.
Snowflake charges you in credits for your use of these compute resources. The credits per hour of usage doubles with Warehouse sizes. The rate of the credit depends on your billing plan with Snowflake but generally falls around $3/credit.

Snowflake Storage costs
Snowflake Storage costs are based on the average daily usage of data stored across tables, clones, and failover regions. Snowflake storage costs begin at a flat rate of $23/TB per month accrued daily. This cost may vary depending on your cloud provider/region and contract with Snowflake. Generally, Snowflake storage costs are lower than virtual warehouses (compute costs).
Snowflake Data transfer costs
Snowflake Data transfer costs are an important factor to consider whenever you are trying to reduce Snowflake costs. These costs are likely to occur when data is moved from one Snowflake region to another cloud data platform. To reduce Snowflake costs, it's crucial to monitor data transfer activity and avoid any unnecessary transfers whenever possible. These are usually the lowest part of your Snowflake bill.
Want to take Chaos Genius for a spin?
It takes less than 5 minutes.

How to reduce Snowflake costs?
1) Selecting the right Snowflake Warehouse Size
Reducing the size of the Snowflake warehouse is one of the best ways to reduce Snowflake costs. It's a common misconception that the larger the warehouse, the more efficient it becomes (in compute). This isn't always the case. In fact, reducing warehouse size can often be done without impacting performance. Of course, this isn't the optimal approach, and the only way to find out what works best for your specific situation is to experiment and dabble with it.
Each warehouse size offers a different number of nodes that a query can use to execute. If your query is small, it may not require all the available nodes, which means you'll be paying for unused resources too.
To determine the optimal warehouse size for your needs, it's important to experiment with various sizes. It's generally recommended to start with a X-small or small-sized warehouse, and then proceed to experiment with it. After some trial & error with several different sizes, you'll finally be able to identify the one that provides the best balance of cost and performance for your particular use case.
Here is one simple command to change the size of your Snowflake warehouse. You can use the following SQL query to change the warehouse size:
ALTER WAREHOUSE COMPUTE_WH
--RESUME
SET WAREHOUSE_SIZE = XSmall;
Note: "COMPUTE_WH" is the name of the virtual warehouse that you want to change the size of, and "XSmall" is the new size that you want to set it to. You can also use the RESUME command if you want to resume the warehouse after changing its size.
Therefore, it's important to monitor and adjust the warehouse size as needed to avoid paying for unused resources.
Note: An effective strategy to find the optimal warehouse size for your particular use case is to start with a X-small or Small-sized warehouse and experiment with different sizes.
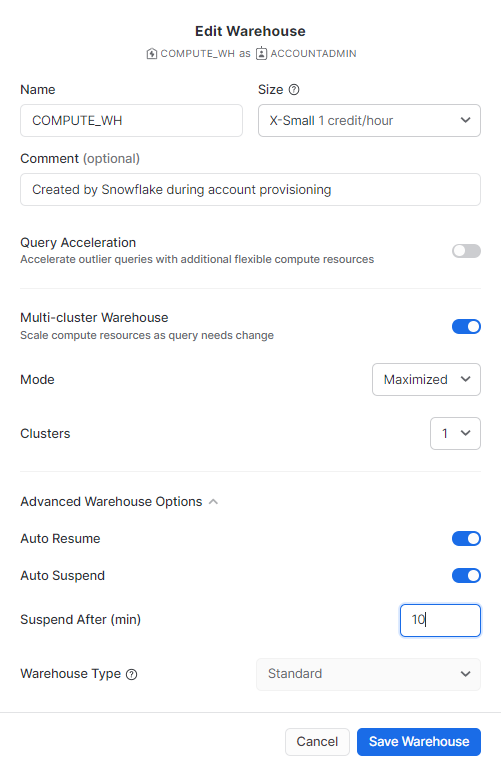
2) Reduce warehouse's auto-suspend period
Another way to reduce Snowflake costs is to reduce the auto-suspend period of data warehouses. The auto-suspend feature automatically suspends data warehouses after a period of inactivity, reducing compute charges.
This feature is enabled automatically, but the default is set to 10 mins (600 seconds). This is a very large auto-suspend window and one of the main causes of Idle compute credits being billed.
Once, you find your warehouses which are incurring low utilization and high idle credits, you should immediately investigate their auto-suspend time. Typically, it's advisable to set the limit to lowest possible ie: 60 seconds.
To reduce the warehouse auto-suspend period, head over to the Edit Warehouses tab and set a time limit to Auto Suspend.
Note: You can also turn on the auto-resume feature to resume the warehouse when it gets queried.
3) Using Materialized Views to minimize resource usage
Materialized views are precomputed views of data that can be used to minimize resource usage and improve query performance. Materialized views in Snowflake can help reduce compute costs by executing queries only against new data that has been added to a table, rather than the entire dataset. Because the query runs only on new data, it leads to a shorter run time, lesser compute costs and hence helps towards Snowflake cost optimization.
Note: Materialized views are exclusively accessible to users with an Enterprise Edition subscription.
4) Update the query timeout default value
Snowflake has a default query timeout value of 48 hours (172800 seconds), meaning that queries running longer than 48 hours will be automatically terminated. Updating the query timeout value can help reduce Snowflake costs by preventing long-running queries from consuming an excessive amount of compute resources.
Note: You can easily adjust the timeout value by updating the STATEMENT_TIMEOUT_IN_SECONDS parameter.
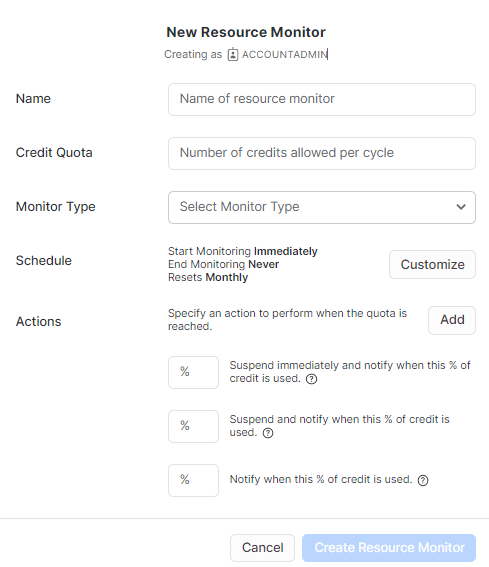
5) Using the resource monitor tool
To make sure that your Snowflake usage stays within budget, it is important to set up resource monitors. These monitors can be setup to send alerts and/or stop WH automatically when consumption levels reach predefined thresholds.
It is recommended to set the notification thresholds below your hard limit to avoid running out of capacity. These alerts can be set at an Account level (comprising all WHs) or for individual warehouses.
Note: Alternatively, you can use advanced Snowflake Observability tools like Chaos Genius, which come with augmented finops capabilities. More information in the next section.
6) Using Snowflake Observability tools
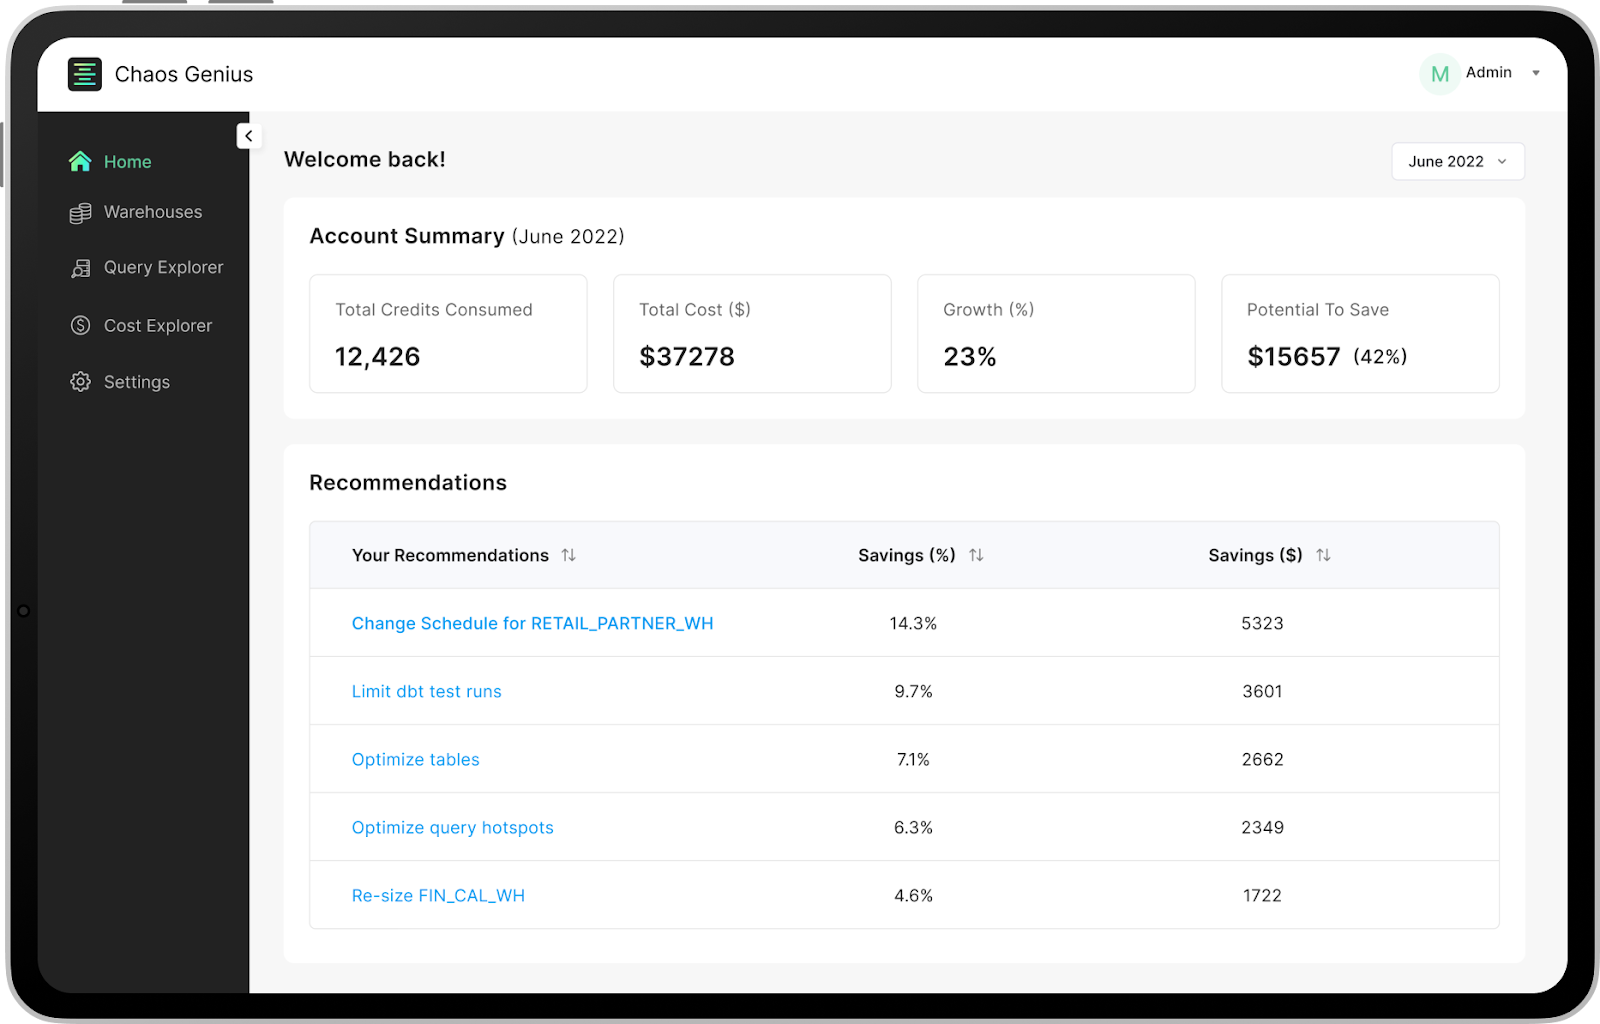
Snowflake’s Resource monitoring is an important step in reducing Snowflake costs, but it may not provide the level of detail needed to make an informed decision. That's exactly where Snowflake observability tools like Chaos Genius come into play!!
Chaos Genius offers comprehensive visibility into your Snowflake workflows, breaking down costs into meaningful insights and identifying key areas for optimizing your Snowflake usage. Chaos Genius goes deeper, breaking down costs into meaningful insights, saving you up to 10 - 30% on Snowflake data costs without hampering any performance. It also provides real-time notifications that let you know about cost anomalies as soon as they occur, allowing you to respond swiftly and effectively.
Don't miss the opportunity to reduce Snowflake costs and transform your business. Schedule a demo with us right now!
Save up to 30% on your Snowflake spend in a few minutes!


7) Snowflake query optimization
Keep in mind that querying data in Snowflake consumes a lot of credits. The little trick to achieving Snowflake cost optimization is to tweak the query code and settings for efficient operation without affecting any job performance.
Few techniques and strategies to make queries run faster are:
- Make use of Snowflake’s Query Profile tool. Query profile tools can identify problems like, Exploding joins, Queries that are too large to fit in memory and Inefficient pruning.
- Use the EXPLAIN command to identify and troubleshoot slow queries.
- Avoid using SELECT * statements and instead specify only the required columns.
- Use appropriate compression methods to reduce storage req. and speed up the query processing time.
- Partition large tables
- Use materialized views to store pre-computed results and avoid unnecessary processing time.
- Optimize design of tables and views to minimize redundant or unnecessary data.
- Use appropriate clustering keys to group similar data together and speed up query processing time.
- Frequently Monitor query performance and adjust settings such as warehouse size and cluster count as needed to optimize query performance and reduce Snowflake costs.
8) Delete unused tables in Snowflake
One of the most effective ways to achieve Snowflake cost optimization is to delete and remove data tables that are no longer in use, which can significantly help free up storage space and lower overall Snowflake costs. However, data engineers may get hesitant to delete tables due to concerns about future data requests and a lack of clarity regarding the data's significance. In some cases, data engineers may hoard data and store large amounts of unused and new information, leading to escalating Snowflake storage costs. To avoid this, it's important to clean up your tables every now and then.
Conclusion
To reduce Snowflake costs, it's important to be open to trying new approaches and experimenting with different strategies!
In this article, we've outlined 8 strategies to reduce Snowflake costs. Here's a summary of what we covered:
- Selecting the right Snowflake Warehouse Size
- Reduce warehouse's auto-suspend period
- Materialized Views to minimize resource usage
- Update the query timeout default value
- Using Resource monitor tool
- Using Snowflake Observability tools
- Snowflake query optimization
- Delete unused tables
Only way to achieve Snowflake cost optimization is to try, experiment and dabble with these strategies! Don't just settle; test out different strategies and track their performance over and over. Remember, the goal of Snowflake cost optimization is to strike the perfect balance between cost and performance.
FAQs
What influences Snowflake pricing?
Snowflake pricing includes compute costs, storage costs, and data transfer costs. Compute costs are based on the time and size of the virtual warehouse used. Storage costs are determined by the amount of data stored, and data transfer costs apply when moving data between regions.
Can I automate cost optimization in Snowflake?
Yes, cost optimization in Snowflake can be automated. You can leverage Snowflake's built-in features such as auto-suspend and auto-resume to automatically pause and resume warehouses when they're not in use. Also, you can utilize third-party tools like Chaos Genius to monitor usage and receive alerts for better cost optimization.
Can Snowflake's pricing model change?
Snowflake pricing model can evolve over time. It's important to stay informed about any updates or changes to ensure you are aware of the most cost-effective options available.
Are there any tools or services available to help in estimating Snowflake costs?
Yes, There are several tools and services available to help estimate Snowflake costs. Some notable options include Snowflake's built-in Snowflake Pricing Calculator, Cleartelligence, Ideas2it, and Godatadrive.