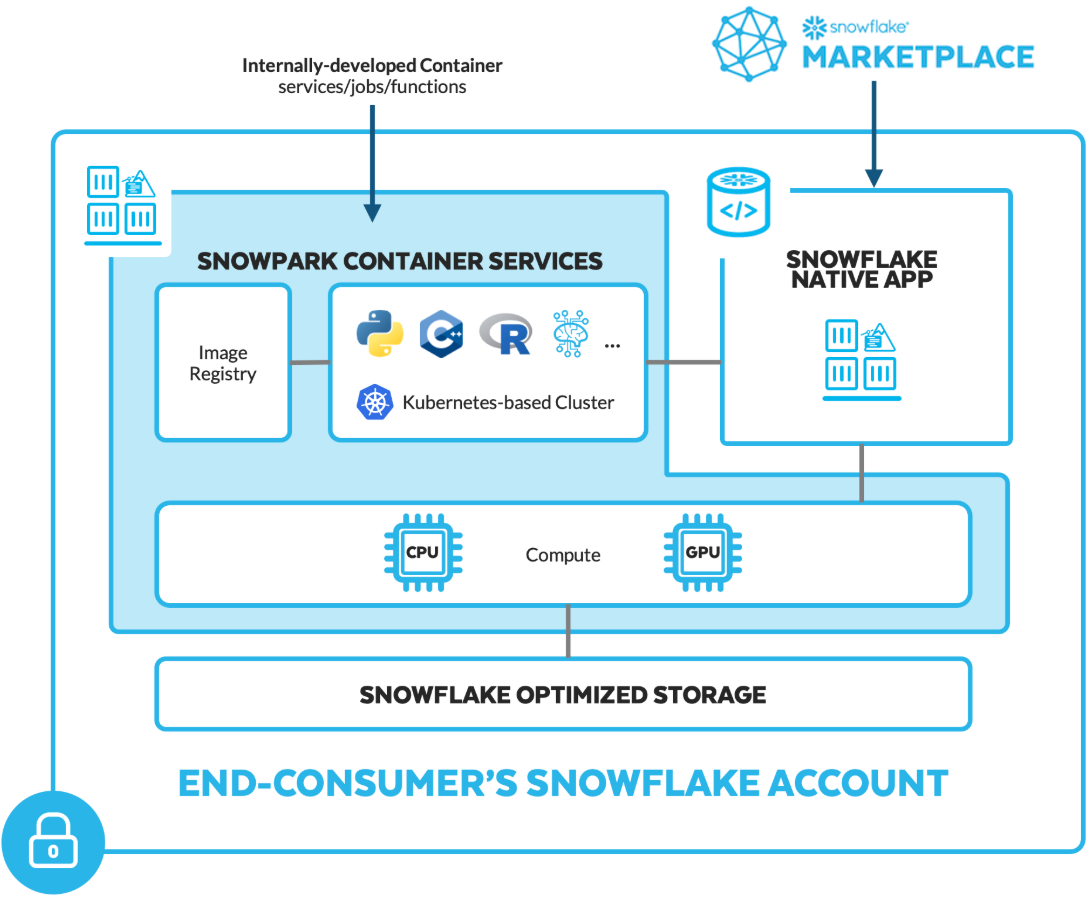
Wouldn't it be great to run containers right where your data lives, in a secure and governed space? Up until now, you've had to rely on external container platforms that typically force you to copy data out of your database and into cloud storage or other servers, adding latency and risk. Snowpark Container Services (SPCS) changes that: you bring your containers to Snowflake instead. Now you can build, run, scale, and deploy containerized applications and services all inside Snowflake, with security built in and direct access to your data. There's no need to manually shuffle data around. It's a simpler approach: instead of moving data to compute, you bring compute to the data, saving you from expensive data movement.
In this article, we'll cover everything you need to know about Snowpark Container Services, from core concepts to a hands-on setup guide. Here, you will learn how to set up Snowflake compute pools, push container images, define service specifications, and deploy your first containerized workload.
What is Snowpark Container Services?
Snowpark Container Services (SPCS) is a fully managed container service integrated into Snowflake. You push Open Container Initiative-compliant images to your account's private Open Container Initiative (OCI) image registry, then run those images as long-running services, finite Snowflake job services, or callable Snowflake service functions on Snowflake-managed compute pools.
Snowflake SPCS guarantees that data remains secure and generally does not leave Snowflake's governed environment unless explicitly configured by the user for external access; your containers have fast local access to tables, stages, and even secrets via Snowflake’s security integrations. You also benefit from Snowflake's native features, such as role-based access control (RBAC), governance, monitoring, and auto-scaling.
As of 2025, Snowpark Container Services is generally available across AWS, Microsoft Azure, and Google Cloud Platform commercial regions, with some exceptions (e.g., not available in most government regions or the Google Cloud me-central2 region). It is unavailable for trial accounts except for running notebooks. Check out Snowflake's documentation for the latest region availability.
According to Snowflake's official documentation:
Snowpark Container Services is a fully managed container offering designed to facilitate the deployment, management, and scaling of containerized applications within the Snowflake ecosystem. This service enables users to run containerized workloads directly within Snowflake, ensuring that data doesn’t need to be moved out of the Snowflake environment for processing. Unlike traditional container orchestration platforms like Docker or Kubernetes, Snowpark Container Services offers an OCI runtime execution environment specifically optimized for Snowflake. This integration allows for the seamless execution of OCI images, leveraging Snowflake’s robust data platform.
Snowpark Container Services Core Concepts Explained
🔮 Snowflake manages the container runtime, scheduling, scaling, and patching. You provide the container image and the service or job specification.
🔮 Containers can execute SQL or call Snowflake APIs to read from and write to tables and stages. Access is controlled via Snowflake roles and policies.
🔮 Each Snowflake account includes a private OCI-compliant image registry. You push images there, and Snowflake pulls them when launching services or jobs.
🔮 Snowflake Compute pools are sets of VM nodes that host your services and jobs. Pools autoscale between a minimum and maximum node count, with choices for instance families (including GPU-enabled options where supported).
🔮 Supports any programming language or framework inside the container, including GPU acceleration for AI/ML workloads.
🔮 Offers three workload models: long-running services (auto-restarting), Snowflake job services (batch or one-off tasks that run to completion), and Snowflake service functions (callable endpoints for SQL-bound computations).
Key Features and Capabilities of Snowpark Container Services
Here are all the key notable features of Snowpark Container Services:
Feature 1: Managed Container Runtime
Snowflake handles the orchestration and scaling of your containers. You don’t have to run your own Kubernetes cluster; you just tell Snowflake the compute you need (via a Snowflake compute pool), and it spins up nodes as needed.
Feature 2: Any language & libraries
You’re not limited to Snowpark Python or SQL. Use any programming language (Python, Node.js, C++, R, Java) and any Linux libraries inside your container. There’s no need to rewrite code for Snowflake; just containerize it.
Feature 3: OCI Image Registry
Snowflake provides a built-in Open Container Initiative (OCI) v2 registry. You can push/pull images using Docker CLI or SnowCLI, and Snowflake stores them (encrypted) in a stage. The registry is accessible only to your account roles.
Feature 4: Workload Types
Snowpark Container Services supports: long-running services (APIs with auto-restarts), Snowflake job services (batch tasks that exit upon completion), and Snowflake service functions (SQL-callable endpoints).
Feature 5: Snowpark Data Integration
Containers can use Snowpark and Snowflake connectors inside them. Snowflake even provides a short-lived OAuth token (/snowflake/session/token) to easily connect from inside a container back to Snowflake.
Feature 6: GPU Acceleration
Snowflake provides GPU-enabled Snowflake compute pools for AI/ML workloads, so you can train or serve large models (like LLMs) right in the platform.
Feature 7: Data Access
Containers can access Snowflake tables and stages directly. You can mount a Snowflake stage as a volume in a container (reads as regular files) or use Snowpark APIs inside the container to query data. You can even export query results directly into your app.
Feature 8: Security & Networking
Snowpark Container Services comes with built-in Snowflake security (IAM roles, private networking, secrets). Containers, by default, have no outbound Internet access; you must explicitly grant egress via Snowflake External Access Integrations. You can also mount Snowflake stages as volumes (subject to privileges).
Feature 9: Observability
You can log container output, and Snowflake can capture logs and metrics from services into event tables or system views.
Common Use Cases for Snowpark Container Services
Snowpark Container Services excels in scenarios where applications need tight integration with Snowflake data:
- Advanced Analytics and ML/AI — Run models or pipelines in-place. Deploy real-time inference services with REST endpoints or fine-tune LLMs on proprietary data using GPUs.
- Bring-Your-Own-Language — Maybe you have C++ or R code that processes data. Package it into a container and run it on Snowflake data. Even COBOL or Java/.NET jobs can run inside Snowpark Container Services.
- External Caches or DBs — If you use a specialized store (like a vector database, Redis cache, or any microservice), you can run it as a container next to your Snowflake data.
- ETL and Pipeline — Instead of extracting to an external server, write your ETL logic as a container. It can pull raw data from a stage, transform it, and load it into tables, all on Snowflake machines.
- Full-Stack Apps and Tools — You could even run tools like Metabase or Grafana in Snowpark Container Services.
- Third-Party and Partner Apps — Snowflake’s own ecosystem (Native Apps marketplace) will host containerized apps from partners on Snowpark Container Services. As an engineer, you could also deploy your company’s custom app via SPCS.
TL;DR: Snowpark Container Services suits any containerizable app that interacts with Snowflake data or benefits from co-location. If your data team wants to run Python scripts, APIs, ML models, or even web UIs without leaving the Snowflake platform, Snowpark Container Services is the right tool.
Next, we’ll deep dive into how it works under the hood.
Want to take Chaos Genius for a spin?
It takes less than 5 minutes.

Snowpark Container Services Architecture Components and Technical Design
Snowpark Container Services Architecture TL;DR: Snowpark Container Services (SPCS) runs OCI images inside Snowflake on managed compute pools. You push images to Snowflake's private OCI registry, create a compute pool with an instance family and node limits, then define services or job services via a YAML spec. Long-running services are restarted automatically. Job services run to completion. Service functions expose container endpoints as SQL-callable functions. Outbound networking is blocked by default and must be allowed via External Access Integrations or private connectivity. Secrets, caller’s rights, volumes, logging, and monitoring are built into the SPCS spec and control plane.
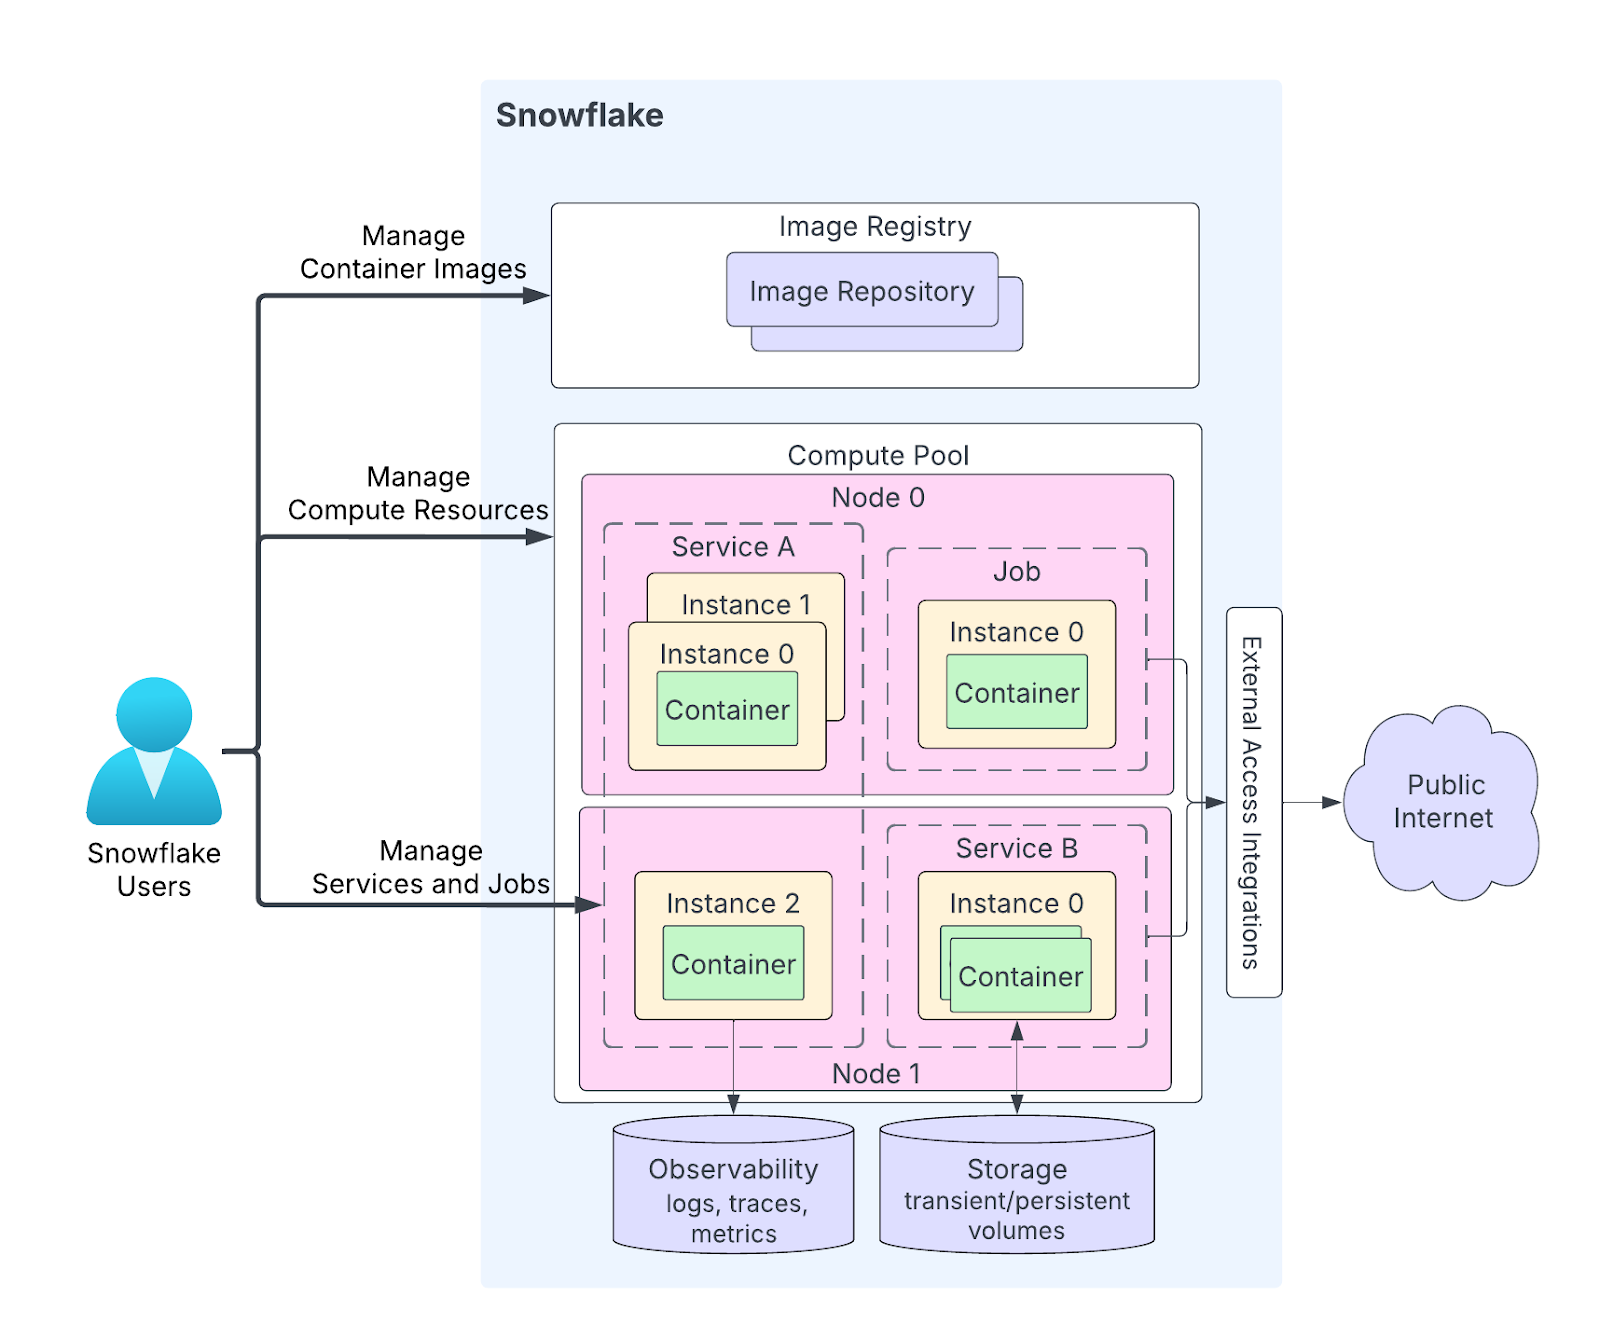
How Snowpark Container Services(SPCS) pieces fit together?
Here’s how it all works together:
🔮 Snowflake Compute Pools (the runtime hosts)
A compute pool is your container “warehouse”. It is a collection of virtual machines (nodes) that Snowflake manages for you. Whenever you create a pool, you pick an instance family (CPU_X64_S for small CPU-optimized, or a GPU family for ML), and set the minimum and maximum number of nodes. Snowflake will auto-scale the pool between those limits based on workload. If your services need more containers, Snowflake spins up additional nodes (up to your max). If they sit idle, it can remove nodes down to the minimum.
🔮 Image Registry & Repository
Each Snowflake account has a private OCI-compliant container registry. Within that registry you create image repositories (like namespaces or projects) to hold your Docker images. When you build a Docker image, you tag it with your Snowflake registry’s hostname and push it there. This registry, by default, is private to your account. Snowflake provides commands (or a Docker login mechanism) to authenticate and upload images.
🔮 Service types: Services vs Jobs vs Service Functions
Once your image is in the registry, you run it by creating a service (long-running), executing a Snowflake job service (batch) or Snowflake service functions.
Snowflake Service is like a forever running container. It might host an API or continuously process a queue. When you fire up the command CREATE SERVICE, you link it to a Snowflake compute pool and give a YAML spec for containers and endpoints. Snowflake ensures this service keeps running – if a container crashes, it restarts it.
Snowflake Job service is one and done. You run it with Snowflake EXECUTE JOB SERVICE, Snowflake spins up the containers on the specified Snowflake compute pool, they run your workload, then exit and the job is marked complete. Jobs do not auto restart. You can request parallel replicas with the REPLICAS parameter; Snowflake will coordinate the data split (via special SNOWFLAKE_JOB_INDEX env var).
Snowflake Service functions are function as a service endpoints exposed by a service. A service implements a REST POST endpoint; a SQL-level function is then defined to call that endpoint. Calls follow the external function call pattern but execute inside Snowflake’s network boundary so your data does not leave Snowflake.
TL;DR:
- Service = always on and auto restarting.
- Snowflake Job service = run to completion, optionally parallel.
- Snowflake Service function = callable, data local function exposed to SQL.
🔮 Service specification (YAML)
Both services and jobs use a YAML spec to describe the container(s) to run, any environment variables, ports, and endpoints. For a service, you often define an HTTP endpoint so external clients can call it. You might specify one container named “app” using your image, listening on port 80, and an endpoint named “http” that maps to that port. Snowflake then takes care of load-balancing requests to your containers.
🔮 Networking: ingress, egress, private connectivity
Ingress
- You can expose endpoints as public. Snowflake provides a stable ingress URL and proxy for public endpoints. Use
SHOW ENDPOINTS IN SERVICEto get theingress_url.
Egress
- Containers have no unrestricted outbound internet access. To allow controlled outbound calls, you must create an External Access Integration with explicit network rules and secrets, then reference it when creating or executing a service or function (via
EXTERNAL_ACCESS_INTEGRATIONS). This lets you whitelist hostnames and permit specific secret usage.
Inter-service traffic
- Containers running inside Snowflake communicate over Snowflake’s internal network. You can design multi-container apps and mount volumes for shared data. Different Snowflake compute pools can be used for isolation while allowing application containers to communicate as required.
🔮 Identity and Access
When a container runs, Snowflake injects temporary credentials so it can connect back to the Snowflake account using a specified role. The container runs as the “owner” role of the service (the role that created it) by default. You can also reference Snowflake secrets in your spec (using containers.secrets) to provide any credentials or API keys to the container securely.
🔮 Autoscaling and Lifecycles
After creation, a Snowflake compute pool starts at your MIN_NODES. When more containers need space, new nodes come up automatically. If containers idle away, nodes scale down (but not below MIN_NODES). You can configure the pool to suspend (free all nodes) after inactivity (AUTO_SUSPEND). A suspended pool incurs no compute cost. You can also set AUTO_RESUME so it restarts when you next run a service.
Next, we’ll go through step-by-step through setting Snowpark Container Service up from scratch.
Step-by-Step Guide to Setting Up Snowpark Container Services
Now, we will walk through the process of launching your first Snowpark Container Service. You’ll need the ACCOUNTADMIN role (or an equivalent) to set this up. Before you begin, however, make sure you have the following prerequisites:
Prerequisites
- A Snowflake account (a non-trial account in a supported AWS region). You need privileges to create Snowflake compute pools, image repositories, and services; this typically requires ACCOUNTADMIN or an equivalent role.
- Snow CLI (snow) / SnowCLI installed for convenient SPCS commands (snow spcs). SnowCLI handles packaging and provides a push login helper.
- Docker Desktop (or an OCI builder) to build images locally.
- Python 3.10 installed.
- Privileges:
CREATE COMPUTE POOLon account,CREATE IMAGE REPOSITORYon schema,CREATE SERVICE, and privileges on any database objects you’ll access. Create roles and grant privileges as needed. - Networking Plan: If containers need outbound access, plan External Access Integration rules and secrets.
Step 1—Log in to Snowflake
Start by logging into Snowflake via Snowsight or Snowflake CLI.
Check out this article to learn more about how to install and configure Snowflake CLI.
Just make sure you have the ACCOUNTADMIN role active.
Step 2—Create Core Snowflake Objects and Roles
First, make sure you switch to a role that can create objects.
USE ROLE ACCOUNTADMIN;Next, create a role called spcs_role.
CREATE ROLE spcs_role;Then, run the following SQL commands to grant all the necessary privileges for that role:
GRANT CREATE DATABASE ON ACCOUNT TO ROLE spcs_role;
GRANT CREATE WAREHOUSE ON ACCOUNT TO ROLE spcs_role;
GRANT CREATE COMPUTE POOL ON ACCOUNT TO ROLE spcs_role;
GRANT CREATE INTEGRATION ON ACCOUNT TO ROLE spcs_role;
GRANT MONITOR USAGE ON ACCOUNT TO  ROLE  spcs_role;
GRANT IMPORTED PRIVILEGES ON DATABASE snowflake TO ROLE spcs_role;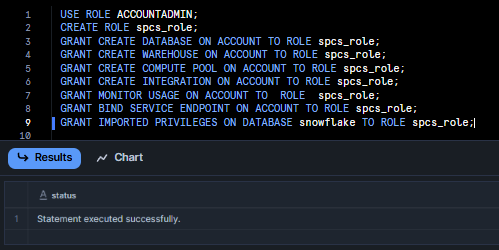
Also, do not forget to allow the role to bind service endpoints. This privilege is needed if you plan to create public endpoints for your services:
GRANT BIND SERVICE ENDPOINT ON ACCOUNT TO ROLE spcs_role;Then, grant spcs_role to ACCOUNTADMIN.
GRANT ROLE spcs_role to role ACCOUNTADMIN;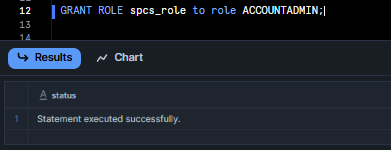
Once all that is done, create the Database, Warehouse, and Image Spec Stage.
USE ROLE spcs_role;

CREATE
OR REPLACE DATABASE spcs_demo_db;

CREATE
OR REPLACE WAREHOUSE spcs_demo_wh WAREHOUSE_SIZE = XSMALL AUTO_SUSPEND = 120 AUTO_RESUME = TRUE;

CREATE STAGE IF NOT EXISTS specs ENCRYPTION = (TYPE = 'SNOWFLAKE_SSE');

CREATE STAGE IF NOT EXISTS volumes ENCRYPTION = (TYPE = 'SNOWFLAKE_SSE') DIRECTORY = (ENABLE = TRUE);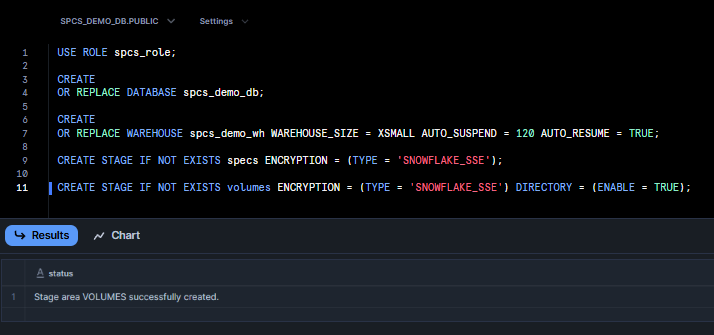
Adjust names as needed for your environment. From here on, we’ll work under spcs_role.
Step 3—Set Up Snowflake Compute Pool
Snowflake compute pool is a new Snowflake object that provides the compute resources (VMs) for containers. To create one, use CREATE COMPUTE POOL and specify the minimum and maximum nodes, plus an instance family:
USE ROLE spcs_role;

CREATE COMPUTE POOL IF NOT EXISTS spcs_compute_pool
  MIN_NODES = 1
  MAX_NODES = 3
  INSTANCE_FAMILY = 'CPU_X64_M'
  AUTO_RESUME = TRUE
AUTO_SUSPEND_SECS = 300;INSTANCE_FAMILYchooses the VM size. Here,CPU_X64_Mmeans 6 vCPUs and ~28 GiB RAM per node. You might pickCPU_X64_S(3 vCPU, 13 GiB) orCPU_X64_L(28 vCPU, 116 GiB) depending on need. For GPUs, choose families likeGPU_NV_SorGPU_NV_M(AWS with A10G GPUs).MIN_NODESis the number of nodes to start with (and the floor to scale down to).MAX_NODESis how far it can grow. Snowflake will auto-scale between them.AUTO_RESUME = TRUEtells Snowflake to automatically start the pool if you submit work when it’s suspended.AUTO_SUSPEND_SECS (optional)is how long to wait with no activity before suspending the pool (turning off all nodes to save cost). Here we set 300 seconds. When suspended, the pool has no running nodes and incurs no compute charges.
Note on Autoscaling: After you create the pool, Snowflake will start MIN_NODES nodes. As you run services, if more nodes are needed (beyond curr. capacity), Snowflake adds nodes automatically until MAX_NODES. If nodes sit idle, Snowflake removes them back down to MIN_NODES. You will be charged for the nodes that exist (in IDLE or ACTIVE state) as compute usage. Using AUTO_SUSPEND on the pool can eliminate idle charges by tearing down all nodes after inactivity.
Step 4—Set Up Image Registry (Create an Image Repository)
Next, create a Snowflake image repository in Snowflake’s registry to hold your container images. This is like a folder for Docker images within Snowflake. For example:
CREATE IMAGE REPOSITORY spcs_demo_repo;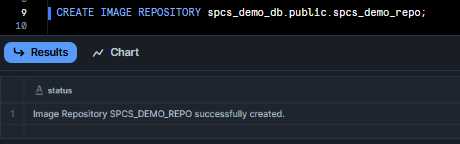
Snowflake encrypts images by default. Once the repository exists, note its URL. Each Snowflake account’s registry has a unique hostname of the form.
To view Snowflake image repository details, run the following command:
SHOW IMAGE REPOSITORIES IN SCHEMA spcs_demo_db.public;
Internally, Snowflake will create a stage to hold the image layers. You don’t need to manage the storage; Snowflake handles it. But remember: any image you push to spcs_demo_repo is stored in your Snowflake account and incurs normal Snowflake stage storage costs.
(Replace <org> and <acct> with your Snowflake organization and account name). As you can see, combined with your database, schema, and repository, your full image path will look like:
<org>-<acct>.registry.snowflakecomputing.com/spcs_demo_db/public/spcs_demo_repoStep 5—Verify Snowflake Objects
Double-check that the objects exist:
SHOW COMPUTE POOLS;        -- should list my_pool as IDLE
SHOW WAREHOUSES LIKE '%WH%';
SHOW DATABASES LIKE 'SPCS_DEMO_DB';
SHOW IMAGE REPOSITORIES;   -- should show tutorial_repo
You should see spcs_demo_db in state IDLE (no containers running yet), and your warehouse and database listed. This step is just sanity-checking your setup.
If you see errors, make sure your role has the right privileges on each object. Once these are set up, your Snowflake account is ready to accept container images and run services.
Step 6—Configure External Access (Optional)
Note that containers in Snowflake, by default, cannot connect to the public internet. This is a security feature of Snowflake’s network. If your app needs to call an external API or service (for example, fetching from S3 or calling a third-party endpoint), you must explicitly allow it via Snowflake’s External Access Integration (EAI). In short, you create network rules specifying allowed addresses and then tie them to an integration.
- Create a Network Rule to whitelist external hosts/ports.
- Create an External Access Integration (EAI) that uses those rules, and grant your role usage on it.
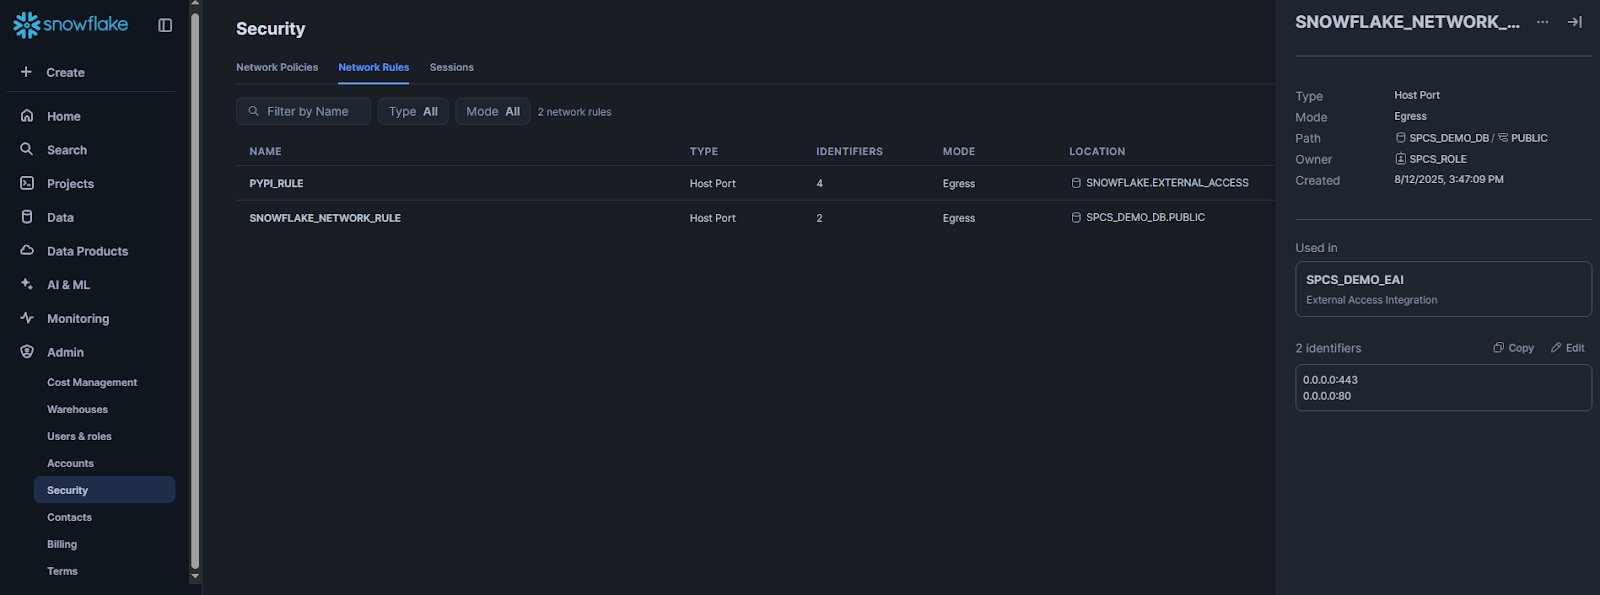
For example, to allow all outbound HTTPS and HTTP traffic, you can define broad network rules like:
CREATE OR REPLACE NETWORK RULE snowflake_network_rule
  TYPE = 'HOST_PORT'
  MODE = 'EGRESS'
  VALUE_LIST= ('0.0.0.0:443', '0.0.0.0:80');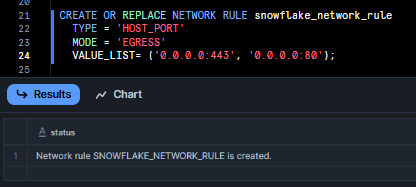
Then create an integration using that rule:
CREATE EXTERNAL ACCESS INTEGRATION spcs_demo_eai
  ALLOWED_NETWORK_RULES = (snowflake_network_rule)
  ENABLED = true;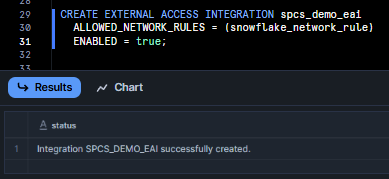
Finally, grant your role permission to use this integration:
GRANT USAGE ON INTEGRATION spcs_demo_eai TO ROLE spcs_role;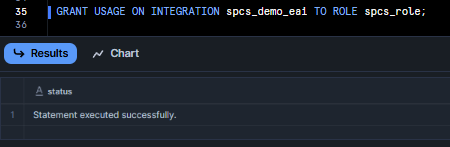
Later, when you create a service or job, you’ll reference spcs_demo_eai (in EXTERNAL_ACCESS_INTEGRATIONS=(...)) so the container can make outbound calls. In production, you would tighten VALUE_LIST to specific domains to follow least-privilege networking.
If you don’t need external calls, skip this; internal Snowflake data access will still work normally.
Step 7—Re-Verify Compute Pool and Image Repository
One more quick check: make sure to re-run SHOW COMPUTE POOLS; and SHOW IMAGE REPOSITORIES; to confirm your pool is running and registry is available. In Snowflake’s web UI (Snowsight), you can also browse the Compute > Pools page to see your pool, and the Stages.
Also, confirm which account/region you’re on:
SELECT CURRENT_ACCOUNT(), CURRENT_REGION();If you created a public endpoint (the BIND SERVICE ENDPOINT grant), check under API Endpoints to make sure your role can bind one.
Also, make sure to check the network rule by heading over to Admin > Security > Network Rules.
Step 8—Authenticate Docker to Snowflake
Now, switch over to your local machine to prepare the Docker image. First things first, open your Docker Desktop app, and also make sure your Snowflake CLI is successfully configured.
Then authenticate your Docker client to Snowflake’s registry. Snowflake CLI makes this easy:
snow spcs image-registry login 
Or, you can retrieve the login credentials and run:
docker login <org>-<acct>.registry.snowflakecomputing.com -u <username> -p <password>Once logged in, your Docker CLI can pull/push images to your Snowflake registry host.
Step 9—Build and Test a Docker Image
Prepare your application code and Dockerfile.
Let's create a simple Dockerfile for a test application. For this example, we will create a very basic Python app that echoes a simple message:
# Dockerfile
FROM python:3.9-slim
COPY hello.py /app/hello.py
ENTRYPOINT ["python", "/app/spcs_demo_app.py"]
And spcs_demo_app.py:
print("Hello from Snowpark Container Services (SPCS) !!!!")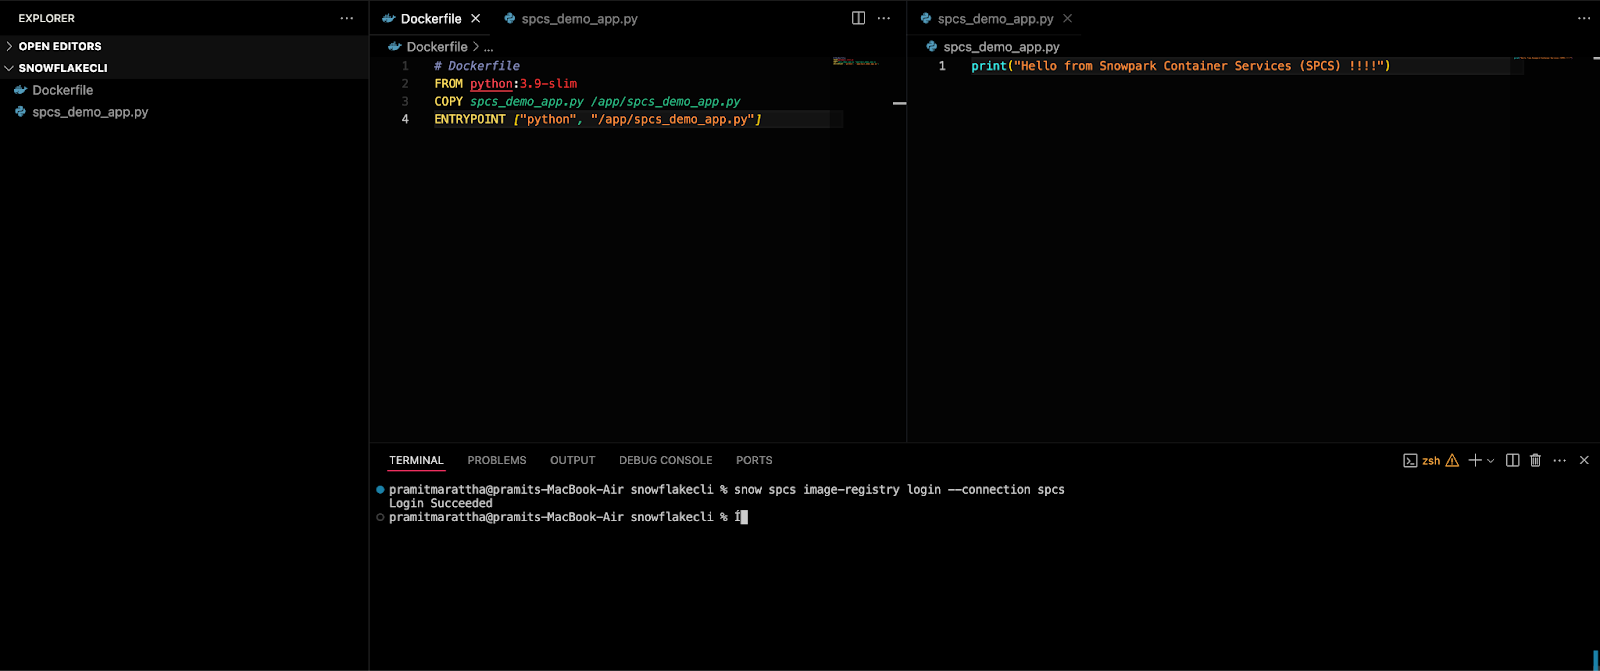
Build and run it locally:
docker build -t spcs_demo_app-app:latest .
docker run --rm spcs_demo_app-app:latest
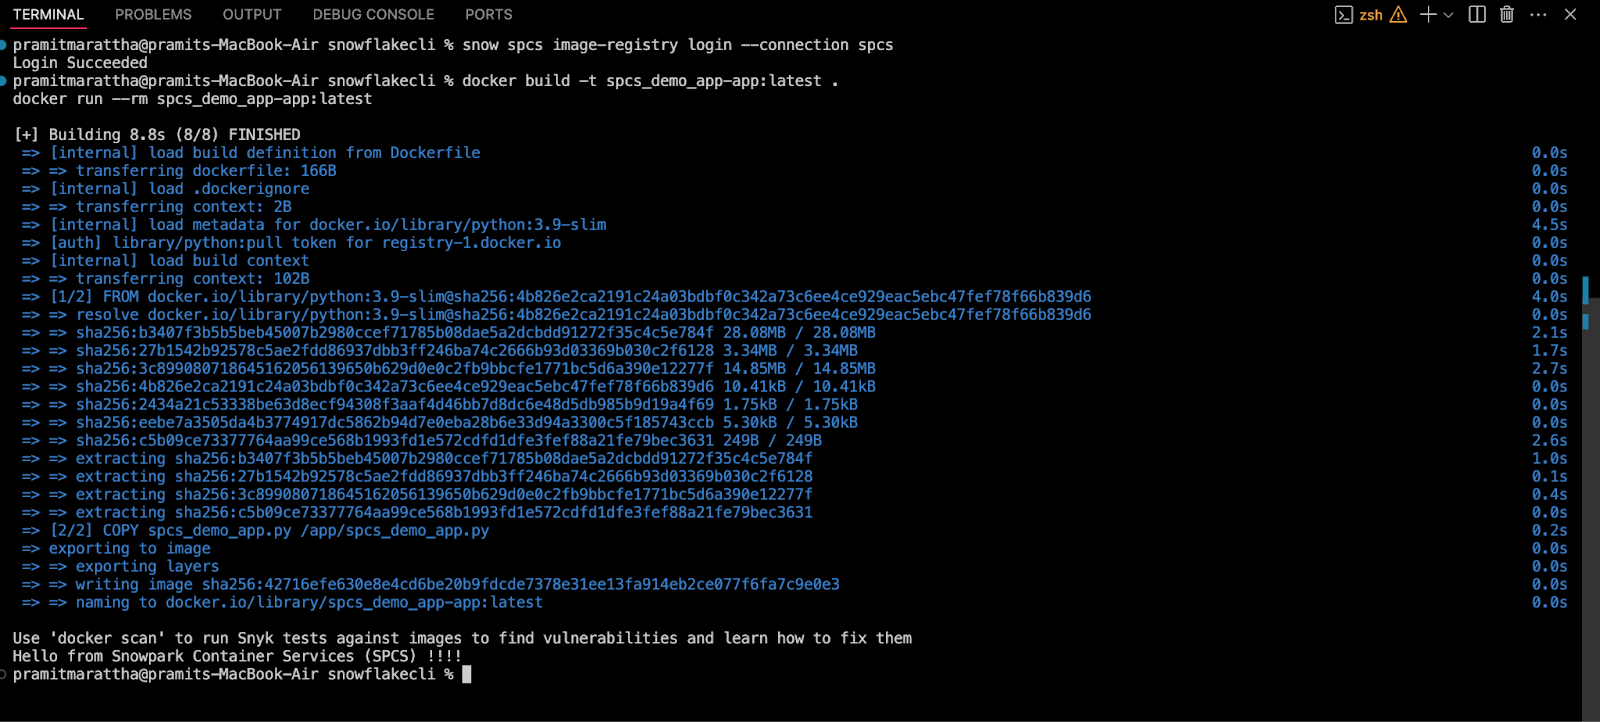
If this runs correctly, you’ve got a working container image.
Step 10—Tag and Push the Container Image
Now tag the image for the Snowflake registry and push it. Suppose your org/account is <myorg-myacct>, your database is spcs_demo_db, schema public, and repository spcs_demo_repo. Do:
docker tag spcs_demo_app-app:latest \
  <myorg-myacct>.registry.snowflakecomputing.com/spcs_demo_db/public/spcs_demo_repo/spcs_demo_app-app:latest

docker push <myorg-myacct>.registry.snowflakecomputing.com/spcs_demo_db/public/spcs_demo_repo/spcs_demo_app-app:latest
Docker will upload the image layers to Snowflake’s registry. (Behind the scenes, Snowflake stores it in a Stage).
There’s no visible “registry UI”, but you can verify from Snowflake:
SHOW IMAGES IN IMAGE REPOSITORY spcs_demo_repo;This should list your pushed image (<app>:latest) and a digest. (Keep track of the image name and tag for the next step).

Step 11—Define the Service Specification (YAML)
Now that we have image in place, let's write a service specification that tells Snowflake how to run it. In Snowpark Container Services, services are defined using YAML files. These YAML files set up all the necessary parameters and configurations required to run the containers within your Snowflake account. While these YAML files support a wide range of configurable parameters, we will only cover a subset of them here.
For our example, say we want one container (port 80) and expose it on endpoint spcs-demo-endpoint. A minimal spec might be:
spec:
  containers:
  - name: spcs
    image: <myorg-myacct>.registry.snowflakecomputing.com/spcs_demo_db/public/spcs_demo_repo/spcs_demo_app-app:latest
    ports:
      - containerPort: 80
    env:
      - name: SNOWFLAKE_WAREHOUSE
        value: spcs_demo_wh
  endpoints:
  - name: spcs-demo-endpoint
    port: 80
    public: true
Save this to a local file, service_spec.yaml. Here’s what it says:
- Under containers, we define a container named hello using our image. We list its ports so Snowflake knows it listens on port 80. We set an environment variable
SNOWFLAKE_WAREHOUSE, which in this case tells the container which Snowflake warehouse to use (Snowflake injects all the credentials automatically). - Under endpoints, we create spcs-demo-endpoint on port 80 and mark it public: true so external clients can reach it. (If you don’t need external access, omit or set public: false).
You could add a readinessProbe or commands, but for a simple container, this is enough.
For reference, check out Snowflake’s docs.
Now that the service_spec file is updated, we need to push it to our Snowflake Stage so that we can reference it next in our create service statement. We will use SnowCLI to push the YAML file.
To do so:
cd <path>

snow stage copy ./service_spec.yaml @specs --overwrite --connection spec

Now, let's verify that our YAML was pushed successfully.
USE ROLE spcs_role;
LS @spcs_demo_db.public.specs;
Step 12—Create and Run the Snowflake Service
After successfully pushing our image and spec YAML, we will have all the necessary components uploaded to Snowflake to create our service. To create the service, you need three key components: a service name, a Snowflake compute pool for the service to run on, and the spec file that defines the service. Use the following SQL to execute it:
CREATE SERVICE spcs_demo_service
  IN COMPUTE POOL spcs_compute_pool
  FROM @spcs
  SPECIFICATION_FILE = 'service_spec.yaml';
This command registers your service with the name spcs_demo_service. Snowflake pulls the image, starts one container on the Snowflake compute pool node, and exposes the spcs-demo-endpoint.
Check it with:
SHOW SERVICES
DESCRIBE SERVICE spcs_demo_service;
You should see the service in status RUNNING. If you made it public, you can invoke it from outside (Snowflake provides a DNS name or you can use CALL SYSTEM$GET_SERVICE_LOGS to find endpoints). For a quick test, use SnowSQL or Snowsight:
SELECT SYSTEM$GET_SERVICE_LOGS('spcs_demo_service');Or simply do:
SELECT spcs_demo_service.spcs_demo_app() Note that your container runs continuously. You can stop it with ALTER SERVICE spcs_demo_service STOP; if needed.
Optional: Beyond Services—Jobs and Functions (Optional)
Once you have a service running, you can also use Snowpark Container Services for batch jobs and UDF-style calls.
1) Snowflake Job Services
If, instead of a long-running service you want to run a one-time job, use Snowflake EXECUTE JOB SERVICE.
EXECUTE JOB SERVICE
  IN COMPUTE POOL spcs_compute_pool
  NAME = example_job
  FROM SPECIFICATION $$
  spec:
    containers:
    - name: worker
      image: <myorg-myacct>.registry.snowflakecomputing.com/spcs_demo_db/public/spcs_demo_repo/spcs_demo_app-app:latest
      env:
        SNOWFLAKE_WAREHOUSE: spec_demo_wh
      args:
      - "--do-something"
  $$;
This spins up the container, runs it with the given args, and waits for it to finish. Snowflake treats each Snowflake EXECUTE JOB SERVICE as a new job instance. You can add REPLICAS = N to run multiple instances in parallel. After completion, check job status with DESCRIBE SERVICE example_job; or query SPCS_GET_EVENTS().
2) Snowflake Service Functions
You can call a service from SQL by creating a UDF that points to the service’s endpoint. For example, if you have an endpoint /echo in your container, you could do:
CREATE FUNCTION my_echo_udf(text VARCHAR)
  RETURNS VARCHAR
  SERVICE = spcs_demo_service
  ENDPOINT = spcs-demo-endpoint
  AS '/echo';

SELECT my_echo_udf('Snowpark Container Services!') as response;
This makes Snowflake issue an HTTP POST to the container’s /echo path, passing "Snowpark Container Services!", and return the result into SQL. Under the hood, Snowflake streams table data to your service as JSON.
That covers the basics. You now have a working service (or job) running as a container on Snowflake.
Snowpark Container Services Cost Breakdown
Snowpark Container Services costs come from three buckets (storage, Snowflake compute pool usage, and data transfer) just like the rest of Snowflake.
Cost Categories in Snowpark Container Services
Snowflake formally divides Snowpark Container Services costs into storage, compute, and data transfer.
- Storage costs: This includes any Snowflake storage you use (tables or stages) plus optional block storage for volumes or snapshots.
- Compute pool costs: Snowpark Container Services runs your containers on compute pools – essentially clusters of VMs. You pay credits based on the number and size of those nodes. That rate depends on the instance “family” you choose (CPU vs high-memory vs GPU) and runs by the hour.
- Data transfer costs: Moving data in or out of Snowflake (ingress/egress) follows Snowflake’s standard rates. Snowflake also charges a small fee for data moving between compute in the same region (we’ll detail that).
🔮 Snowpark Container Services Compute Pool Costs
Compute pool is a cluster of one or more nodes running your containers. Each node is an instance with a fixed vCPU/memory profile. Snowflake assigns a credit rate per hour to each instance type. To get dollars per hour, multiply the credits by your Snowflake edition’s price-per-credit. On-demand credits are:
- ~$2 each in Standard US East;
- ~$3 in Enterprise;
- ~$4 in Business Critical;
Snowpark Container Services offers several instance families.
- CPU instances (X64) – general-purpose. (
XS,S,M,SL,Lsizes.) - High-Memory CPU – more RAM for each CPU (
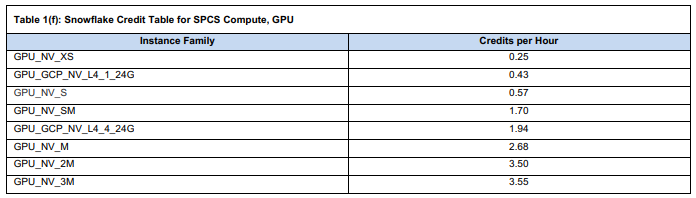
S,M,SL,L). - GPU instances – for GPU-accelerated workloads (NVIDIA-based families like
NV_XS,NV_S,NV_SM,NV_L,NV_2M,NV_3M, plusGoogle L4/A100variants).
Each has a fixed credits-per-hour rate. From Snowflake’s consumption tables.
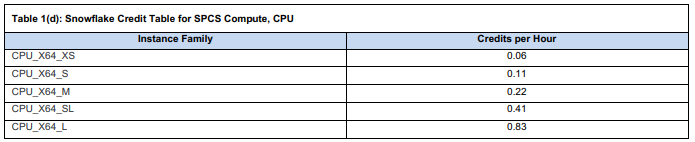
➥ CPU_X64 (standard CPU)
➥ HIGHMEM_X64 (high-memory CPU)

➥ GPU_NV (NVIDIA GPU & GCP)

Example:
Standard Plan (US-East, $2/credit):
- CPU_X64_XS: 0.06 × $2 = $0.12/hour
- CPU_X64_L: 0.83 × $2 = $1.66/hour
- HIGHMEM_X64_S (Small High-Memory): 0.28 × $2 = $0.56/hour
- HIGHMEM_X64_L (Large High-Memory): 4.44 × $2 = $8.88/hour
GPU Instances:
- NV_XS (NVIDIA T4, Tiny): 0.25 × $2 = $0.50/hour
- NV_L (NVIDIA A100, Large): 14.12 × $2 = $28.24/hour
Note for Enterprise or Business Critical Editions: Replace the $2/credit rate with $3 (Enterprise) or $4 (Business Critical) and recalculate the hourly costs.
Bigger nodes burn credits faster. There’s also a small startup penalty: when a compute pool starts or resumes, Snowflake bills at least 5 minutes of credits up-front, then charges by the second thereafter. And note: you are charged for a pool as long as it’s active (even if idle) so it’s wise to configure AUTO_SUSPEND to shut nodes off when they’re not needed.
🔮 Snowpark Container Services Storage and Volume Costs
Snowpark Containers Service use standard Snowflake storage plus optional block storage.
➥ Snowflake stage/table storage
Anything you store in a Snowflake stage or table (including container images or logs) is billed at Snowflake’s normal storage rate. In US-East (Northern Virginia), standard storage is about $23 per TB per month (on-demand). (Rates vary by region; for example in Zurich it’s ~$30 per TB per month). In short, standard Snowflake data storage costs apply. So if you have 1 TB of images in a stage, expect roughly $23/month in that region.
➥ Image repository
Snowpark Container Services uses a Snowflake-managed stage as the container image registry. That means your container images live in a Snowflake stage and incur normal stage storage fees. There’s no special discount or charge – it’s just paid as regular stage storage.
➥ Logs
If you configure services to store local container logs in Snowflake tables (so-called event tables), that data simply counts as table storage. You pay the usual storage rate on those logs.
➥ Volume mounts
Snowpark lets you mount volumes into containers. If you mount a Snowflake stage as a volume, again you pay stage costs as above. If you mount the Snowflake compute pool’s local storage as a volume, there’s no extra charge beyond the compute node cost. It’s “free” in the sense that you’ve already paid for the node’s cost.
Block storage (persistent volumes)
If you want persistent disk beyond ephemeral, Snowpark Containers Service offers block storage volumes (backed by cloud block storage). These are metered in four ways: Volume size (TB-month), IOPS usage, Throughput and Snapshot storage.
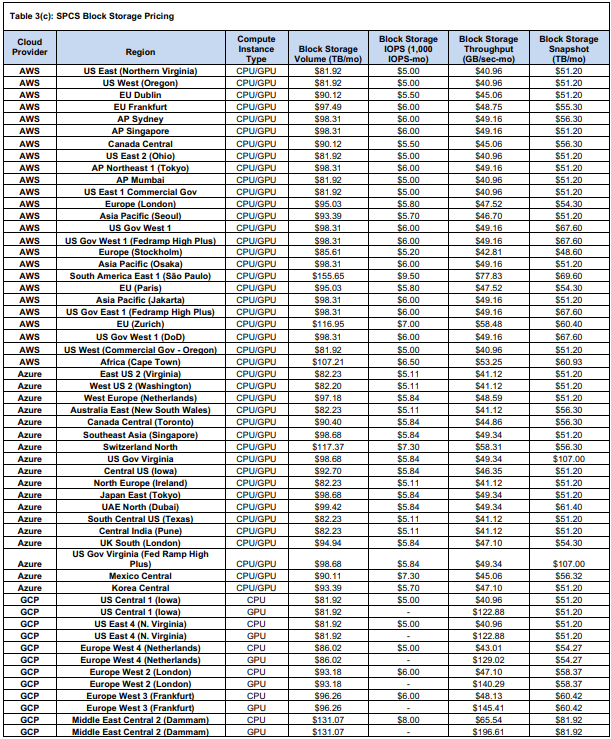
In summary, for storage: standard Snowflake storage prices apply for anything on stages or tables. Container-specific extras come from block volumes. Those volumes are fairly expensive (on the order of $82–$100 per TB-month) but give you persistent disk. Don’t forget: all these storage costs run monthly (so divide by ~730 to get a “per hour” sense if needed).
So, a quick note on storage: if you've got data stored on stages or tables, you'll be charged the standard rates. And if you're using containers, you'll also need to pay for block volumes on top of that. Those block volumes are fairly expensive, with a price tag of around ~$82-$100 per terabyte per month. Just remember, these costs are monthly, so if you're looking for an hourly breakdown, you can divide by 730 to get an estimate.
🔮 Snowpark Container Services Data Transfer Costs
Data transfer (ingress/egress) follows Snowflake’s usual rules, with a small twist for Snowpark Container Services.
➥ Ingress Cost
Ingress (loading data in) is typically free or included in your storage/compute costs. Snowflake doesn’t charge to upload data into a stage (aside from your cloud provider’s charges, which Snowflake does not bill).
➥ Egress to Internet or other clouds
Snowflake charges by the terabyte moved out.
- On AWS, for example, it’s about $90 per TB to the public internet (after the first 50 GB which is free in AWS accounts).
- On Azure, the outbound internet rate is about $87.50/TB.
- Cross-cloud egress (from AWS Snowflake to Azure) is typically $90–$120/TB on each end.
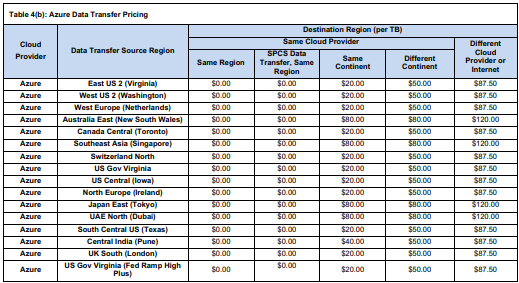
➥ Intra-cloud (same cloud) transfers
Moving data between regions or within the same cloud has its own rates.
- On AWS, Snowflake does not charge for data transfer within the same region (aside from a special SPCS fee, see below).
- Transfer to a different AWS region is about $20/TB.
- On Azure, inter-region (same continent) is ~$20/TB, cross-continent up to ~$50/TB.
➥ Snowpark Container Services internal data transfer
When containers move data between compute (within Snowflake), Snowflake applies a nominal fee even if staying in the same region. On AWS, Snowpark Container Services data transfers in the same region cost ~$3.07 per TB. It’s a small fee to account for internal network traffic. Also note that, Snowflake caps these SPCS transfer fees: any given day, your SPCS data transfer charge will be reduced by up to 10% of that day’s compute cost. In effect, you never pay SPCS transfer that exceeds 10% of compute spend, which keeps it modest.


The true cost of Snowpark Container Services is a sum of all these. Snowflake also provides ACCOUNT_USAGE views (like SNOWPARK_CONTAINER_SERVICES_HISTORY) so you can query exactly how many credits each pool used. It also shows you any Snowpark Container Services block storage usage and data transfer costs.
Quick Tips and Best Practices
1) Check your nodes
Choose the smallest instance family that meets your needs.
- For light workloads or dev testing, CPU_X64_XS (1 vCPU, 6 GiB) or S (3 vCPUs) will cost less.
- For heavy parallel tasks, larger families or GPUs may be worth it.
Always make sure to check the instance family table to see vCPU, memory, and node limits. Remember each family has a max-node limit (XS family allows up to 50 nodes, GPUs often max at 10 nodes).
2) Auto-suspend to save credits
Set AUTO_SUSPEND_SECS on your pool (and consider AUTO_RESUME=TRUE) so that it doesn’t burn credits when idle. Just keep in mind that it takes a bit of time and credits to start nodes back up. You pay for them in the STARTING state. Usually, it's a good idea to suspend the pool after a few minutes of inactivity. This way, you avoid wasting credits, but you won't have to wait too long for it to start back up.
3) Manage scaling carefully
If you're dealing with variable loads, bump up MAX_NODES, but keep MIN_NODES on the low side. For services that require low latency, you might keep MIN_NODES=1 or more can help with responsiveness. When it comes to batch jobs, you can set REPLICAS to process in parallel but make sure your pool MAX_NODES can accommodate it. Monitor usage with SHOW COMPUTE POOLS and metrics from CloudWatch or Stackdriver if you're on AWS or GCP.
4) Network and security
Use Snowflake’s roles and network policies to lock things down. For public services, only bind endpoints if needed. Always make sure to use a separate service role for each application, so you can revoke access easily. Be very careful of Snowflake’s default outbound block, only open egress when absolutely necessary (via EAI).
5) Secure Your Secrets
DO NOT add your secrets into your image. Use Snowflake secrets integration. Store any API keys or passwords in Snowflake Secret objects and reference them in your service spec under containers.secrets. This injects the secret into the container (as an env var or file) without exposing it in code or image.
6) Monitoring and logs
Make use of Snowflake’s built-in tables and functions for Snowpark Container Services. The views/functions like SPCS_GET_EVENTS, SPCS_GET_LOGS, and SPCS_GET_METRICS let you query service metrics and logs
7) Test incrementally
Start with a simple service (one container, no autoscaling) and confirm it works before adding more complexity.
8) Always Clean up
If you run out of pool credits, you can ALTER COMPUTE POOL … SUSPEND; to stop everything. Or DROP SERVICE when done. Be very careful that services consume resources until stopped.
10) Container Networking (private connectivity)
For enterprise use, consider using Snowflake’s PrivateLink or Private Connectivity features. Snowflake now supports AWS and Azure PrivateLink for SPCS, letting containers access Snowflake without public internet.
Now that you've got the complete details on Snowpark Container Services, you're all set to start using it. You know the basics of setting it up and when to use it. Happy containerizing!
Save up to 30% on your Snowflake spend in a few minutes!


Conclusion
And that’s a wrap! Snowpark Container Services lets you run your containers inside Snowflake, so your code and data stay together under one security and governance umbrella. It’s essentially a “data-center-less” or “serverless” version of Kubernetes. Now that you’ve thoroughly followed the steps above, you can now easily push images and run microservices, APIs, or ML inference without having to copy huge amounts of data to external storage. No more jumping between different platforms and environments or worrying about moving massive datasets. Snowpark Container Services has you covered.
In this article, we have covered:
- What is Snowpark Container Services?
- How Snowpark Container Services Works (Architecture & Core Components)
- Step-by-Step Guide to Setting Up Snowpark Container Services
- Snowpark Container Services Cost Breakdown
- Quick Tips and Best Practices
… and so much more!
Frequently Asked Questions (FAQs)
What is the difference between Snowflake and Snowpark?
Snowflake is the overall cloud data platform (storage + compute + services). Snowpark is Snowflake’s developer framework (libraries and APIs) for running custom code inside Snowflake. Snowpark Container Services is a feature of Snowpark that allows full Docker containers in the platform, extending beyond SQL or DataFrame UDFs.
What is Snowpark Container Services?
Snowpark Container Services (SPCS) is a fully managed container runtime within Snowflake that lets you deploy and scale containerized applications without moving data. It provides compute pools, image registries, and container orchestration while maintaining Snowflake's security and governance model.
Do I need a separate cloud account (AWS/GCP/Azure) to use Snowpark Container Services?
No, Snowpark Container Services runs entirely within your existing Snowflake account. You don't need AWS, Azure, or GCP accounts to use Snowpark Container Services. Snowflake manages all the underlying cloud infrastructure.
How is Snowpark Container Services different from running containers on Kubernetes or EC2?
Snowpark Container Services is like a “serverless Kubernetes” for Snowflake. You don’t manage the control plane, pods, or networking. Snowflake does all of that. This makes it simpler and more secure for Snowflake-centric workloads. On Kubernetes or EC2, you would set up VPCs, clusters, and manage scaling yourself. With SPCS, you only specify the desired compute (pool size) and Snowflake handles the orchestration. The main limitation is less flexibility: you can’t run arbitrary OS tasks outside of containers, and you’re limited to Snowflake’s supported instance types and regions. But the big advantage is data locality and built-in Snowflake security.
Which Snowflake editions support Snowpark Container Services?
Snowpark Container Services is available on all paid Snowflake editions in commercial regions. It is not available on trial or free-tier accounts. In 2024 it launched on AWS, then Azure GA (Feb 2025) and Google Cloud GA (Aug 2025). So if you have a standard Enterprise or Business Critical account (non-trial) on AWS, Azure, or GCP, you should have SPCS.
What is a compute pool and how to size it?
Snowflake compute pool is a collection of virtual machine nodes that run your containers. You can size it up based on your workload's CPU, memory, and GPU requirements. Start with CPU_X64_S instances and scale up based on actual resource utilization rather than over-provisioning from the start.
Does Snowflake charge for idle containers?
Snowflake charges for the Snowflake compute pool nodes, not individual containers. Any node that exists in IDLE or ACTIVE state costs Snowflake credits. So if you have 2 nodes idling (no container processing), you still pay for them. But, you can configure the pool to auto-suspend (eliminating all nodes) after inactivity. Whenever you suspend it, there are no nodes and you aren’t charged.
So, if your pool is up (even idle) you pay; if it’s fully suspended, you don’t.
How do containers access Snowflake data?
Inside your container, you typically use Snowflake’s client libraries (Snowpark, Python Connector, JDBC, …) just as you would externally. Snowflake automatically provides temporary credentials to the container under the role that owns the service. That lets your container call snowflake.cursor() or snowpark.session to run queries. You can query tables, load from a stage, or write results back.
Can I mount Snowflake stages as volumes in Snowpark Container Services?
Yes. Snowflake supports mounting stages as virtual volumes inside a container. When you do this, the data in the stage is available as files/directories. (Under the hood, this uses Snowflake storage and block volumes). You pay standard Snowflake storage rates for that data. The cost is just stage storage; there’s no separate container volume charge.
How do I give containers internet access?
Outbound internet is disabled for Snowflake containers (for security). To allow outbound calls, set up a Snowflake External Access Integration (EAI) with allowed network rules pointing to those domains or IPs.
Are container images private or public?
Snowflake image registry is private to your account. You must authenticate with your Snowflake credentials (or token) to docker pull or docker push. Only roles/users you grant access to the repository can read it. There are no public repositories (like Docker Hub) inside SPCS. If you want to use a public base image, Snowflake behind the scenes pulls it from Docker Hub when you build locally, but when you push to Snowflake, only your Snowflake repo is used.
Can I run multiple containers per service?
Yes. A single service specification can define multiple containers, but more commonly you run multiple instances (replicas) of the same container.
What's the difference between a service and a job service?
A Service is long-lived (like a web server). Snowflake will keep it running forever until you stop it. If a container crashes or node restarts, Snowflake restarts it. You create it with CREATE SERVICE. A job service (or just “job”) is temporary work. You start it with Snowflake EXECUTE JOB SERVICE, and Snowflake runs the container(s) until they exit on their own, then it stops.
How do I secure secrets and credentials inside containers?
DO NOT insert secrets into the Docker image. Instead, use Snowflake’s Secret objects and the service spec’s containers.secrets feature. As Snowflake docs explain, you can first CREATE SECRET (to store, say, an API key). Then in your YAML spec under the container, add:
containers:
- name: main
  image: ...
  secrets:
  - name: MY_SECRET
    object_type: 'SECRET'
    object_name: 'SNOWFLAKE_SECRET'
....
How do I roll back to a previous image in Snowpark Container Services?
Snowpark Container Services doesn’t have a one-click rollback feature, but you can revert by re-deploying the service with an older image tag.