


Snowflake Resource Monitors is a powerful feature that helps in Snowflake monitoring and avoid unexpected credit usage. It's the only official monitoring tool from Snowflake that lets you monitor your credit consumption and control your warehouses, making it essential for Snowflake users. In this article, we’ll explain how the Resource Monitors work, how to set it up, how to customize notifications and define actions—and much more!!
What is Snowflake Resource Monitors?
Snowflake Resource Monitors is a feature in Snowflake that helps you manage and control Snowflake costs. It allows you to monitor and set limits on your compute resources, so you can avoid overspending and potentially going over your budget. By setting up Resource Monitors, you can define actions to be taken when usage thresholds are exceeded, such as sending alerts or suspending warehouses. This gives you more control over your Snowflake data warehouse and helps you stay within your budget.
What Features Do Snowflake Resource Monitors Offer?
Snowflake Resource Monitors is a great feature for anyone using Snowflake. It offers a wealth of features that can help you better monitor and manage your Snowflake workloads and resources, giving you more control over your Snowflake environment.
Some of the important features of the Snowflake Resource Monitors are:
- Credit usage monitoring: It allows you to monitor your credit usage in real-time, so you can stay updated on your account's resource consumption.
- Multiple levels of control: Snowflake Resource Monitors can be set at the account level or warehouse level, giving users high flexibility and control over their resources.
- Credit quota management: It allows you to set credit quotas for specific warehouses and even for the entire account to help you stay within your budget and avoid unexpected Snowflake costs.
- Custom notification + alerting: It can send notifications and alerts to users when credit usage reaches specific thresholds.
- Custom Actions: It allows you to configure custom actions that can be triggered when credit usage is exceeded (such as by suspending a warehouse or sending an alert).
How to setup Snowflake Resource Monitors using Snowflake Web UI?
Setting up Snowflake Resource Monitors is a straightforward process. To make one in Snowflake, follow the steps outlined below:
Step 1: Log in to Snowflake Web UI
To setup Snowflake Resource Monitors, you need to log in to Snowflake Web UI.

Step 2: Navigate to the Snowflake Resource Monitors page
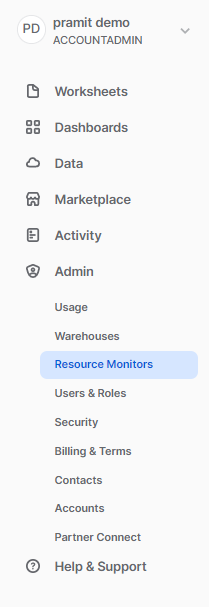
Once you have logged in to Snowflake Web UI, navigate to the Resource Monitors page. You can find this page under the "Admin" tab.
Step 3: Click on the "+Resource Monitors" button
Under "Admin", select "Resource Monitors" and then click "+Resource Monitors".

You will now see a "New Resource Monitor" window. In this window, you can set the Resource Monitor’s name, the Resource Monitor’s frequency(credit quota), the credit usage threshold, and the actions to be taken when the credit usage threshold is exceeded.

Step 4: Configure the Credit Quota property
Inside the "New Resource Monitor" popup window, configure the Credit Quota property. This is the number of credits that are allowed to be consumed in a given interval of time during which the Resource Monitor takes action.

Step 5: Configure the Monitor Type property
Next, let's configure the Monitor Type property. The Snowflake Resource Monitor can monitor credit usage at the Account and Warehouse levels. If you have selected the Account level, the Resource Monitors will monitor the credit usage for your entire account (i.e., all warehouses in the account), and if you select the Monitor Type as Warehouse level, you need to individually select the warehouses to monitor.
Account level

Warehouse level

Step 6: Configure the Schedule property
Now that you have configured the Monitor Type property, let's configure the Schedule property. By default, the scheduling of the Resource Monitor is set to begin monitoring immediately and reset back the credit usage to 0 at the beginning of each calendar month. However, you can customize the scheduling of the Resource Monitor to your needs.
- Time Zone: You have two options to set the schedule's time zone: Local and UTC.
- Starts: You can start the Resource Monitor immediately or later. If you choose Later, you should enter the date and time for the Resource Monitor to start.
- Resets: You can choose the frequency interval at which the credit usage resets. The supported values are Daily, Weekly, Monthly, Yearly, and Never.
- Ends: You can run the Resource Monitor continuously by selecting the "never" reset option, or you can set it to stop at a certain date and time.

Step 7: Configure the Actions property
Now that you have set up the basic properties of your Resource Monitor, it's time to define the Actions property that will be taken when the credit usage threshold gets exceeded. As you can see in the screenshot below, In the Actions property, there are three types of actions that Resource Monitors provide by default:

Resource Monitors actions configuration
- Suspend Immediately: This action suspends all the assigned warehouses immediately, which cancels any query statements being executed by the warehouses at that time.
- Suspend and notify: This action suspends all the assigned warehouses after all statements being executed by the warehouse(s) have been completed and then sends an alert notification to the users.
- Notify: This action sends an alert notification to all users with notifications enabled.
Note: You can define up to three actions for a Resource Monitor, which include one Suspend and Notify action, one Suspend Immediately action, and up to five custom Notify actions. Resource Monitor must have at least one action defined. If no actions have been defined, you won't be able to create your Resource Monitor.
Step 8: Create the Resource Monitor
As you can see in the screenshot below, we have successfully configured the Resource Monitor. So, once you've configured it, click the "Create Resource Monitor" button to create it. As you can see, we created a Snowflake Resource Monitor with the name "ResourceMonitor_DEMO," a Credit Quota of "200" at the warehouse level, one warehouse configured with the default schedule, Suspend Immediately and Notify action set to trigger at 80% of credit usage, Suspend and Notify action set to trigger at 75% of credit usage, and Finally Notify action set to trigger at 50% & 60% of credit usage.


How to create a Snowflake Resource Monitors using SQL query?
Creating Snowflake Resource Monitors using SQL query is straightforward, so to do that, Snowflake provides the following DDL commands for creating and using/managing Resource Monitors: CREATE Resource Monitors, ALTER Resource Monitors, SHOW Resource MonitorsS, and DROP Resource Monitors. However, for this article's purpose, we will be focusing on creating only.
CREATE Resource Monitors "ResourceMonitor_DEMO2" WITH CREDIT_QUOTA = 300
TRIGGERS
 ON 80 PERCENT DO SUSPEND
 ON 75 PERCENT DO SUSPEND_IMMEDIATE
 ON 60 PERCENT DO NOTIFY
 ON 50 PERCENT DO NOTIFY;
This query creates a Resource Monitor named "ResourceMonitor_DEMO2" with a credit quota of 300 and sets triggers for suspend and suspend immediate actions at 80 and 75 percent usage, respectively. The monitor also includes a trigger for a notify action at 60 and 50 percent of usage respectively.

Once the query has been executed, navigate back to the Resource Monitors page. There, should see the newly created Resource Monitor, which will be in an active state.

How to Assign Warehouses to Resource Monitors?
Once you have successfully created Snowflake Resource Monitors using SQL, warehouses can be easily assigned by using the following SQL query
ALTER WAREHOUSE "COMPUTE_WH" SET RESOURCE_MONITOR ="ResourceMonitor_DEMO2";
You can even configure and set your Resource Monitors to Account level; for that, execute the following SQL query.
ALTER ACCOUNT SET RESOURCE_MONITOR = ResourceMonitor_DEMO2;How to enable Notification Alerts for Account admin?
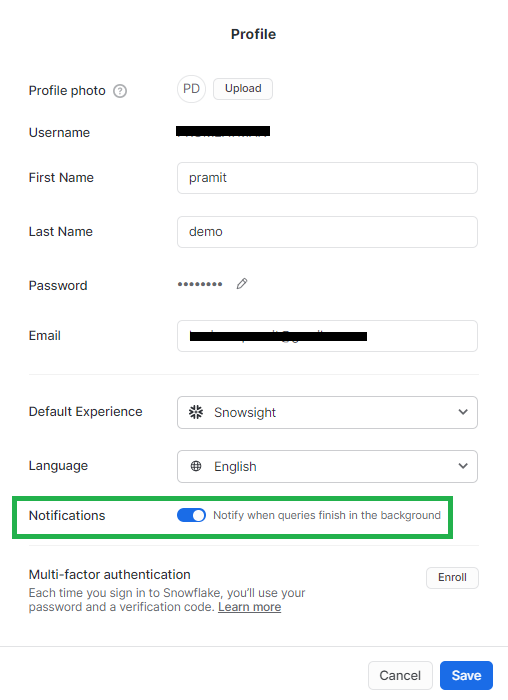
Account administrators can receive notifications via the web interface or via email. Notifications are not enabled by default. It must be enabled manually, so follow the steps outlined below.
- Use the ACCOUNTADMIN role. If you are not already in this role, you can switch to it by clicking on the drop-down menu next to your name in the upper-right corner, selecting "Switch role", and then selecting "ACCOUNTADMIN" from the list.

- In the same drop-down menu, select Profile > Toggle Notifications.
How to enable Notification Alerts for Non-Admin Accounts?
Enabling email notifications for non-admin users can only be done through SQL statements(It's not possible via the web interface). Use the SQL command shown below to trigger a notification for Non-admin accounts:
CREATE Resource Monitors "ResourceMonitor_ALERT" WITH CREDIT_QUOTA = 300
 NOTIFY_USERS = ('USER_NAME')
 TRIGGERS
 ON 80 PERCENT DO SUSPEND
 ON 75 PERCENT DO SUSPEND_IMMEDIATE
 ON 60 PERCENT DO NOTIFY
 ON 50 PERCENT DO NOTIFY;
To view the list of users with access to email alerts for Resource Monitors, use the following SQL command.
SHOW Resource Monitors
Conclusion
Snowflake Resource Monitors is an invaluable feature for any Snowflake user who wants to gain better control over their costs. The setup process is straightforward; this article explains how to create a Resource Monitor, what it does, and how to set up notifications and trigger actions. With the Snowflake Resource Monitors in place, you don't have to worry about unexpected Snowflake costs. Get started on your Snowflake Monitoring journey today!
FAQs
How does Snowflake Resource Monitors help control Snowflake costs?
Snowflake Resource Monitors helps you manage and control Snowflake costs. It allows you to monitor and set limits on your compute resources, so you can avoid overspending and potentially going over your budget.
How to setup resource monitor in Snowflake using Snowflake Web UI?
To set up Snowflake Resource Monitors using Snowflake Web UI, log in, navigate to the Resource Monitors page under the Admin tab, and click on the "+Resource Monitors" button.
What are the steps to configure a Resource Monitor's credit quota and schedule?
To configure a Resource Monitor's credit quota and schedule, specify the desired values in the New Resource Monitor window, including credit quota, monitor type (account or warehouse level), and schedule properties.
Can I define custom actions for Snowflake Resource Monitors?
Yes, Snowflake Resource Monitors allow you to define custom actions to be taken when credit usage thresholds are exceeded, such as suspending warehouses or sending alerts.
Can I create Snowflake Resource Monitors using SQL queries?
Yes, Snowflake Resource Monitors can be created using SQL queries, using this simple query:
CREATE Resource Monitors "ResourceMonitor_DEMO" WITH CREDIT_QUOTA = 300
TRIGGERS
 ON 80 PERCENT DO SUSPEND
 ON 75 PERCENT DO SUSPEND_IMMEDIATE
 ON 60 PERCENT DO NOTIFY
 ON 50 PERCENT DO NOTIFY;
Can Resource Monitors be set at both the account and warehouse levels?
Yes, Resource Monitors can be set at both the account and warehouse levels, providing flexibility and control over resource management.
Which schema has the resource monitor view in Snowflake?
This Account Usage view displays the resource monitors that have been created in the reader accounts managed by the account. This view is only available in the READER_ACCOUNT_USAGE schema.


