


Snowflake has recently released the Snowflake Python Worksheets in public preview! This latest release is a game-changer, making it easier than ever to integrate Snowpark Python directly into your Snowflake environment. And the best part? It's completely free for everyone to use!
In this article, we will cover everything you need to know about the Snowflake Python Worksheets. Learn how to prepare roles and packages, set up your Python worksheets, write Python code, run it efficiently, and deploy it as a stored procedure—all without leaving the Snowflake environment.
So sit tight, and let's get started!!
Getting Started with Snowflake Python Worksheets
Snowflake Python Worksheets allow users to easily leverage the power of Snowpark Python within Snowsight to perform data processing, transformations, and manipulations. Users can easily use pre-existing packages from Anaconda or import their own Python files from stages into the worksheet.
What are the Prerequisites for using Python worksheets?
To make use of Snowflake Python worksheets, follow these steps:
- Review and accept the Anaconda Terms of Service in Snowsight.
- Add Python files and packages that are not included in the Anaconda package to a named stage.
- Make sure to choose a warehouse to use for Python worksheets. Consider using an X-Small or Small warehouse for development or a Snowpark-optimized warehouse for large workloads.
Want to take Chaos Genius for a spin?
It takes less than 5 minutes.

How to enable Anaconda Python Packages?
Before you begin using the Snowflake Python Worksheets feature, you must first review and accept the Snowflake Terms of Service to use Anaconda in Snowflake (Snowsight).
Here's a step-by-step guide for how to do so:
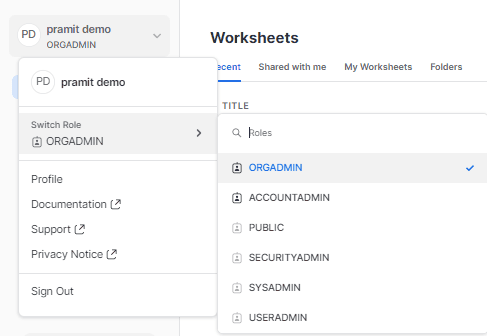
Step 1: Login to Snowflake using an admin account and switch to the ORGADMIN role. This role is required to enable Python packages.
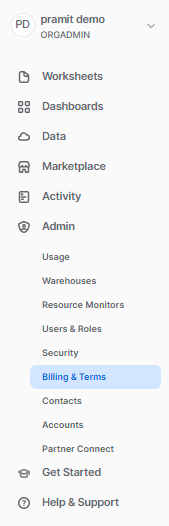
Step 2: Go to the "Admin" section and select "Billing & Terms".
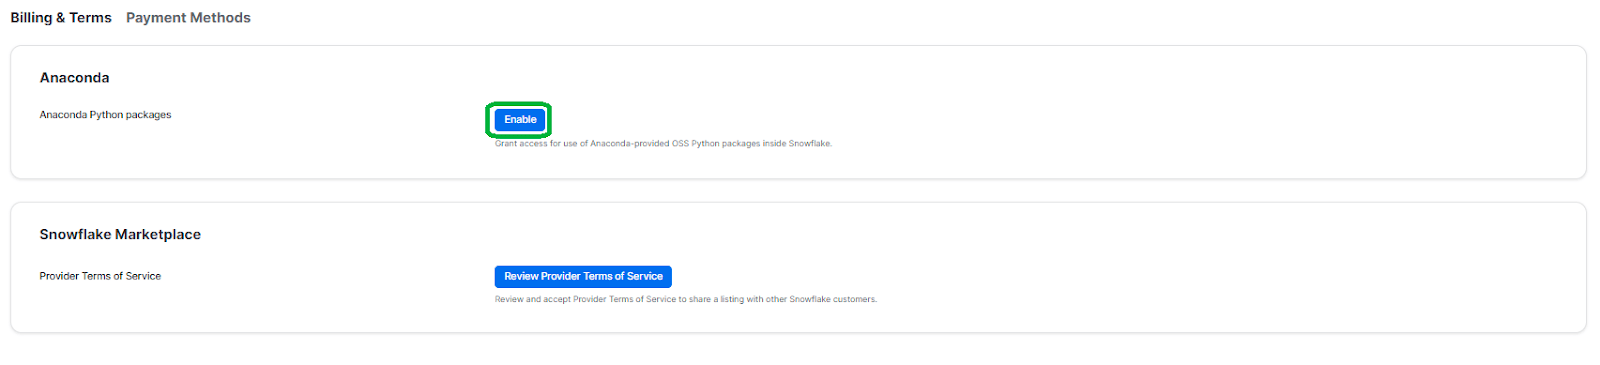
Step 3: Under "Anaconda Python Packages", click "Enable".
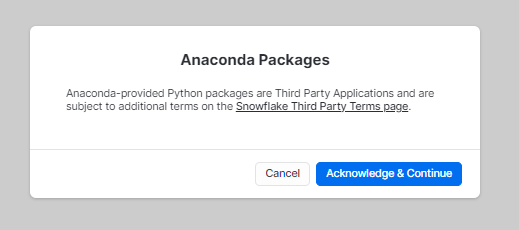
Step 4: Review the Snowflake Third Party Terms and click "Acknowledge & Continue" to accept them. You can now use the Snowflake Worksheets for Python feature with the Anaconda packages.
Note: You only need to accept the terms once for your Snowflake account. If you're unsure how to enable your account's ORGADMIN role, refer to step 2.
Checking available packages in Anaconda packages in Snowflake
To check the available Python packages in Snowflake, you can execute SQL commands. First, make sure that the necessary packages are available in Anaconda packages by checking the repository of available packages (Snowflake conda channel), or you can simply execute the following query:
SELECT distinct package_name
FROM information_schema.packages
WHERE language = 'python';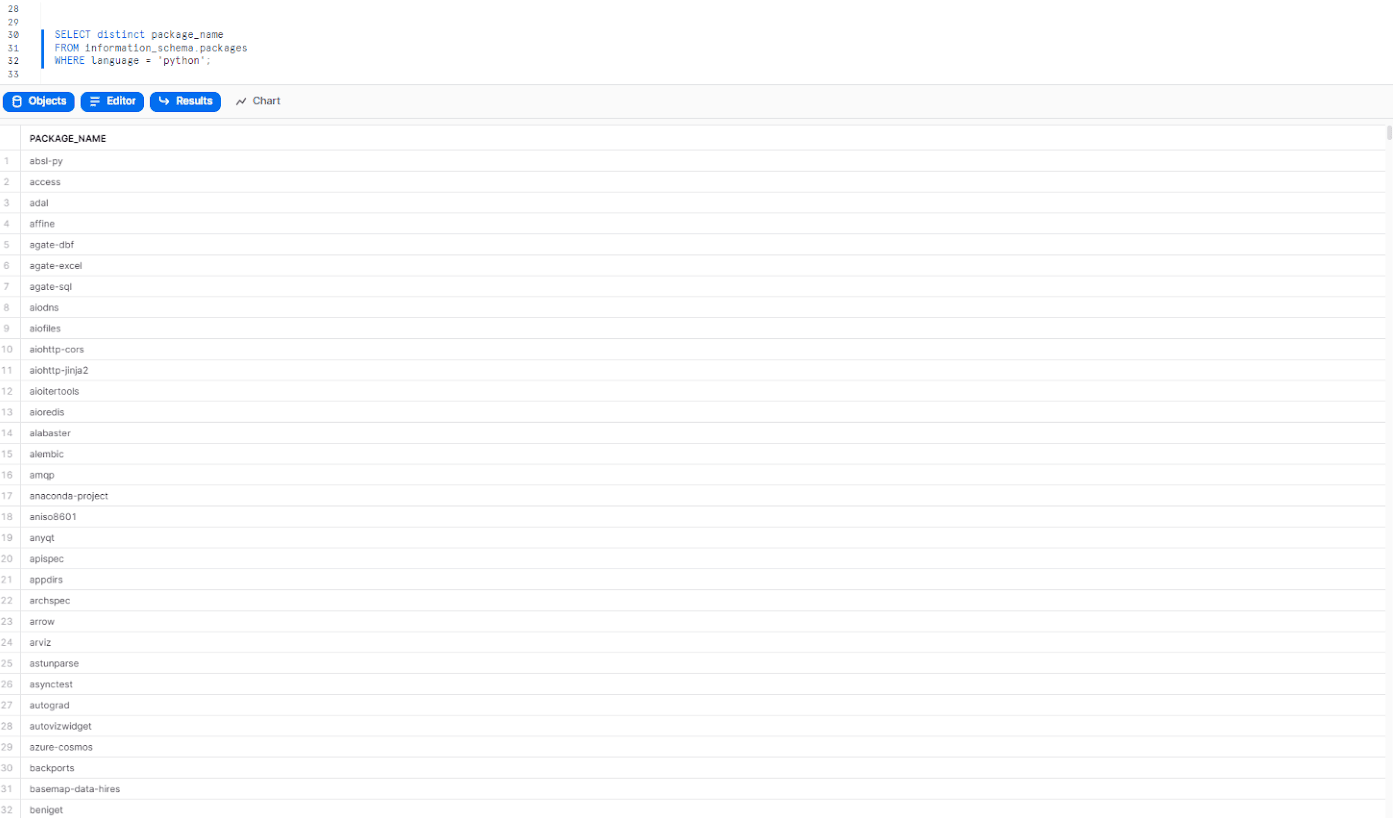
In case if you want to select specific packages and check their versions, you can do so easily by simply executing the following query:
SELECT * FROM information_schema.packages WHERE (package_name='numpy' AND language = 'python');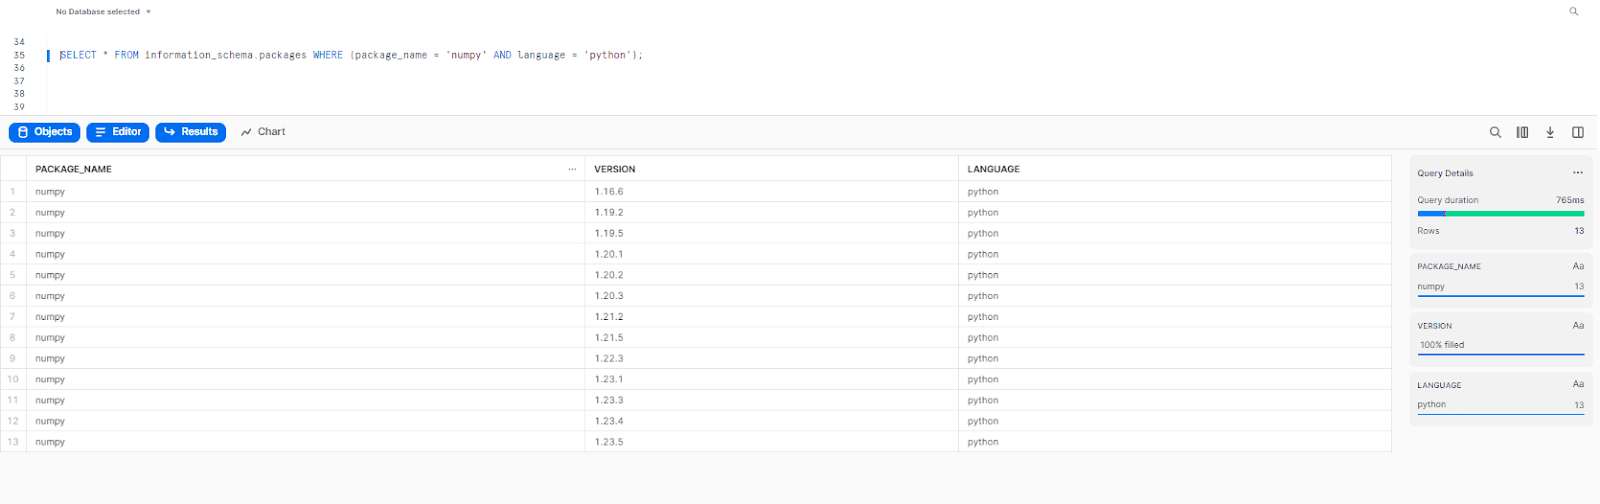
But, in case you need to use other Python files or packages not available in Anaconda packages, you must upload the files to a named stage in Snowflake and then add them to the list of packages for your Python worksheet. This process we will cover in the following section in a step-by-step manner.
Step-by-step guide on Creating Snowflake Python Worksheets in Snowflake
When you create a new Snowflake Python worksheet, it comes with sample code that you can easily change to fit your needs. However, if you want to create a worksheet from scratch, the following step-by-step guide will help you out. You will learn how to write simple code, execute it, and explore the functionality of a Snowflake Python worksheet, giving you a better understanding of what a Snowflake Python worksheet is and how it works.
Step 1: Log in to the Snowflake (Snowsight UI) and navigate/open the Worksheets located in the left-side panel.
Step 2: Select the “+” button, a drop-down menu should appear, and then select Python Worksheet.

Step 3: Select a database and schema.

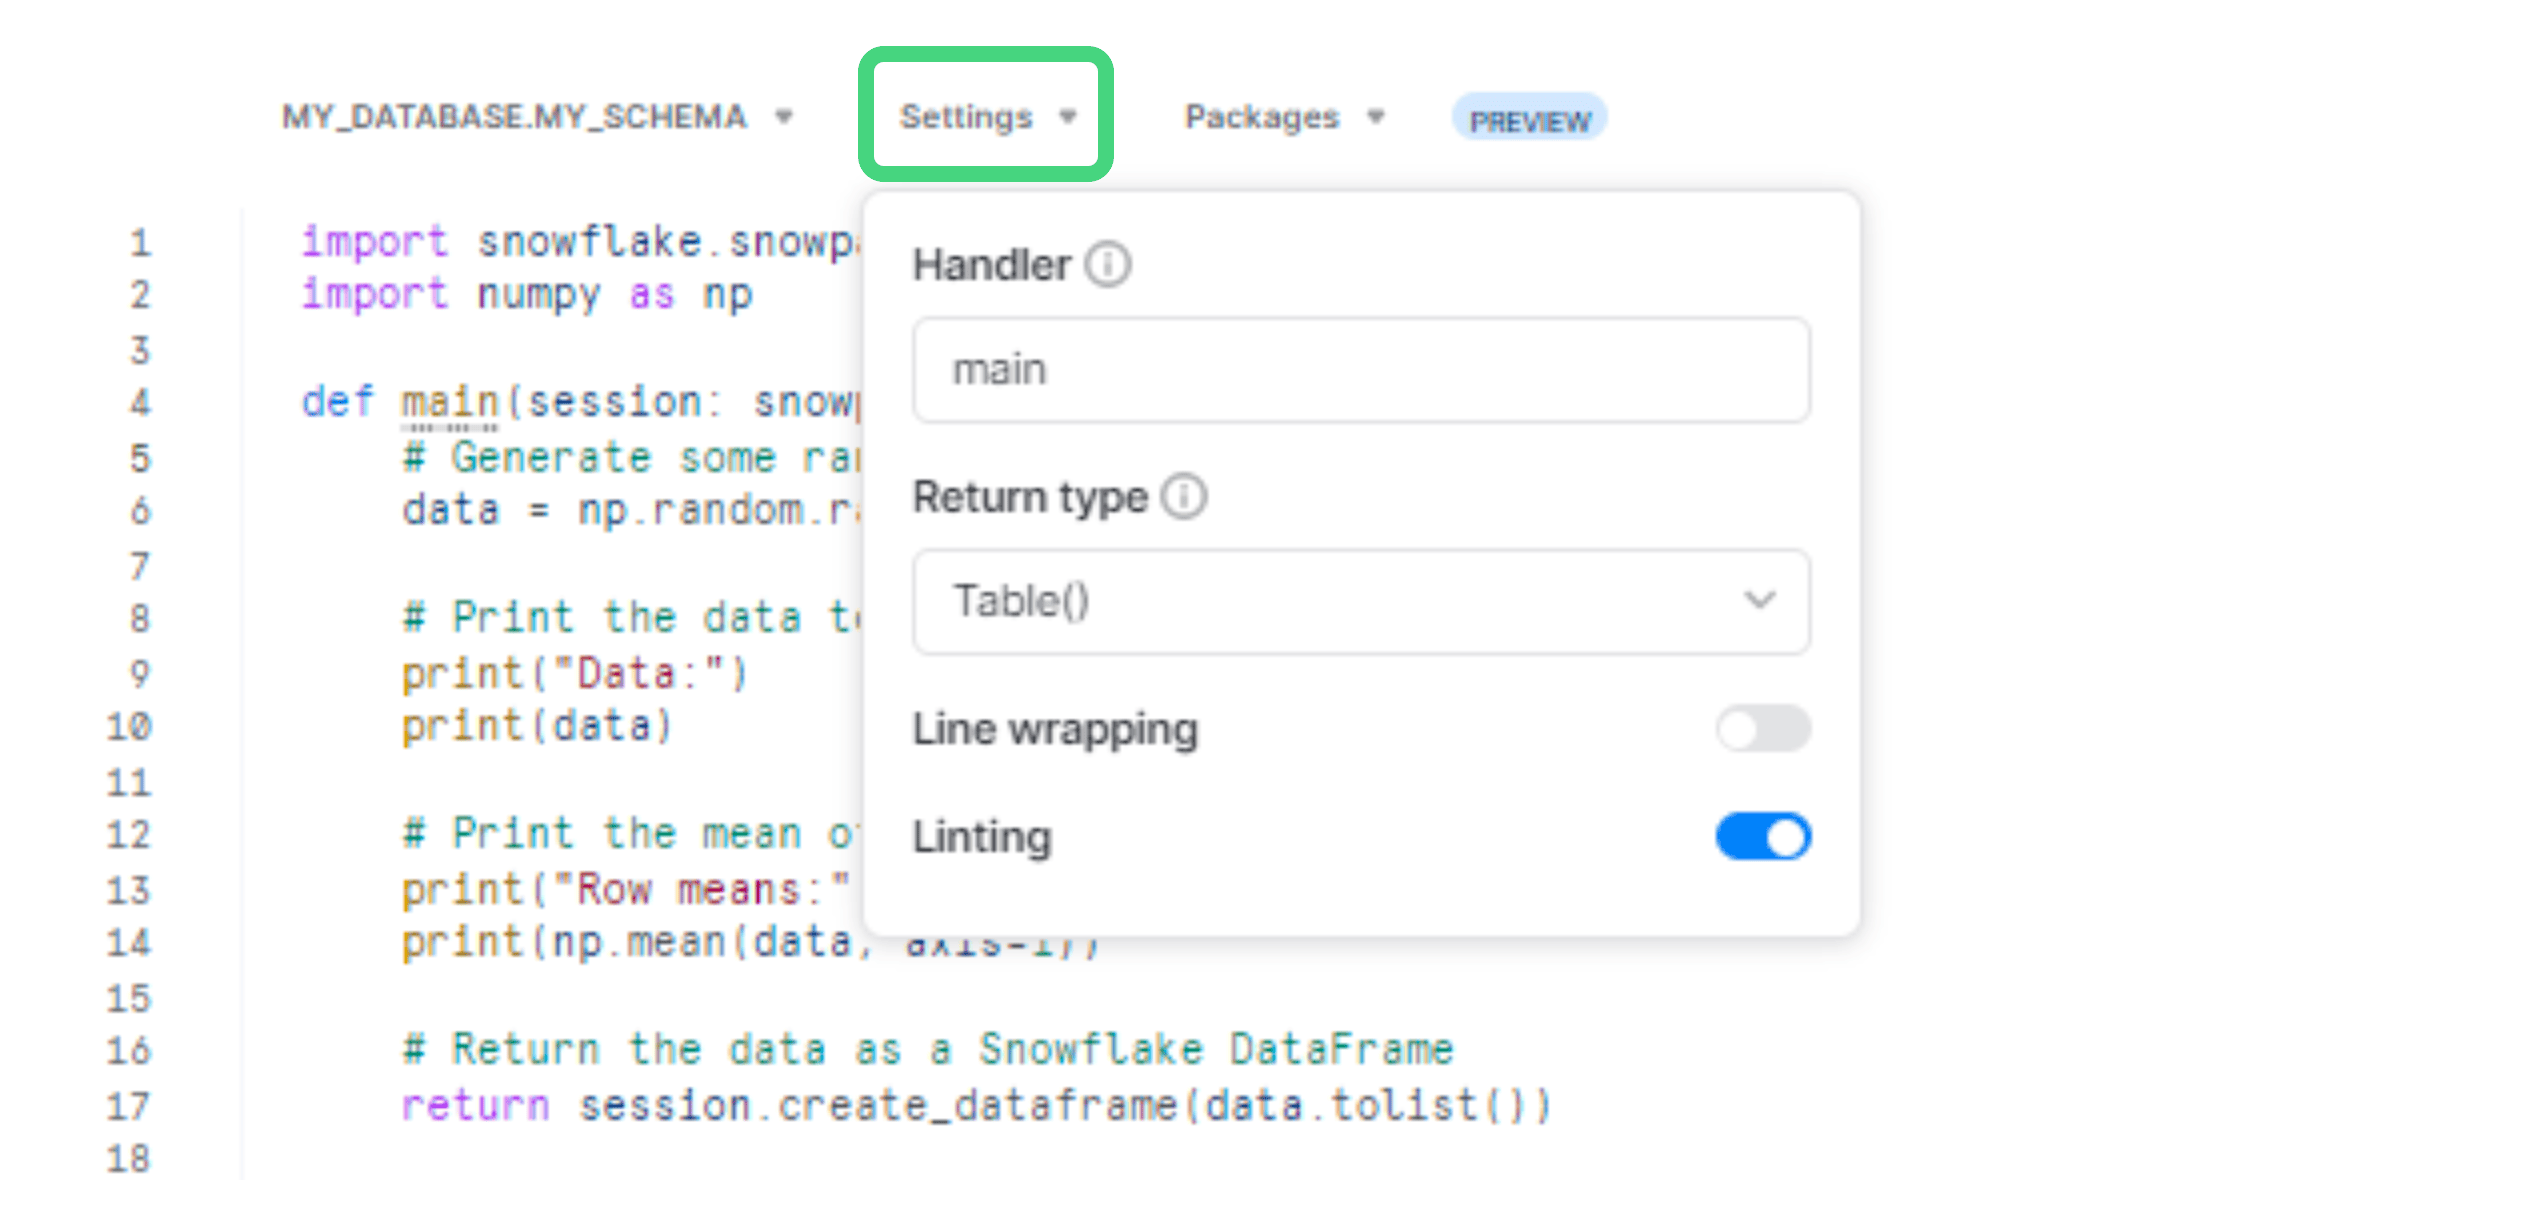
Step 4: Navigate to the settings drop-down menu in the Snowflake Python worksheet, located next to db/schema and to the left of the Packages menu. You will find an option called Handler, which you can customize to your preference. The handler is simply a function that gets called whenever the worksheet is executed. Below the Handler option, you will see a drop-down menu containing options like table, variants, and strings, which help you display the result in the table, variant, and string format returned by the handler function. You can also toggle the line-wrapping and linting options according to your preference.
Step 5: Navigate to the Packages menu option and select a package in the worksheet. Note this:
- Anaconda packages come with pre-installed packages like NumPy, Pandas, Requests, and urllib3.
- Search for other packages you want to use, and select them from the search results.
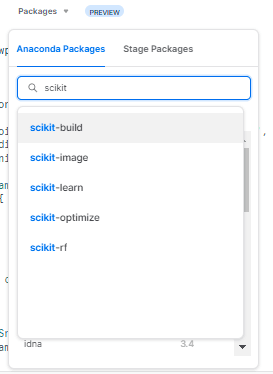
- You can easily modify the default package version if needed.
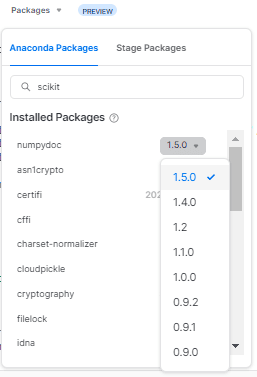
- Installed packages appear at the top of the package list.
- For detailed instructions on how to add your own packages and Python files, see the section above.
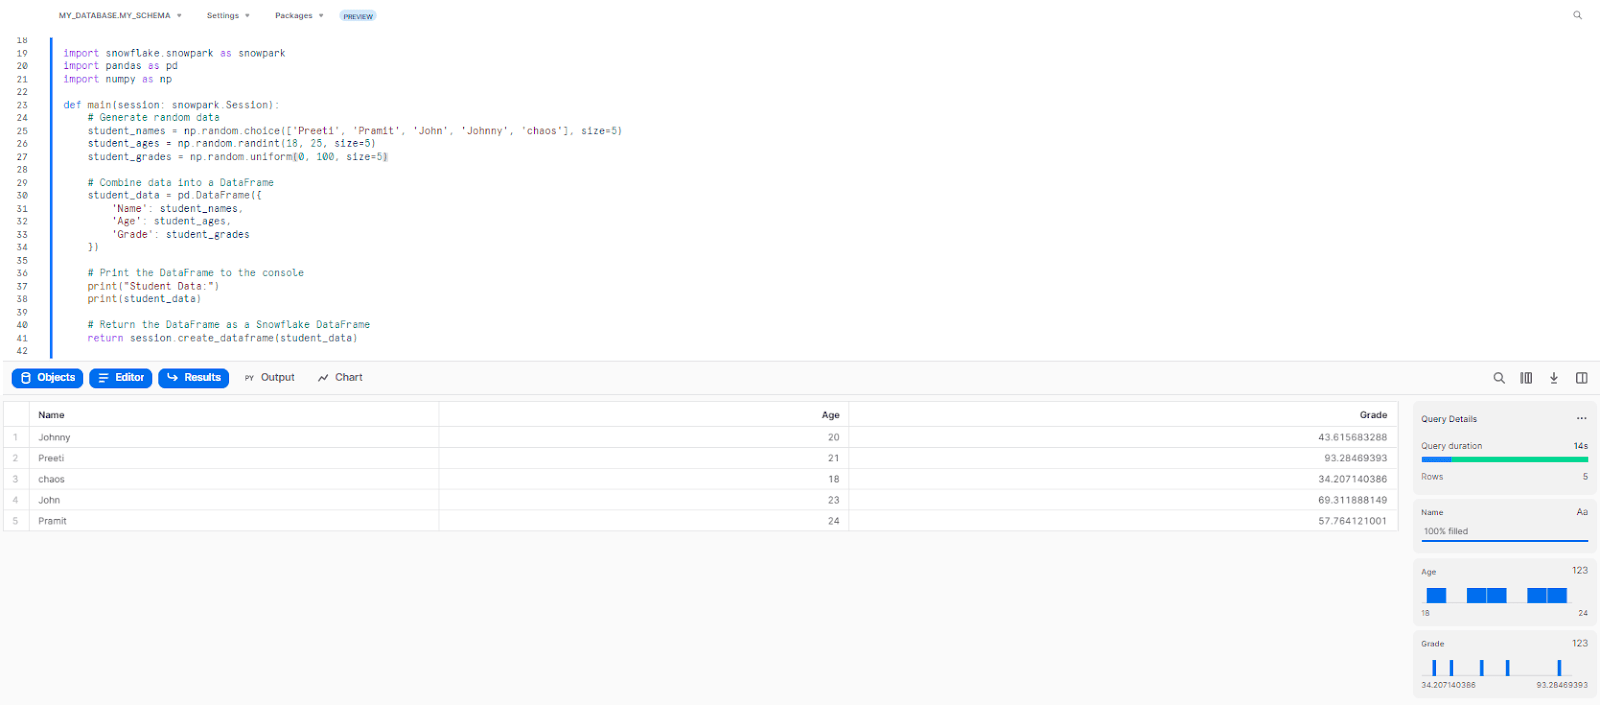
Step 6: Now let's write some code inside the Snowflake Python worksheet that generates random data for five students, which includes their names, ages, and grades.
import snowflake.snowpark as snowpark
import pandas as pd
import numpy as np

def main(session: snowpark.Session):
    # Generate random data
    student_names = np.random.choice(['Preeti', 'Pramit', 'John', 'Johnny', 'chaos'], size=5)
    student_ages = np.random.randint(18, 25, size=5)
    student_grades = np.random.uniform(0, 100, size=5)

    # Combine data into a DataFrame
    student_data = pd.DataFrame({
        'Name': student_names,
        'Age': student_ages,
        'Grade': student_grades
    })

    # Print the DataFrame to the console
    print("Student Data:")
    print(student_data)

    # Return the DataFrame as a Snowflake DataFrame
    return session.create_dataframe(student_data)
What is happening in the above code is that the code generates random data for 5 students, including their names, ages, and grades. It combines the data into a pandas DataFrame and prints it to the console, and finally, it returns the DataFrame as a Snowflake DataFrame using a session object provided as an argument to the main handler function.
That's it! As you can see, working with the Snowflake Python worksheet is simple!
How to add a Python file or package not available in Anaconda?
Let's suppose you need to use or work with a Python file or package that is not available in Snowflake’s Anaconda packages. In that case, what will you do? Welp! There is a solution to that! You can upload the required files to a named stage in Snowflake and then add them to the list of packages for your Python worksheet.
Here are the steps to follow:
Step 1: Log in to the Snowflake (Snowsight UI) and navigate/open the Worksheets located in the left-side panel.

Step 2: Select +, a drop-down menu will appear, and then select Python Worksheet.

Step 3: Select a database and schema.

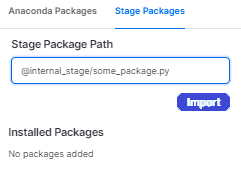
Step 4: Select Packages and then Stage Packages.

Step 5: Enter the path to the package in the stage.
Step 6: If the selected database and schema for the worksheet contain the stage where the package is located, you can reference the stage using an unqualified name.
For example, @YourStage/path/to/package.py
And, if you want to reference a stage in a different database and schema, you can easily do so by specifying the full database and schema name and then referencing the path to it like this: @Database.Schema.Stage/path/to/package.py
Refer to this official Snowflake documentation if you want to stage files from a Local File System
Step 7: Select Import to add your package to the list of installed packages.
Step 8: You can now use import statements to use the package in your Python worksheet.
Note: Numpy package is available in the Anaconda, but we use it here for demonstration. If you prefer to use your custom staged Python package or library, you can follow the steps outlined earlier to install and import it into your worksheet and just use "import <your-package-name>" to import it.
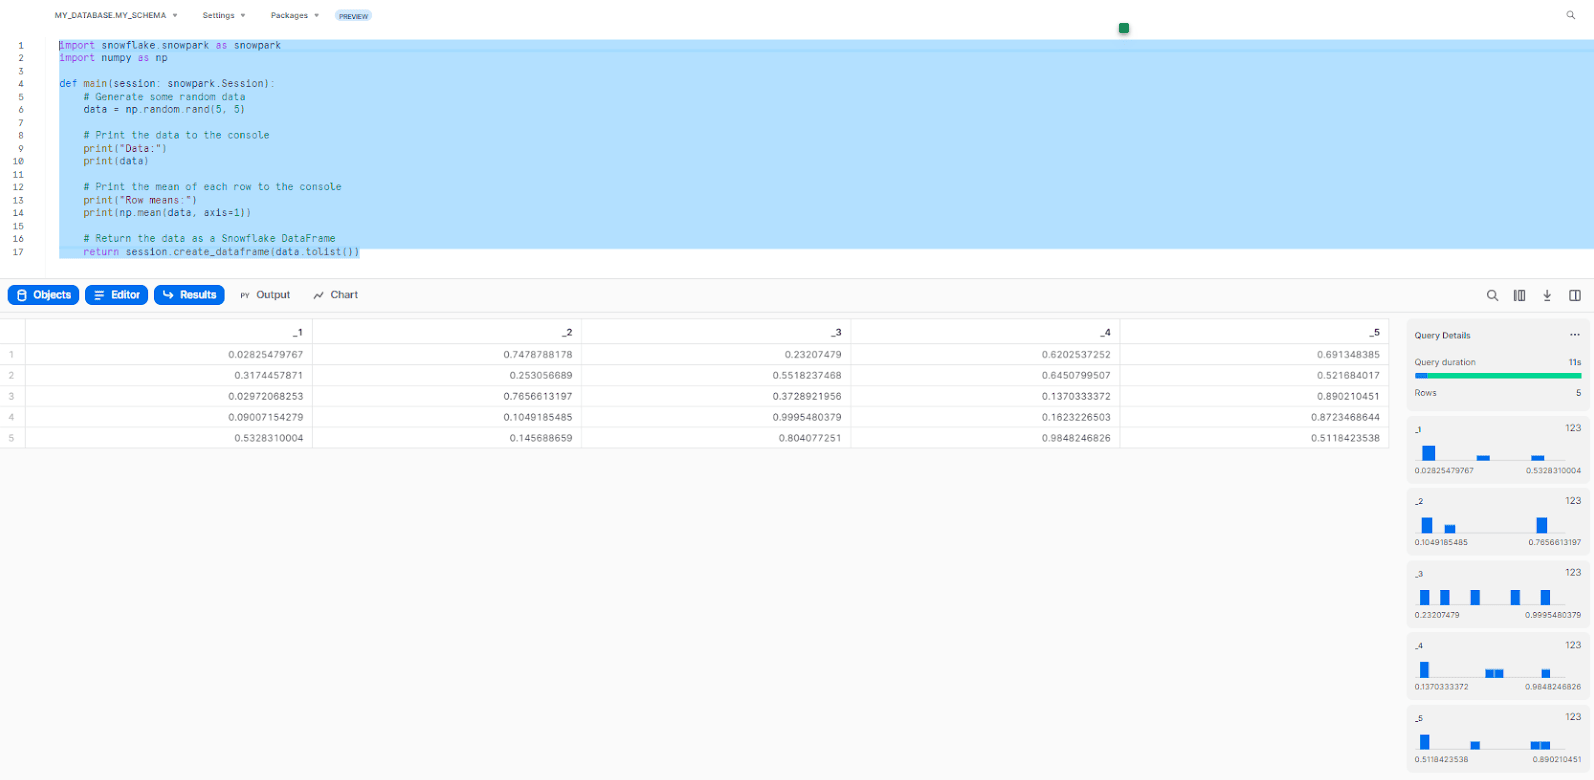
import snowflake.snowpark as snowpark
import numpy as np

def main(session: snowpark.Session):
    # Generate random data
    data = np.random.rand(5, 5)

    # Print the data to console
    print("Data:")
    print(data)

    # Print the mean of each row
    print("Row means:")
    print(np.mean(data, axis=1))

    # Return the data as Snowflake DataFrame
    return session.create_dataframe(data.tolist())
This code above imports the numpy package and then uses it to generate and manipulate data inside the main function; the function then returns a Snowflake DataFrame containing the generated data.
What you can do with Snowflake Python Worksheets?
Snowflake Python Worksheets allow you to perform a variety of tasks using Snowpark Python directly within the Snowflake UI (Snowsight). Here are some notable things you can do with Snowflake Python Worksheets:
- Develop and test your code without having the need to install any kind of dependencies locally.
- Easily set up your worksheet for development by just selecting a db and schema, configuring roles and privileges, and adding any required packages.
- Easily write Snowpark code in your Python worksheet to perform any kind of data processing tasks, such as extracting data from stages or database objects in Snowflake, transforming the data, and storing the transformed data in Snowflake.
- Convert your code to a stored procedure and build a data pipeline within Snowflake, without having to leave the Snowflake environment.
What are the limitations of using Snowflake Python Worksheets?
Snowflake Python Worksheets have various limitations that you should be aware of before using them; they are as follows:
- Log levels lower than WARN do not appear in the Output for a Snowflake Python worksheet by default, but you can use a logging library, such as the logging module to set the level of messages logged.
import snowflake.snowpark as snowpark
import logging
def main(session: snowpark.Session):
    # Configure logging
    # (use logging.INFO or logging.DEBUG to change the default)
    logging.basicConfig(level=logging.WARNING)
    # Log messages
    # This message will not appear in the Snowflake Python worksheet output
    logging.debug("Debug message")
    # This message will not appear in the Snowflake Python worksheet output
    logging.info("Info message")
    # This message will appear in the Snowflake Python worksheet output
    logging.warning("Warn message")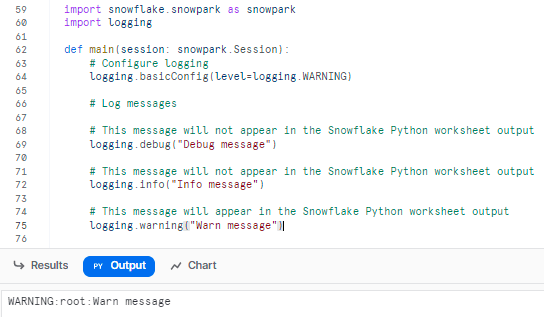
- Snowflake Python worksheets do not support breakpoints or running only portions of the Python code in a worksheet. You need to run the entire code in the worksheet each time you want to test it.
- Snowflake Python worksheet operates within Snowflake rather than in a local development environment; users cannot add files or packages using session.add_import or session.add_packages; instead, users must add them to a stage and reference them within their code.
- Snowflake Python worksheets cannot display images or web pages generated by Python code.
- Snowpark Python uses Python 3.8, meaning that any package or library that requires a different version of Python may not be compatible with Snowflake Python Worksheets.Refer to the official Snowflake documentation for more information.
How to Deploy the Code as a Permanent Stored Procedure?
Now that we've created a working Snowflake Python Worksheet and written a script that generates random student data, you might want to use that script as a permanent stored procedure. How would you do that? Welp! It's pretty simple. With just one simple click of a button, your Python script can be deployed as a Permanent Stored Procedure.
So how will you do that? Well, here is a step-by-step guide to doing so:
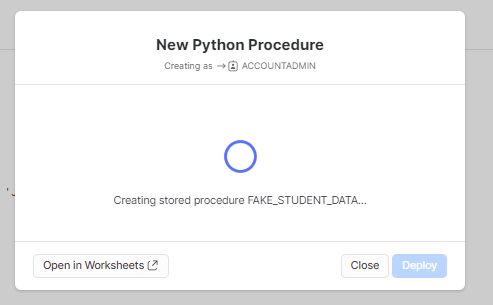
Step 1: Look at the top right-hand corner of your screen, where you should be able to see a 'Deploy' button next to the 'Run' option. Click on it.

Step 2: Name your Stored Procedure, and provide a description and if you want to overwrite an existing Stored Procedure, toggle the 'Replace if exists' option.

Step 3: Click 'Deploy' to create the Stored Procedure.
Step 4: Call the Stored Procedure to test if it is working correctly.
CALL MY_DATABASE.MY_SCHEMA.FAKE_STUDENT_DATA()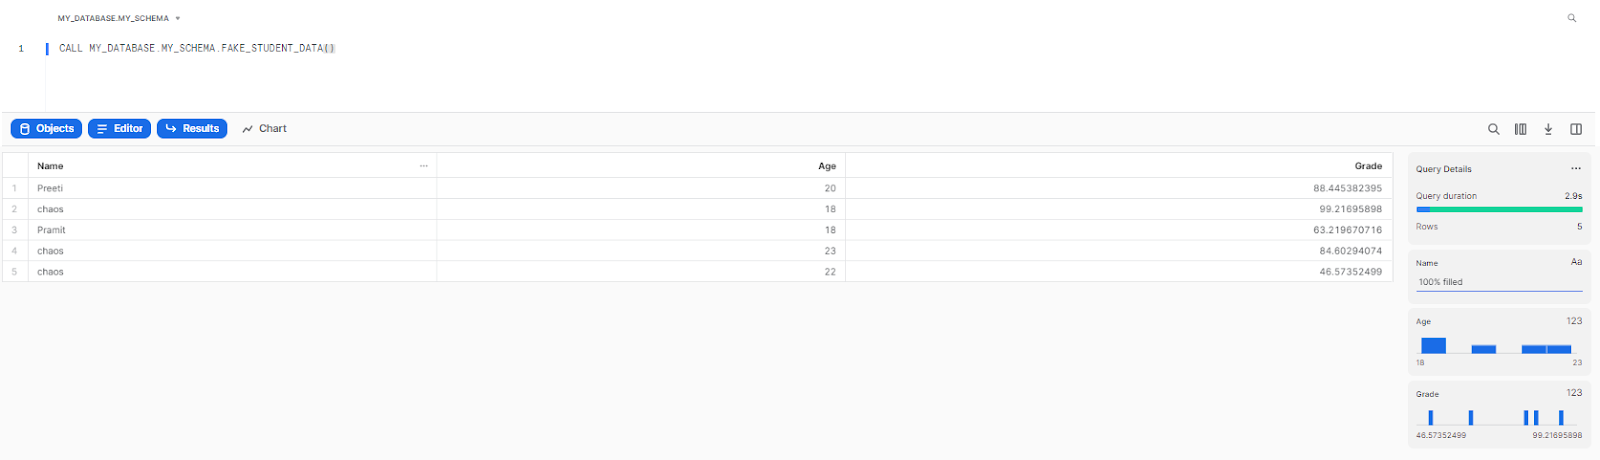
Step 5: Congrats! Your Python script is now successfully deployed as a permanent Stored Procedure.
Save up to 30% on your Snowflake spend in a few minutes!


Conclusion
Snowflake Python Worksheets are a game-changing feature that was just recently made available to everyone. These worksheets are made to make it easier and faster to code in Python in the Snowflake environment. It also comes with features that support Snowpark and other third-party libraries. On top of that, it also supports IntelliSense with auto-complete, making it even easier to use.
In this article, we covered all the essentials you need to know about Snowflake Python Worksheets. We discussed how to prepare roles and packages, set up your Python worksheet, wrote a Python script, ran it efficiently, and deployed it as a Stored Procedure with just one click—all without leaving the worksheet environment.
Don't just sit there and stare! Give the Snowflake Python Worksheets a try and see how it can revolutionize your day-to-day use case and your entire Snowflake workflow.
FAQs
How do I create a Snowflake Python Worksheet?
To create a Snowflake Python Worksheet, log in to Snowflake (Snowsight UI), navigate to the Worksheets section, click the "+" button, select "Python Worksheet," choose a database and schema, configure settings and packages, and start writing code.
How can I add a Python file or package not available in Anaconda?
If you need to use a Python file or package not available in Anaconda, you can upload the required files to a named stage in Snowflake and then add them to the list of packages for your Python worksheet.
What can I do with Snowflake Python Worksheets?
Snowflake Python Worksheets allow you to develop and test code without installing dependencies locally. You can perform data processing tasks, extract and transform data, and store transformed data in Snowflake.
What are the limitations of using Snowflake Python Worksheets?
Some limitations of Snowflake Python Worksheets include the lack of support for breakpoints, running only portions of the code, cannot display images or web pages generated by Python code and compatibility issues with packages requiring a different version of Python.
How do I deploy the Python code as a permanent stored procedure?
To deploy your Python code as a permanent stored procedure, click the "Deploy" button next to the "Run" option in the Snowflake Python Worksheet. Provide a name, description, and select the appropriate options. Finally, click "Deploy" to create the stored procedure.


