


Data lakes provide a flexible and scalable solution for storing vast amounts of structured, semi-structured, and unstructured data in its raw format. However, managing data lakes can be challenging due to issues with data reliability, consistency, data silos, and the inability to track data changes and recover from errors. Delta Lake, an open source storage layer, addresses these challenges by introducing a transactional storage layer on top of your data lake, enabling ACID transactions, data versioning, schema enforcement, and scalable metadata handling. But Delta Lake is just the framework/foundation; to really get the most out of your data, you need Delta Tables. These are like traditional tables but on steroids—optimized for large-scale analysis and capable of maintaining data consistency even as schemas evolve. They offer features like ACID transactions, data versioning (aka "time travel"), strict schema enforcement, and performance optimizations, enabling you to work with your data in ways that traditional table formats cannot.
In this article, we will cover everything you need to know about Databricks Delta Tables, exploring their architecture, features, and capabilities. On top of that, we will also guide you through the process of getting started with Delta Tables, covering everything from creating and loading data to querying, updating, and optimizing your tables. And then, we will discuss best practices, performance considerations, and real-world use cases of Delta Tables.
What is a Delta Lake?
Alright, let's talk about Delta Lake! Before diving into Databricks Delta Tables, we need to understand what a Delta Lake is.
So, you know how data lakes are like a centralized repository for all your structured, semi-structured, and unstructured raw data? Well, the problem with traditional data lakes is that they often lack robust data management capabilities, leading to issues like data quality, reliability, and integrity. This is where Delta Lake comes into play. That's where Delta Lake comes in—it's an open source storage layer that adds some serious upgrades to data lakes. We're talking ACID transactions, scalable metadata handling, and the ability to handle both streaming and batch data processing. Plus, it's built on top of Apache Spark, so it plays nicely with your existing big data architecture.
Basically, Delta Lake is like a supercharged data lake, bringing some much-needed reliability and efficiency to your data game.

Here are the core components of Delta Lake:
- Delta Table: A transactional table optimized for large-scale data processing, storing data in a columnar format. It supports schema enforcement and schema evolution. We will dive more deeply into it in a later section.
- Delta Log: A transaction log that records every operation performed on the Delta table, acting as a source of truth and providing support for versioning and rollbacks.
- Storage Layer: The underlying storage layer responsible for storing data in Delta Lake. It is compatible with various object storage systems, like HDFS, S3, GCS or Azure Data Lake. It provides durability and scalability for the data stored in Delta Lake.
Together, these three components enable Delta Lake to provide ACID transactions, scalable metadata handling, and a unified interface for working with large datasets on top of Data Lakes.
Check out this article to learn more in-depth about Delta Lake.
What Is a Delta Table in Databricks?
So, what exactly is a Delta Table? In simple terms, it's a supercharged version of a regular table that gives you a ton of extra features to work with your data. Think of it like a table on steroids! Delta Tables are designed to provide a robust and efficient way to manage large datasets in data lakes, while also offering advanced features that traditional data formats lack.
At its very core, a Delta Table is a bunch of Parquet files stored in a data lake, with a special transaction log that keeps track of all the changes made to the data. This log is the secret sauce that makes Delta Tables so powerful. It enables cool features like ACID transactions, data versioning, schema enforcement, and performance optimizations.
Let's break down some of these features:
- Delta Tables support ACID (Atomicity, Consistency, Isolation, Durability) transactions, ensuring that data modifications are performed consistently and reliably, meaning that either all parts of a transaction are applied, or none are, preventing partial updates or corrupted data.
- Delta Tables keep a record of all the changes made to your data, so you can go back in time and see what your data looked like at any point in the past.
- Delta Tables are strict about the type and format of data that can be stored in them. They make sure that only data that follows the rules gets written to the table. This helps keep your data clean and accurate.
- Delta Tables incorporate several performance optimization techniques, such as data skipping, caching, compaction, indexing, and data clustering, to improve query performance and reduce storage footprint.
What Are Delta Live Tables in Databricks?
Databricks Delta Tables provide a powerful storage layer for managing large datasets, but building and maintaining data pipelines can still be a complex and error-prone process, especially when dealing with multiple interconnected tables and transformations. This is exactly where Databricks Delta Live Tables (DLT) come into play.
Databricks Delta Live Tables is a framework that makes it easy to build and manage data pipelines using Databricks Delta Tables. It simplifies the process of creating ETL/ELT pipelines by allowing you to define the flow of data between Delta Tables and specify the transformations to be applied. You don't have to worry about managing dependencies, orchestrating jobs, or ensuring data quality, as these are all handled automatically by Delta Live Tables. The framework enables you to focus on defining the data transformations and business logic, while it takes care of the rest.
Here are some of the key benefits of building and running ETL/ELT pipelines with Databricks Delta Live Tables:
- Declarative Pipeline Development: Instead of writing complex job orchestration code, you can declaratively define your pipelines using simple SQL or Python expressions.
- Automatic Testing: Databricks Delta Live Tables automatically validates data quality and integrity at each stage of the pipeline, preventing bad data from propagating downstream.
- Error Handling and Recovery: Databricks Delta Live Tables provides automatic error handling and recovery mechanisms, reducing downtime and ensuring reliable pipeline execution.
- Monitoring and Visibility: Databricks Delta Live Tables offers deep visibility into pipeline operations, data lineage, and performance metrics, enabling effective monitoring and troubleshooting.
- Incremental Processing: Databricks Delta Live Tables supports both batch and streaming data processing, allowing you to efficiently handle incremental updates to your data.
To create a Delta Live Table pipeline, you can use the following syntax:
Using SQL:
CREATE OR REFRESH [TEMPORARY] { STREAMING TABLE | LIVE TABLE } table_name
(...
...
...
...)
PARTITIONED BY (<col_name>)
COMMENT "Some comment"
AS SELECT * FROM ...
Databricks Delta Live Table Syntax
Using Python:
import dlt

@dlt.table(
  name="table_name",
  comment="table_comment",
  table_properties={"key1": "value1", "key2": "value2"},
  path="storage_location_path",
  partition_cols=["partition_column1", "partition_column2"],
  schema="schema_definition",
  temporary=False
)
@dlt.expect("expectation_name1", "expectation_expr1", on_error="fail_update")
@dlt.expect("expectation_name2", "expectation_expr2", on_error="drop_row")
def table_function():
  return dlt.read_stream("data_source").select("column1", "column2", ...)
Databricks Delta Live Table Syntax
Check out this article to learn more in-depth about Delta Live Tables..
What Is the Difference Between Delta Live Table and Databricks Delta Table?
Delta Tables and Delta Live Tables are closely related concepts within the Databricks ecosystem, they serve different purposes and have distinct functionalities. Here's a table that highlights the key differences between Delta Live Tables and Databricks Delta Tables:
|
Delta Live Table |
Databricks Delta Table |
|
DLT is a framework for building and managing data pipelines on top of Delta Tables |
Databricks Delta Tables are a storage layer for managing large datasets within Delta Lakes |
|
DLT manages the flow of data between Delta Tables |
Databricks Delta Table stores and manages the actual data in Delta Tables |
|
DLT provides declarative pipeline development, automatic testing, error handling, and monitoring |
Databricks Delta Table provides ACID transactions, data versioning, schema enforcement, and performance optimizations |
|
DLT orchestrates the execution of multiple interconnected Delta Tables |
Databricks Delta Table supports data manipulation operations (insert, update, delete, merge) on a single Delta Table |
|
DLT supports both batch and streaming data processing |
Databricks Delta Table supports incremental updates through MERGE operations |
For more detailed differences between Delta Live Table and Databricks Delta Table, you can refer to this article.
What Is the Difference Between Hive Table and Databricks Delta Table?
Hive Tables and Databricks Delta Tables are both storage and data management solutions, but they differ in several key aspects. Here's a table that compares the two:
|
Hive Table |
Databricks Delta Table |
|
Hive Table supports various file formats (e.g., CSV, Parquet, ORC) |
Databricks Delta Table primarily uses Parquet files with a transaction log |
|
Hive Table does not provide ACID transactions by default |
Databricks Delta Table supports ACID transactions out of the box |
|
Hive Table has no built-in data versioning or time travel capabilities |
Databricks Delta Table maintains a complete history of data changes, enabling time travel |
|
In Hive Table schema enforcement is optional and can be enforced manually |
Databricks Delta Table has strict schema enforcement on write operations |
|
Hive Table has limited performance optimizations |
Databricks Delta Table incorporates various performance optimizations (data skipping, caching, compaction, indexing, data clustering) |
|
Hive Table relies on a centralized Hive Metastore |
Databricks Delta Table utilizes a distributed and scalable metadata management system |
|
Hive Table has limited support for streaming data |
Databricks Delta Table supports both batch and streaming data processing |
|
Hive Table lacks built-in mechanisms for ensuring data integrity |
Databricks Delta Table provides ACID compliance and data versioning for data integrity |
|
Hive Table can struggle with large datasets and high concurrency |
Databricks Delta Table is designed for petabyte-scale datasets and high concurrency workloads |
|
Hive Table integrates with various Apache Hadoop ecosystem components |
Databricks Delta Table tightly integrated with Databricks ecosystem |
Step-By-Step Guide on Getting Started with Databricks Delta Tables
Now that we've covered the theoretical aspects of Databricks Delta Tables, let's dive into a hands-on guide on how to get started with them. Here in this section, we'll walk through the steps required to create, load, query, and perform various operations on Delta Tables using both SQL and the DataFrame.
Now that we've covered the theoretical aspects of Databricks Delta Tables, let's dive into a hands-on guide on how to get started with them. Here in this section, we'll walk through the steps required to create, load, query, and perform various operations on Delta Tables using both SQL and the DataFrame.
Step 1—Start a Databricks Cluster
Before you can work with Delta Tables, you'll need to start a Databricks cluster. A cluster is a collection of compute resources (e.g., virtual machines) that runs your Spark workloads.
Check out this step-by-step guide to create a Databricks cluster.
Just a quick note before we dive in—for this article, we'll be using the free Databricks Community Edition. Now, the Community Edition is a great way to get started with Databricks, but there are a few limitations to keep in mind. One of the main limitations is that you can't create or configure your own compute clusters—you have to use a pre-defined shared cluster that Databricks provides. This cluster is a bit more limited in its resources and capabilities compared to the paid clusters you can get with Databricks' commercial offerings. So just be aware that you might experience some performance limitations with the Community Edition.
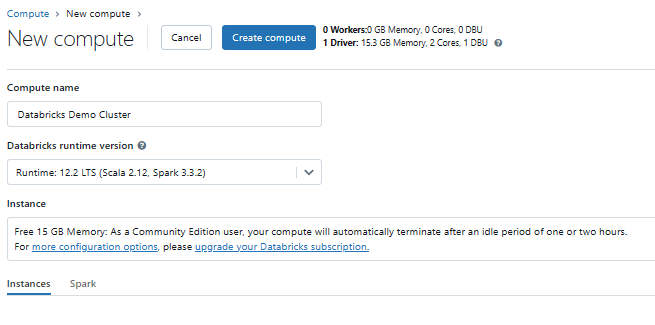
Once the cluster is running, you'll be able to attach it to your Databricks notebooks for executing Delta Table operations.
Step 2—Create Databricks Notebook
Databricks notebooks are web-based interfaces where you can write and execute code, visualize data, and collaborate with others.
To create a new Databricks notebook, follow these steps:
- Open your web browser and head over to the Databricks workspace URL. Log in using your username and password.
- Once you're logged in, you'll see the main Databricks workspace interface. On the left-hand side, you'll find a navigation bar with a bunch of options.
- Look for the "+ Create" button in the navigation bar and click on it. This will open a dropdown menu with a bunch of options.
- In the dropdown menu, find the "Notebook" option and click on it. This will take you to a new screen where you can create your notebook.
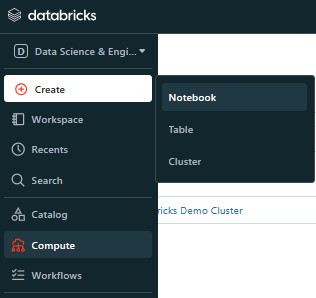
5. Now it's time to give your notebook a name! Choose something descriptive so you can easily find it later. You'll also need to pick a language for your notebook, like Scala, Python, R, or SQL. Choose the one you're most comfortable with.

Voila! You've created your Databricks notebook. Now you're ready to start writing and executing code within its cells.
Step 3—Creating Databricks Delta Table
Alright, now that you've got your Databricks cluster and notebook all set up, it's time to create your very first Delta Table! You've got two main options for creating a Delta Table—you can use SQL, or you can use DataFrame.
Using SQL:
CREATE TABLE students_info (
  id INT,
  name STRING,
  age INT
)
USING DELTA
LOCATION '/user/hive/warehouse/student_info'
Databricks Delta Table example
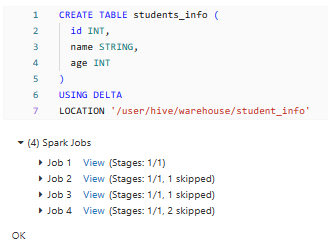
As you can see, this SQL statement creates a new Delta Table named students_info with three columns: id (integer), name (string), and age (integer). The USING DELTA clause specifies that the table should be created as a Delta Table, and the LOCATION clause defines the path where the Delta Table files will be stored.
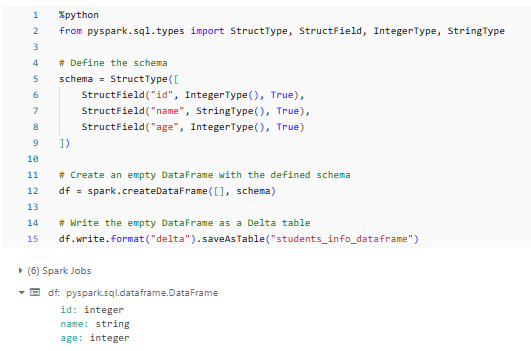
Using DataFrame:
%python
# Databricks Delta Table example
from pyspark.sql.types import StructType, StructField, IntegerType, StringType

# Define the schema
schema = StructType([
    StructField("id", IntegerType(), True),
    StructField("name", StringType(), True),
    StructField("age", IntegerType(), True)
])

# Create an empty DataFrame with defined schema
df = spark.createDataFrame([], schema)

# Writing empty DataFrame as a Delta table
df.write.format("delta").saveAsTable("students_info_dataframe")
# or
# or df.write.format("delta").save("/path/to/delta/…")"
As you can see, creating a Delta Table using DataFrame is a straightforward process. We first import the required libraries and define the schema for the table. Then, we create an empty DataFrame with the specified schema and use the write method to save it as a Delta Table. By specifying the format as "delta" and providing the path or table name, we can easily create a Delta Table that's ready for data loading.
Step 4—Inserting Data Into Databricks Delta Table
Once you've created a Delta Table, the next step is to insert data into it. Again, you can use either SQL or the DataFrame to insert data into a Delta Table.
Using SQL:
To insert data into a Delta Table using SQL, you can execute an INSERT statement:
INSERT INTO students_info
VALUES (1, "Elon", 25),
       (2, "Jeff", 30),
       (3, "Larry", 35)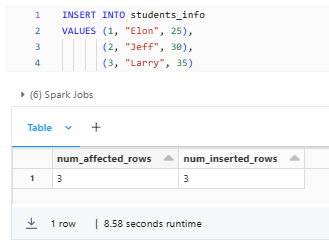
It inserts three rows of data into the students_info Delta Table.
Using the DataFrame:
To insert data into a Delta Table using the DataFrame, you can create a DataFrame from your data source and then write it to the Delta Table using the appropriate methods. Here's an example in Python:
%python
from pyspark.sql.types import StructType, StructField, IntegerType, StringType

# Create a DataFrame from data
data = [
  (1, "Elon", 25),
  (2, "Jeff", 30),
  (3, "Larry", 35)
]
schema = StructType([
    StructField("id", IntegerType(), True),
    StructField("name", StringType(), True),
    StructField("age", IntegerType(), True)
])

# Create an empty DataFrame with the defined schema
df = spark.createDataFrame(data, schema)

# Append data to the Delta Table
df.write.format("delta").mode("append").saveAsTable("students_info_dataframe")
Databricks Delta Table example

As you can see, we first create a DataFrame from a list of tuples representing our data. Then, we use the write method to append the data to the existing Delta Table. The mode("append") option ensures that the new data is appended to the existing table without overwriting it.
Step 5—Query the Delta Table
After creating and populating a Delta Table, you can query its data using SQL or the DataFrame, just like you would with any other Spark table or DataFrame.
Using SQL:
To query a Delta Table using SQL, you can execute standard SQL statements in your Databricks notebook:
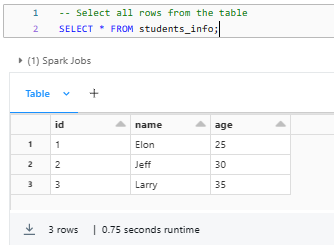
SELECT * FROM students_info;Databricks Delta Table example
SELECT id, name
FROM students_info
WHERE age >= 30;
Databricks Delta Table example
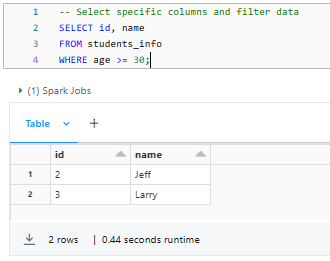
These SQL statements query the students_info Delta Table, retrieving either all rows or a subset of rows based on the specified filter condition.
Using the DataFrame:
To query a Delta Table using the DataFrame, you can read the Delta Table into a DataFrame and then apply transformations or actions as needed. Here's an example in Python:
%python
# Read the Delta Table into a DataFrame
delta_table_df = spark.read.format("delta").load("/user/hive/warehouse/students_info_dataframe")

# Select all rows
delta_table_df.show()

# Select specific columns and filter data
filtered_df = delta_table_df.select("id", "name").filter(delta_table_df.age >= 30)
filtered_df.show()
Databricks Delta Table example
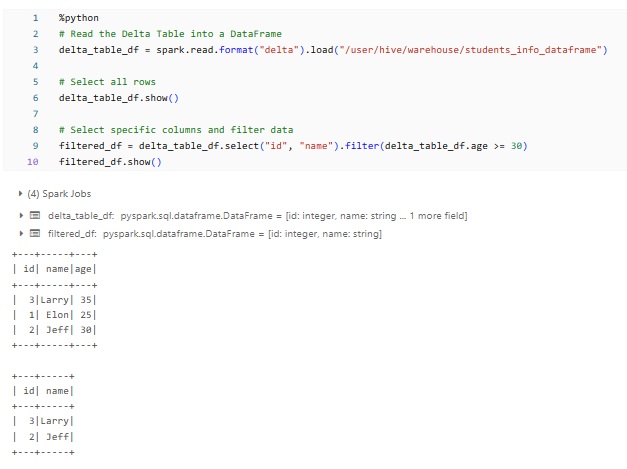
You can see that we first read the Delta Table into a DataFrame using the spark.read.format("delta").load() method. Then, we can apply various transformations and actions to the DataFrame, such as show() to display the data, select() to select specific columns, and filter() to filter the data based on a condition.
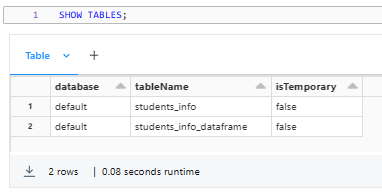
You can also make use of the SHOW TABLES command to get an overview of the available tables in your database.
SHOW TABLES;Databricks Delta Table example
Step 6—Perform DML Operations (Update, Delete, Merge)
One of the powerful features of Databricks Delta Tables is their support for ACID transactions, which allows you to perform data manipulation operations like updates, deletes, and merges while maintaining data integrity and consistency.
1) Updating Records in a Delta Table:
To update records in a Delta Table, you can use the SQL UPDATE statement or the DataFrame merge operation.
Using SQL:
UPDATE students_info
SET name = "Tony Stark"
WHERE id = 1;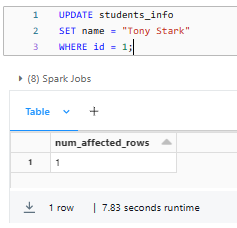
This statement updates the name column to "Tony Stark" for the row where the ID is 1.
Using the DataFrame:
%python
from pyspark.sql.functions import when, lit

# Read the Delta table into a DataFrame
students_df = spark.table("students_info_dataframe")

# Update the DataFrame
updated_df = students_df.withColumn(
    "name",
    when(students_df.id == 1, lit("Tony Stark"))
    .otherwise(students_df.name)
)

# Write the updated DataFrame back to the Delta table
updated_df.write.format("delta").mode("overwrite").option("mergeSchema", "true").saveAsTable("students_info_dataframe")
Databricks Delta Table example
Let's break it down:
First, we read the existing Delta table students_info_dataframe into a DataFrame using the spark.table() method. Next, we create a new DataFrame updated_df by modifying the original students_df DataFrame using the withColumn() method to update the name column conditionally. The when() function checks if the ID is 1 and replaces the name with “Tony Stark” for those rows, while the otherwise() function keeps the original name value for all other rows.
Finally, we write the updated_df back to the Delta table using the write() method, with the format specified as delta to indicate we're writing to a Delta table. The mode('overwrite') option overwrites the existing data in the table, while the option('mergeSchema', 'true') ensures that the schema is merged with the existing table schema to avoid any schema-related errors. The saveAsTable('students_info_dataframe') method is used to update the existing students_info Delta table with the new data.
2) Deleting Records in a Delta Table:
To delete records from a Delta Table, you can use the SQL DELETE statement or the DataFrame filter operation.
Using SQL:
DELETE FROM students_info
WHERE age < 30;
Databricks Delta Table example
This SQL statement deletes all rows from the students_info Delta Table where the age is less than 30.
Using the DataFrame:
%python
# Read the Delta Table into a DataFrame
delta_table_df = spark.read.format("delta").load("/user/hive/warehouse/students_info_dataframe")

# Filter the DataFrame to exclude rows to be deleted
filtered_df = delta_table_df.filter(delta_table_df.age <= 30)

# Write the filtered DataFrame back to the Delta Table
filtered_df.write.format("delta").mode("overwrite").save("/user/hive/warehouse/students_info_dataframe")
Databricks Delta Table example
First, we read the Delta Table into a DataFrame. Then, we create a new DataFrame filtered_df by filtering out rows where the age is less than 30 using the filter method. Finally, we write the filtered DataFrame back to the Delta Table using the overwrite mode to replace the existing data.
3) Merging Records in a Delta Table:
The merge operation in Delta Tables allows you to insert, update, or delete records based on specific conditions. You can use the SQL MERGE statement or the DataFrame merge operation.
Using SQL:
MERGE INTO students_info AS target
USING (SELECT 1 AS id, 'Tony Stark' AS name, 35 AS age
       UNION ALL SELECT 4 AS id, 'Bruce Wayne' AS name, 40 AS age) AS source
ON target.id = source.id
WHEN MATCHED THEN
  UPDATE SET name = source.name, age = source.age
WHEN NOT MATCHED THEN
  INSERT (id, name, age) VALUES (source.id, source.name, source.age);
Databricks Delta Table example
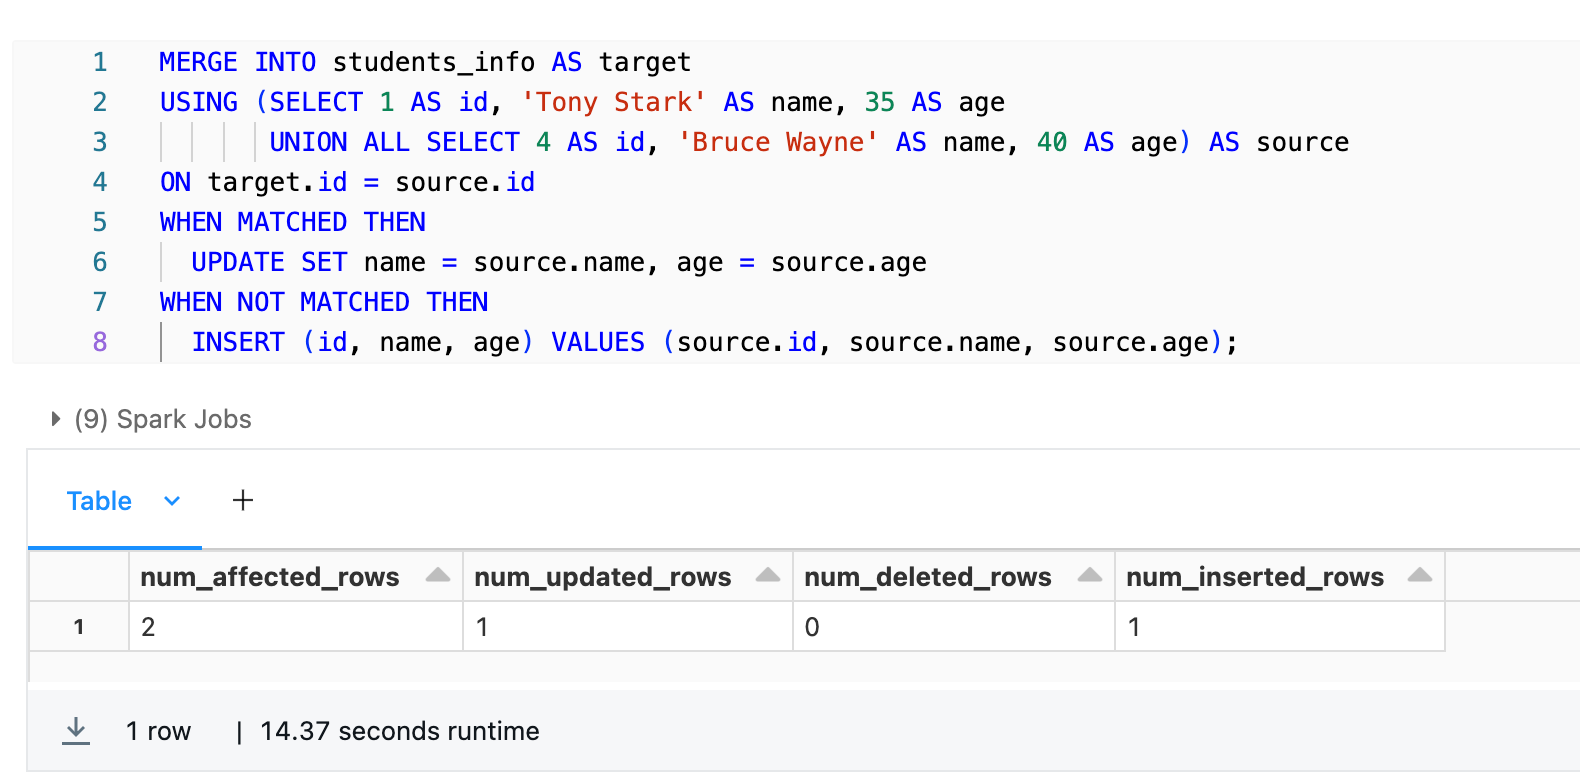
This SQL statement performs a merge operation between the students_info (aliased as target) and a temporary table representing the new/updated data (aliased as source), matching on the ID column. The WHEN MATCHED clause updates the existing records in the students_info with the new values from the source when a match is found. The WHEN NOT MATCHED clause inserts new records from the source when no match is found in the students_info.
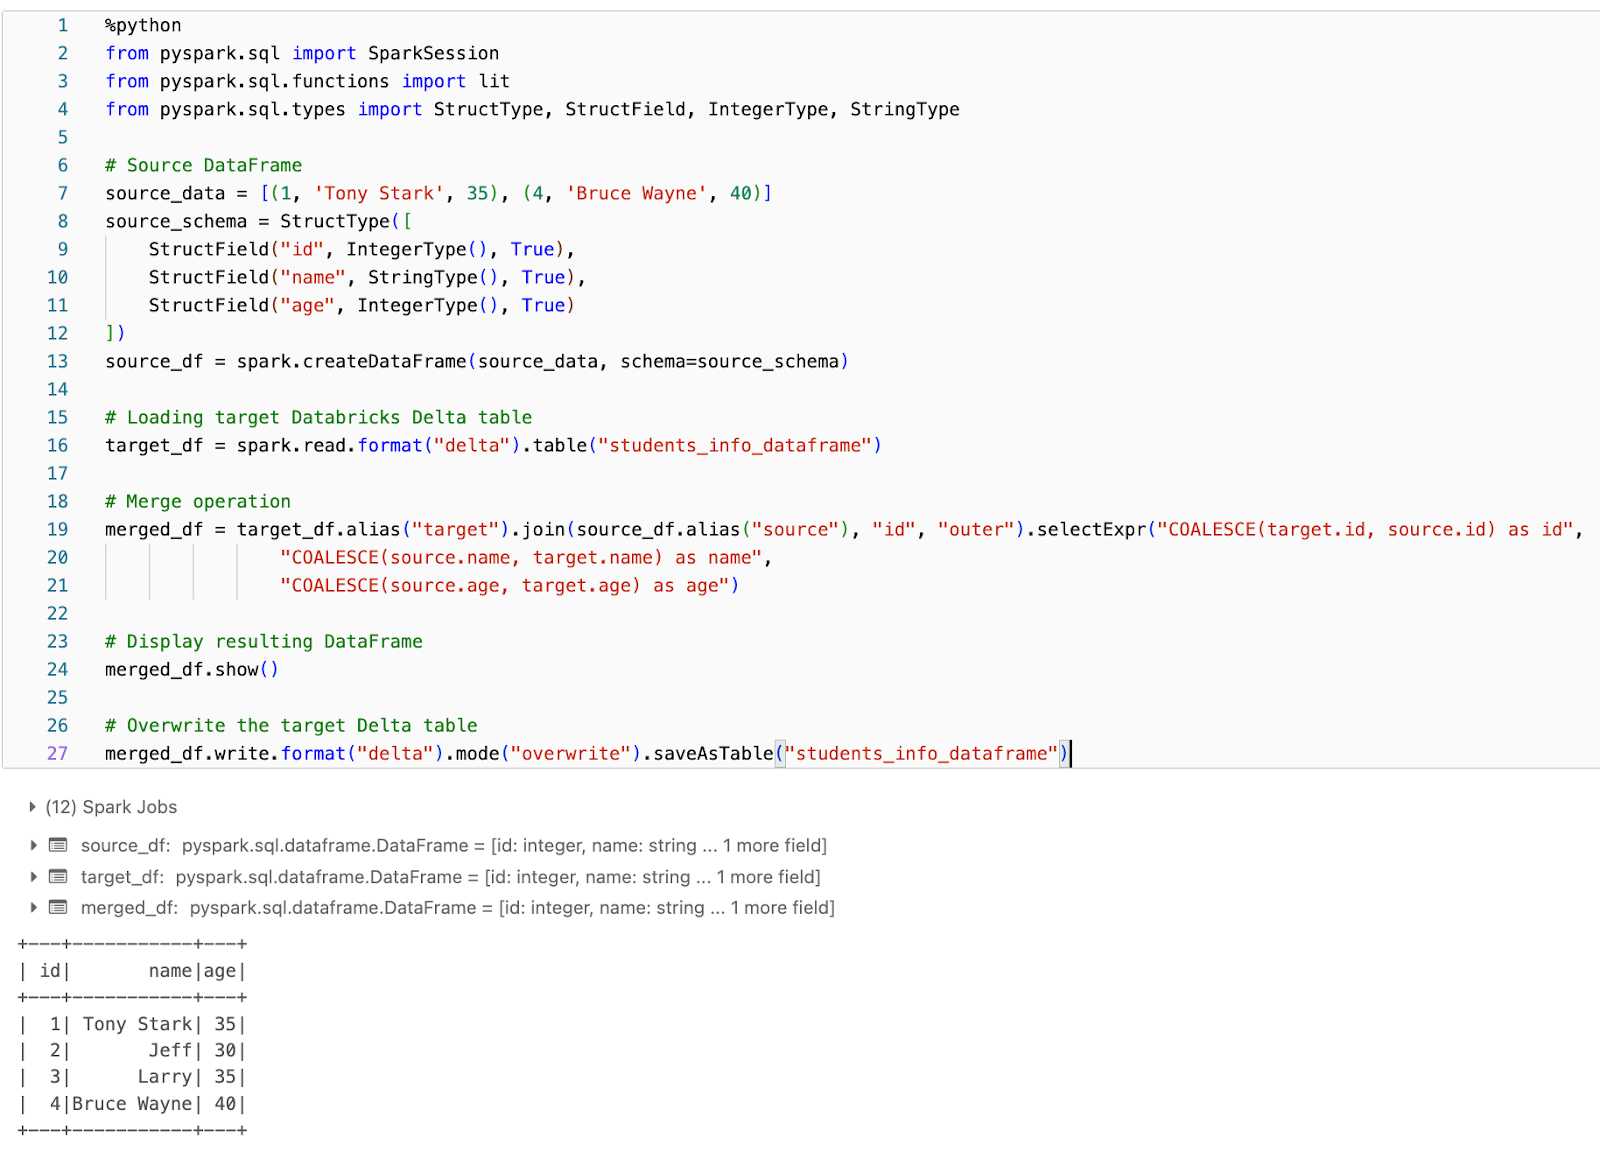
Using DataFrame:
%python
from pyspark.sql import SparkSession
from pyspark.sql.functions import lit
from pyspark.sql.types import StructType, StructField, IntegerType, StringType

# Source DataFrame
source_data = [(1, 'Tony Stark', 35), (4, 'Bruce Wayne', 40)]
source_schema = StructType([
    StructField("id", IntegerType(), True),
    StructField("name", StringType(), True),
    StructField("age", IntegerType(), True)
])
source_df = spark.createDataFrame(source_data, schema=source_schema)

# Loading target Databricks Delta table
target_df = spark.read.format("delta").table("student_info_dataframe")

# Merge operation
merged_df = target_df.alias("target").join(source_df.alias("source"), "id", "outer").selectExpr("COALESCE(target.id, source.id) as id",
                "COALESCE(source.name, target.name) as name",
                "COALESCE(source.age, target.age) as age")

# Display resulting DataFrame
merged_df.show()

# Overwrite the target Delta table
merged_df.write.format("delta").mode("overwrite").saveAsTable("student_info_dataframe")
Databricks Delta Table example
First, we create a source DataFrame source_df with some sample data containing student IDs, names, and ages. This represents the data we want to merge into the existing Delta table.
Next, we load the target Databricks Delta table students_info_dataframe into a DataFrame called target_df using the Delta Lake format.
Then, we perform the merge operation by joining the target_df and source_df DataFrames on the ID column using an outer join. This ensures that all rows from both DataFrames are included in the resulting DataFrame, merged_df.
When creating merged_df, we use the COALESCE function to handle the merge logic. For each column (ID, name, and age), the COALESCE function will choose the value from the source_df if it exists, otherwise, it will take the value from the target_df. This way, we merge the data from the source DataFrame into the target DataFrame, updating existing rows and inserting new rows as needed.
Finally, we overwrite the original student_info_dataframe Delta table with the merged data by writing merged_df back to the table using the Delta Lake format and the overwrite mode.
Step 7—Using Time Travel Option in Delta Table (Optional)
One of the powerful features of Databricks Delta Tables is their ability to maintain a complete history of all changes made to the data, enabling what's known as "time travel." This feature allows you to query and restore previous versions of your data, which can be invaluable for auditing, debugging, and reproducing experiments or reports.
Querying a Previous Version:
To use the time travel option in Delta Tables, you need to specify a version or timestamp when querying or restoring the data.
Using the SQL:
To query a previous version of a Delta Table, you can use the SQL TIMESTAMP AS OF or VERSION AS OF clause.
SELECT *
FROM students_info
VERSION AS OF "-------";
OR
SELECT *
FROM students_info
TIMESTAMP AS OF "-------";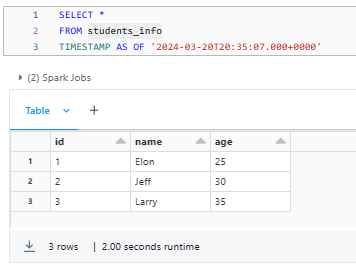
Using the DataFrame:
To query a previous version of a Delta Table using DataFrame you can make use of the option("versionAsOf", ...) method.
%python
version_df = spark.read.format("delta").option("versionAsOf", 2).load("/user/hive/warehouse/students_info_dataframe")
version_df.show()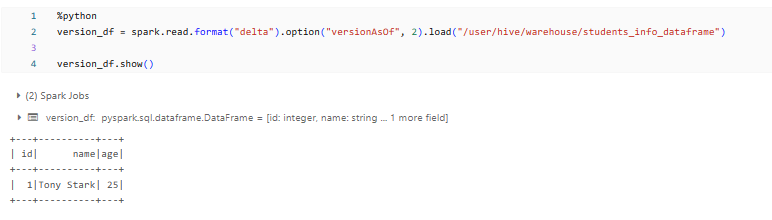
Restoring a Previous Version:
To restore a Delta Table to a previous version, effectively rolling back any changes made after that version, you can use the SQL RESTORE command or the DataFrame.
Using SQL:
RESTORE TABLE my_delta_table
TO VERSION AS OF 123;
This SQL statement restores the my_delta_table Delta Table to that particular version, overwriting the current state of the table.
Using the DataFrame:
from delta import DeltaTable

# Restore the Delta Table to a specific version
dt = DeltaTable.forPath(spark, "/path/to/delta/table")
dt.restoreToVersion(123)
As you can see, we first create a DeltaTable object using the DeltaTable.forPath method, which represents our Delta Table located at /path/to/delta/table. We then use the restoreToVersion method to restore the table to the version specified.
If you use the time travel feature, you can query and restore previous versions of your data, enabling auditing, debugging, and reproducibility of experiments or reports based on historical data snapshots.
Step 8—Optimizing Databricks Delta Table (Optional)
While Databricks Delta Tables offer several performance optimizations out of the box, there are additional steps you can take to further improve query performance and reduce storage footprint.
One of the key optimization techniques is the OPTIMIZE command, which compacts small files in your Delta Table into larger files, improving query efficiency and reducing metadata overhead.
Using the OPTIMIZE Command:
To optimize a Delta Table using the OPTIMIZE command, you can execute the following SQL statement:
OPTIMIZE students_info;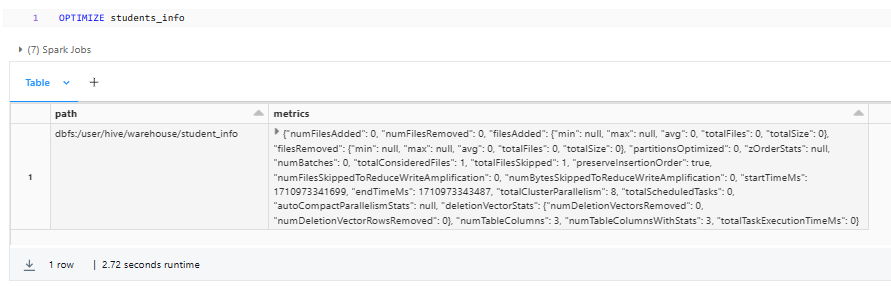
You can also specify additional options with the OPTIMIZE command, such as:
- WHERE clause to optimize a specific partition or subset of the table
- ZORDER option to automatically cluster the data based on query patterns
- VACUUM option to remove files and directories that are no longer referenced by the table
Step 9—Dropping a Delta Table
In some cases, you may need to drop or remove a Delta Table; it could be due to various reasons, such as data reorganization, cleanup, or simply because the table is no longer needed. Delta Tables provide mechanisms to drop tables using both SQL and the DataFrame.
Using SQL:
To drop a Delta Table using SQL, you can execute the standard DROP TABLE command in your Databricks notebook:
DROP TABLE students_info;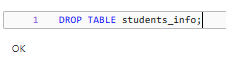
Note that this will permanently remove the students_info Delta Table, including all its data and metadata. If you want to conditionally drop the table only if it exists, you can use the IF EXISTS clause:
DROP TABLE IF EXISTS students_info;Using the dbutils.fs.rm() command:
By using the dbutils.fs.rm() command to remove the Delta Table files:
dbutils.fs.rm("/user/hive/warehouse/students_info_dataframe", recurse=True)
This method removes the Delta Table files from the specified path.
Be very cautious when using this method, as it permanently deletes the files and cannot be undone.
Using spark.sql():
You can also drop a Delta Table programmatically from within Python code by using spark.sql() to execute the SQL DROP TABLE command:
spark.sql("DROP TABLE students_info_dataframe")This approach is similar to using SQL directly, but it allows you to execute the DROP TABLE command from within your Python code.
Note: Dropping a Delta Table is an irreversible operation, and the data associated with the dropped table will be permanently deleted. Therefore, it's recommended to exercise caution and ensure that you have appropriate backups or versions of the data before dropping a Delta Table.
How to improve the performance of the Delta table in Databricks?
Databricks Delta Tables provide a highly efficient and scalable solution for managing and analyzing large datasets. To make the most of Delta Tables and maximize their performance, you can use several strategies and best practices.Let’s explore various techniques to help you optimize your Delta Tables and enhance query performance.
1) Hardware Provisioning (Provision Powerful Compute Clusters)
Always make sure that your Databricks clusters have adequate compute resources (CPU, memory, and disk) to handle your workloads. Provisioning more powerful clusters can significantly improve query performance, particularly for resource-intensive tasks.
2) Data Skipping
Delta Tables maintain statistics about the data in each file, enabling Spark to skip reading files that don't contain relevant data for a given query. This technique, known as "data skipping," can greatly improve query performance by reducing the amount of data that needs to be read and processed.
3) Data Layout Optimization
Delta Tables can automatically optimize the layout of your data by compacting small files and rewriting data in a more efficient format. This can be achieved using the OPTIMIZE command or by configuring automatic optimization schedules.
4) Data Clustering and Z-Ordering
Clustering your data based on commonly queried columns can improve query performance by minimizing the data that needs to be read and processed. Delta Tables support automatic data clustering using the Z-Ordering technique, which can be enabled using the OPTIMIZE command or specified when writing data to the table.
5) Partition your Data Wisely
Partitioning your Delta tables based on commonly filtered columns can significantly improve query performance by reducing the amount of data that needs to be scanned.
6) Delta Caching
Delta Tables support caching frequently accessed data in memory, which can significantly improve query performance. You can enable Delta Caching using the CACHE command or programmatically using the DataFrame.
8) Remove Stale Data
Over time, Delta Tables can accumulate a large number of stale data, which can negatively impact performance. You can use the VACUUM command to remove unreferenced or leftover data that are no longer needed, improving storage efficiency and query performance.
9) Optimize Join Strategies
Carefully evaluate your join strategies, especially for large datasets, and consider techniques like broadcast joins or partition-based joins. Use the EXPLAIN command to understand the execution plan and analyze the join strategies used by Spark and optimize accordingly.
10) Partition Pruning
Make sure that your queries can take advantage of partition pruning by filtering on partitioned columns. Use the SHOW PARTITIONS <table_name> command to inspect and validate your partitioning strategy.
10) Automated Workload Optimization
Databricks provides various utilities and features to help optimize the performance of your Delta Tables. You can benefit from the features like:
- Databricks Runtime: Keep your Databricks Runtime up to date, as new versions often come with performance improvements and optimizations for Delta Tables.
- Databricks Workflows: You can use Databricks Workflows to automate and schedule optimization tasks (for example, such as running the OPTIMIZE and VACUUM command on a regular basis).
- Databricks Autoscaler: This feature automatically adjusts the number of clusters based on your workloads, ensuring that you have the right resources available to optimize performance.
Check out this article to learn more about the best practices and considerations for creating tables in Databricks.
The techniques we've covered are just the tip of the iceberg when it comes to best practices for optimizing the performance of Delta tables in Databricks. While these strategies can certainly provide a significant boost, there's always room for further fine-tuning and exploration.
Conclusion
And that's a wrap! Databricks Delta Tables offer a powerful solution for managing and analyzing large volumes of data. They offer a bunch of features like ACID transactions, time travel, and schema evolution, which simplify data engineering tasks and enable advanced analytics. With the help of Delta Tables, organizations can build data platforms that are scalable, reliable, and efficient, ultimately enabling better decision-making and data-driven innovation.
In this article, we have covered:
- What is a Delta Lake?
- What Is a Delta Table in Databricks?
- What Are Delta Live Tables in Databricks?
- What Is the Difference Between Delta Live Table and Databricks Delta Table?
- What Is the Difference Between Hive Table and Databricks Delta Table?
- Step-By-Step Guide on Getting Started with Databricks Delta Table
- How to improve the performance of the Delta table in Databricks?
FAQs
What is a Delta Lake?
Delta Lake is a centralized repository that allows storing structured, semi-structured, and unstructured data in its raw format while providing ACID transactions, scalable metadata handling, and unified batch/streaming processing on top of data lakes.
What are the core components of a Delta Lake?
Delta Tables (transactional tables), Delta Log (transaction log), and the Storage Layer (durable data store).
What is a Delta Table in Databricks?
Delta Table is a Parquet-based table stored in a data lake with an accompanying transaction log that enables ACID transactions, data versioning, schema enforcement, and performance optimizations.
What are the key features of Delta Tables?
ACID transactions, data versioning (time travel), strict schema enforcement, and performance optimizations like data skipping, caching, compaction, and clustering.
What is a Delta Live Table in Databricks?
Delta Live Tables is a framework for building and managing data pipelines using Delta Tables in a declarative manner with automatic testing, error handling, and monitoring.
What are the benefits of using Delta Live Tables?
Declarative pipeline development, automatic data quality testing, error handling and recovery, monitoring and visibility, incremental batch/streaming processing.
What is the difference between a Delta Live Table and a Databricks Delta Table?
Delta Live Tables manage data pipelines between Delta Tables, while Delta Tables are the underlying storage layer managing data within a table.
What is the difference between a Hive Table and a Databricks Delta Table?
Key differences include ACID transactions, data versioning, schema enforcement, performance optimizations, distributed metadata, streaming support, and integration with Databricks.
How do you create a Databricks Delta Table using SQL?
Use the CREATE TABLE ... USING DELTA LOCATION '/path' command.
How do you create a Databricks Delta Table using the DataFrame?
Use the df.write.format("delta").saveAsTable("table_name") command.
How do you insert data into a Delta Table using SQL?
Use the INSERT INTO table_name VALUES (...) command.
How do you insert data into a Delta Table using the DataFrame?
Use the new_df.write.format("delta").mode("append").saveAsTable("table_name") command.
How do you query a Delta Table using SQL?
Use the SELECT ... FROM table_name command.
How do you query a Delta Table using the DataFrame?
Use the table_df = spark.read.format("delta").load("/path") command.
How do you delete records from a Delta Table using SQL?
Use the DELETE FROM table_name WHERE … command.
How do you use the Time Travel feature in Delta Tables to query previous versions?
To query previous versions using SQL: SELECT * FROM table VERSION AS OF v or TIMESTAMP AS OF t. Using DataFrame: version_df = spark.read.option("versionAsOf", v).load("/path")
What are some techniques to optimize the performance of Delta Tables in Databricks?
Techniques to optimize Delta Table performance include clustering data, Z-Ordering, compaction, caching, data skipping, hardware provisioning, and automated workload optimization.
How do you handle schema evolution in Delta Tables?
Delta Tables automatically handle schema evolution by updating the table schema as new data is added.
How do you optimize data layout in Delta Tables for query performance?
Use the Z ORDER BY clause to sort and partition data based on columns frequently used in filters.
How do you manage access control and security in Delta Tables?
Use Databricks' built-in access control features, such as table access control and cluster-level permissions.