


Say you have massive volumes of data to process and analyze on Databricks, the key is to do so efficiently by maximizing its compute capabilities. Databricks offers different types of compute that provide scalable cloud hardware resources like CPUs, memory, and storage—these underlying resources power data processing tasks. Databricks Clusters are then provisioned on this compute infrastructure to utilize the resources for distributed data processing through Spark. Clusters are highly customizable virtual environments that allow you to configure isolated runtimes with nodes tailored to your specific data processing workloads. So, while compute provides the raw hardware muscle—clusters optimize how that muscle powers your data work.
In this article, we’ll dive deep into Databricks clusters including the different types available, how to create and manage them, and best practices for configuring high-performance clusters tuned to your use cases.
What Is Compute in Databricks?
Databricks compute are the foundational infrastructure resources that are allocated to power data and analytics workloads which includes CPU, memory, storage and networking capacity.
Databricks offers various methods for acquiring compute, like pay-as-you-go usage or committing to instances for cost savings. The compute purchased can then be utilized by clusters to run jobs and queries.
Types of Compute in Databricks
Databricks offers several options for allocating compute, which includes All-Purpose compute, Job compute, Vector Search (Preview), Instance Pools, Serverless SQL warehouse, and Classic SQL Warehouse.

1). All-Purpose Compute
All-Purpose compute is a flexible, on-demand computing option that is ideal for ad-hoc data analysis using interactive notebooks. You can create, terminate, and restart this compute using the interface, Databricks CLI, or REST API, and you are charged per second of usage. All-purpose compute is also known as all-purpose clusters, which are the most common type of cluster in Databricks.
2). Job Compute
Job compute is tailored and reserved exclusively for executing production ETL jobs on a schedule. Whenever you initiate a job on a new compute, the Databricks job scheduler generates a job compute. Once the job concludes, this compute is automatically terminated and cannot be restarted. Job compute is also known as job clusters.
You can learn more about Job compute in this documentation.

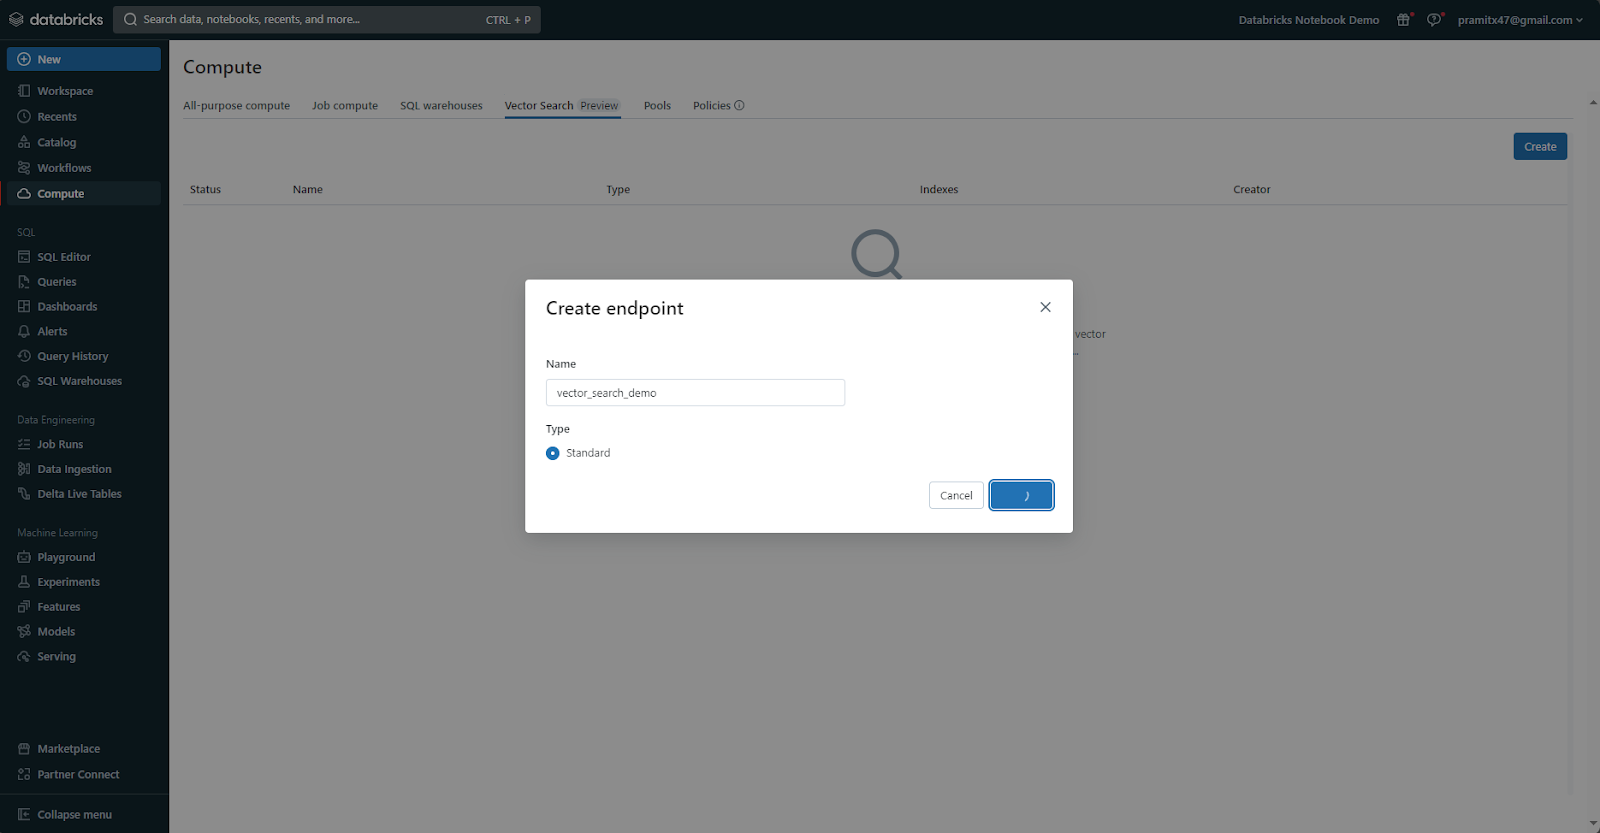
3) Vector Search (Preview)
Databricks Vector Search, currently available for public preview in the following regions: us-east-1, us-east-2, us-west-2, eu-west-1, ap-southeast-2, is integrated within the Databricks Intelligence Platform and functions as a vector database optimized for the storage and retrieval of embeddings. These embeddings, which are mathematical representations of semantic content, play a crucial role in various GenAI applications such as RAG systems, recommender systems, and image recognition. Vector Search allows you to build a vector search index from a Delta table. The index contains vector data along with metadata. You can then query the index through a REST API to find the most similar vectors and return the matching documents. The index can be configured to automatically sync when the underlying Delta table is modified.

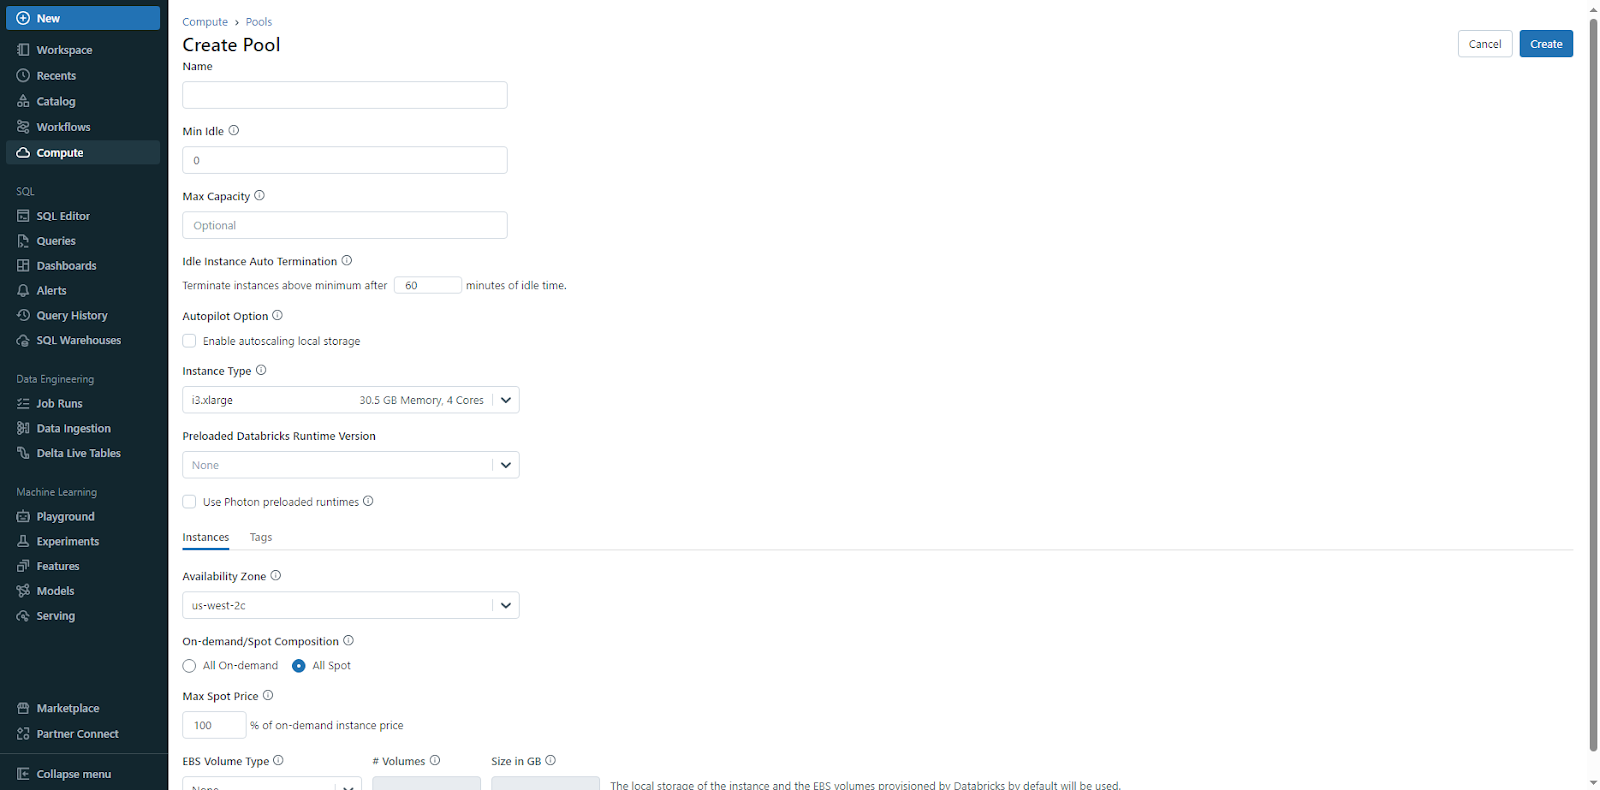
3). Instance Pools
Instance Pools provide reserved compute capacity by pre-provisioning idle, ready-to-use instances that sit warm awaiting workloads. This helps reduce start up time and autoscale delays by having resources ready to allocate immediately when needed. With the help of Instance Pools, you, as a user, can commit to paying for instances even when not actively in use, in exchange for predictable performance and lower latency. The reserved pool of instances is dedicated for your exclusive use.
4). Serverless SQL Warehouses (Pro)
Serverless SQL Warehouses offer a serverless, autoscaling SQL analytics compute layer that can dynamically allocate resources as needed to run SQL queries without requiring capacity planning or management. This simplifies SQL analytics on Databricks.
5). Classic SQL Warehouses
Classic SQL Warehouses enable SQL analytics on Databricks via traditional pre-provisioned compute that requires manual resource management based on workload forecasts. This contrasts with the automated serverless scaling of the Serverless SQL Warehouses option. The provisioned model provides predictable capacity but requires manual administration.

Databricks Compute and Databricks Clusters are closely related concepts in Databricks, but they are not exactly the same thing. Compute refers to the selection of computing resources you can provision in your Databricks workspace, while clusters are the reusable, isolated virtual environments that use those resources to run your workloads.
What Are Clusters in Databricks?
Databricks clusters are virtual environments instantiated on the Databricks platform that are optimized to run data processing workloads. These workloads include ETL pipelines, streaming analytics, ad-hoc analytics, and ML tasks. Databricks clusters can execute code written in various languages supported on the platform including Python, SQL, Scala, and R. Each cluster is an isolated environment with configurable compute resources that allows running multiple workloads in parallel without interference.
You can create and manage clusters using the Databricks UI, Databricks CLI, or the REST API. Each cluster consists of:
- Compute Nodes: The virtual machine instances that provide CPU, memory, and storage resources to the cluster. Nodes can be resized and added dynamically.
- Databricks Runtime: An optimized distribution of Apache Spark tailored for the Databricks platform. It includes enhancements for performance, scalability, security, and integrations.
- Libraries: Users can install additional JARs, Python/R packages, Spark packages etc. that can be used by workloads running on the cluster. These are automatically available on cluster start.
- Init Scripts: Custom scripts that execute on cluster start to configure dependencies, mount storage, download data etc.
- Notebooks and Dashboards: Data artifacts and visualizations created in Databricks that can be associated with a cluster for easy access. The cluster will have permissions to access these resources.
Databricks clusters have the following key characteristics:
- Reusable: Databricks clusters persist after being created and can execute multiple jobs and workloads over their configured lifetime, which saves the overhead of creating clusters for every job.
- Customizable: Databricks clusters can be customized with different types of nodes, number of nodes, installed libraries and init scripts to match the resource requirements of different workloads.
- Isolated: Each Databricks cluster provides a separate virtual environment with dedicated resources, which provides performance isolation between concurrent workloads.
- Auto-scaling: Databricks clusters can auto-scale based on workload metrics to add or remove nodes dynamically. They can also auto-terminate after being idle to optimize cost savings.
- Scalable: Databricks cluster resources like node types and number of nodes can be manually scaled up or down to meet changing workload demands.
- Secure: Granular access controls can be defined at the cluster level to restrict users and workloads. Resources like data can also be securely accessed from clusters.
TL;DR: Databricks clusters deliver customizable, isolated environments to execute jobs and queries utilizing assigned compute resources.
Types of Databricks Cluster
Databricks offers two types of clusters optimized for different use cases:
1). All-Purpose Databricks Clusters
All-Purpose Clusters are used for collaborative data analysis using interactive notebooks. These clusters can be created, terminated, and restarted using the Databricks UI, Databricks CLI, or REST API. Multiple users can share these Databricks clusters for collaborative analysis. All-Purpose Clusters are designed to be flexible and can be configured with different amounts of compute resources, such as CPU, memory, and GPU, to meet the needs of different workloads. They are ideal for data exploration, ad-hoc analysis, and iterative development of machine learning models.
2). Job Clusters
Job Clusters, on the other hand, are created by the Databricks job scheduler to run fast and robust automated jobs. These Databricks clusters are terminated once the job is complete and cannot be restarted. Job clusters are designed to be highly optimized for specific workloads, such as ETL pipelines, streaming analytics, and batch processing. They are typically configured with a fixed amount of compute resources and are optimized for performance and cost efficiency.
Step-By-Step Guide to Create Databricks Cluster
Let’s walk through step by step on creating an all-purpose Databricks cluster. Having the right cluster configuration is key to getting optimal performance and cost efficiency from Databricks. So let's roll up and dive into the details!
For our example, we will fully focus on provisioning an all-purpose compute cluster. This configuration is well-suited for swiftly deploying resources as needed, particularly for collaborative, ad-hoc analysis, and data science/engineering tasks. Let's explore the step-by-step procedure for creating this versatile workhorse.
Step 1—Creating a New Databricks Cluster
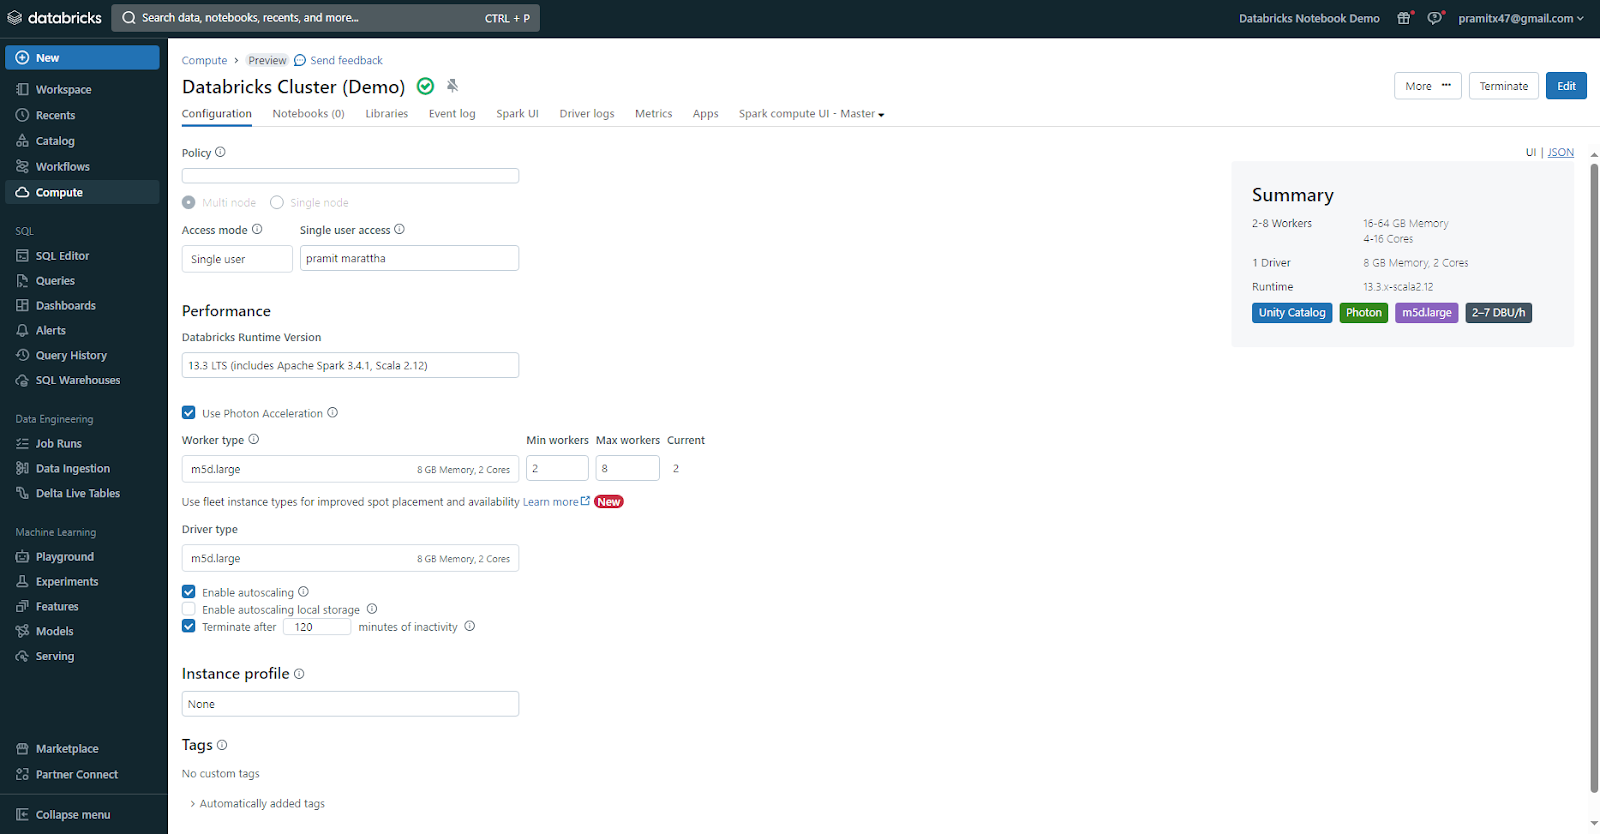
To get started creating a new Databricks cluster, head over to the Compute page within your Databricks workspace. On the Databricks Clusters page, you'll see several tabs. Click on the All-Purpose compute tab, and once you click on it, you will see a list of existing cluster resources along with their status and details. Towards the top right corner, you'll notice a "Create Compute" button. Give this a click to initiate the creation process for a new isolated Spark environment.

You can find the same way to create a new cluster by navigating to +New ➤ Cluster as the option. Both paths will lead you to the New Databricks Cluster page, where the real fun begins!
This is where you set up all the details about how powerful your cluster will be. There are a bunch of settings to adjust, so let's go through them one by one.
Step 2—Creating a Cluster Policy
The first option you'll see on the New Cluster page allows you to associate a cluster policy with your new environment. But what exactly is a cluster policy?
Think of it as a set of predefined rules and configurations that limit the configuration options available to users when creating a cluster.
To configure a cluster according to a policy, select a policy from the Policy dropdown. The dropdown menu shows you the available policy options you can pick based on your access rights.
Each workspace includes default policies you can use for specific use cases. By default, all users have access to the Personal Compute policy, allowing them to create single-machine compute resources.
Users without the unrestricted cluster creation access right can only create clusters based on their granted policies.
There are 4 different policies designed for four different use cases. The policies are the following:
a) Unrestricted Policy
This policy has no restrictions on cluster configurations. Users can create clusters with any type of instance, size, settings, etc. It provides full flexibility, but also the most potential for unconstrained resource usage and costs if not carefully managed.
b) Personal Compute Policy
Designed for individual, self-service usage. It is available to all users in your workspace by default. This policy allows users to easily create a single-node compute resource with minimal configuration options.
c) Shared Compute Policy
Allows users to create larger multi-node resources intended for multiple users to share. These Databricks clusters can be accessed by multiple users within the workspace for collaborative purposes. The policy likely has some guardrails around security, networking, auto-termination, etc.
d) Power User Compute Policy
Grants more privileged users additional flexibility beyond the standard Shared Compute policy. This policy allows users to create larger multi-node resources. The policy is intended for single-user workloads that require more compute resources than Personal Compute allows. Power users might be able to use GPU-accelerated instances, more advanced configurations, longer termination timeouts, etc.
e) Legacy Shared Compute Policy
An older policy that permitted the creation of shared clusters without strict data isolation between users. On modern Databricks runtimes, it's recommended to use the standard Shared Compute policy in conjunction with Unity Catalog for secure multi-user collaboration.
TL;DR:
- Unrestricted = No limitations
- Personal Compute = Single node for individuals
- Shared Compute = Multi-node with some rules
- Power User Compute = Elevated permissions beyond standard Shared
- Legacy Shared Compute = Outdated policy without strict isolation
Step 3—Selecting Access Mode
Next, you'll need to determine what level of access should be granted to users for this new Databricks cluster.
Essentially, this setting controls who can actually leverage the compute resources and any data associated with that isolated Spark environment. It's an important piece for security and governance.
The available options are:
- Single User: Grants cluster access only to the user who creates the environment. No one else can view or interact with this cluster.
- Shared: Opens access to all users within the Databricks workspace. Anyone on the same workspace can view and access the cluster resources.
- No Isolation Shared: Similar to Shared, but utilizes compute with no user isolation. Essentially, all users share the same pooled compute infrastructure.
- Custom: Allows granular specification of user and group access permissions through access control lists. You can cherry-pick exactly who gets access.
For our use case of an interactive all-purpose Databricks cluster, the Shared mode makes sense. This will allow any of your trusted users within the same Databricks workspace to take advantage of the compute resources you provision.
But if you really need strong data security and privacy, you might prefer a more limited approach, like Single User access. Just keep in mind that this significantly reduces the potential for collaboration.
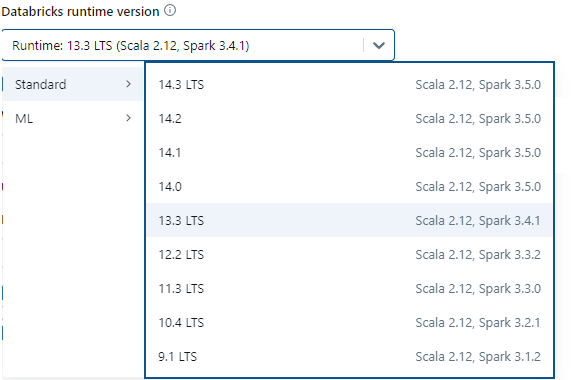
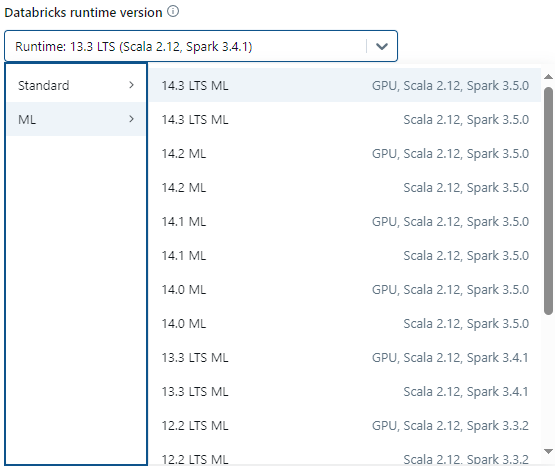
Step 4—Picking a Databricks Runtime Version
Now, let's delve into a critical selection that significantly impacts the core functionality of your Databricks cluster—the Databricks Runtime Version.
But what exactly is this Runtime? Simply put, it's like the engine that powers your cluster's computational capabilities. It has Apache Spark at its core, and it also includes a group of other tools for data processing, file systems, and other supporting technologies, all packaged together neatly.
Basically, Databricks Runtime is the set of core components that run on your compute. Each Databricks Runtime version includes updates that improve the usability, performance, and security of big data analytics. It contains everything needed to actually "run-time" your analytics workloads.
Databricks frequently updates and maintains different releases of this Runtime package, tracking the open-source origins but adding proprietary optimizations, security updates, and managed support. Selecting the right version for your use case is important.
Each version is identified by a version number, with special status designations like LTS (Long-Term Support) to indicate its stage in the release lifecycle.
Here are some key things to think about when deciding which Runtime to pick:
a) Language and API Support Needs (e.g., Python, R, Scala)
Consider the programming languages and interfaces you'll be using, like Python, R, or Scala. Make sure the Runtime you choose supports what you need.
b) Performance Optimization Profiles for Specific Workload Patterns
Think about the kind of work you'll be doing. Different Runtimes might be better for certain types of tasks, so pick the one that fits your workload patterns.
c) Latest Security Patches
Check if the Runtime version has the most recent security updates. It's important to keep things secure.
4) Availability of Supporting Libraries and Cloud Storage Connectors
Make sure the Runtime works well with the extra tools and connections you'll be using, like supporting libraries and links to cloud storage.
For general-purpose, versatile workloads, Databricks recommends using one of the latest stable Databricks Runtime releases, which ensures you have access to the most current optimizations while maintaining compatibility between your code and preloaded libraries.
But if you are creating job clusters to run critical production workloads, it may be advisable to leverage a Long-Term Support (LTS) Databricks Runtime version. LTS releases undergo extended hardening with minimal changes, providing a stable foundation less prone to compatibility issues. This stability allows you to thoroughly test and validate jobs before upgrading runtimes.
For data science and machine learning use cases, you should consider Databricks' unique Runtime for Machine Learning. This Runtime is pre-configured and optimized for efficient distributed model training and hosting.
All Databricks Runtime versions include Apache Spark as the core distributed processing engine. However, each release incorporates additional components, performance enhancements, security updates, and expanded integration capabilities over time.
You can consult with your Databricks admins to understand each version's suitabilities for your specific workloads. But for our all-purpose cluster, we'll simply select one of the newest tried-and-true LTS releases, which is 13.3. To do so, select the runtime using the Databricks Runtime Version dropdown.
Now your Databricks cluster will be powered by robust, performant software under the hood! The Runtime selection is a vital piece of the puzzle. Now let's configure the raw computational resources themselves.
Step 5—Enabling/Disabling Photon Acceleration
Photon is a high-performance query execution engine that is enabled by default on Databricks clusters using Apache Spark 3.0 or a newer version. It's designed to make SQL queries and working with Apache Spark DataFrames, Delta Lake tables, and Parquet data formats way quicker.
Photon achieves faster query performance through a combination of techniques. It does something called vectorized processing, which allows applying operations to multiple rows simultaneously, reducing the per-row overhead compared to traditional Spark execution. This really speeds up operations like aggregations, joins, filtering, and sorting data. Photon is also optimized to leverage data locality when retrieving data from disk storage. It utilizes hash-based joins instead of traditional sort-merge joins, avoiding the expensive sorting steps. When working with Delta Lake, it can apply updates, deletes, and merges more efficiently for both narrow and wide tables containing many columns.
To enable Photon acceleration, select the "Use Photon Acceleration" checkbox, located right below the Databricks Runtime version option.

Step 6—Configure Worker and Driver Nodes
Now, in the process of creating your Databricks cluster, we're diving into the important part of deciding the actual hardware resources that will make your cluster work.
This is where we allocate virtual machine instances with various profiles of compute power, memory capacity, storage speeds, and more. We're talking about flexing real muscle!
Databricks clusters have two main types of nodes: one is the driver node, and the other is the worker node.
a) Worker Nodes
Worker nodes form the core computational muscle of a Databricks cluster. They are the virtual machine instances that execute the actual parallel data processing tasks.
When you submit a Spark job or query to your cluster, it gets divided into smaller tasks by the Spark engine. These tasks then get spread out across the worker nodes to run at the same time, making parallel data processing possible and giving Spark its fast performance.
Every worker node runs something called a Spark Executor process. An executor takes care of running the code for a Spark task, which includes processing your data to get the results you want. So in Databricks' architecture, there is typically a 1:1 mapping between worker nodes and Spark executors.
The number of worker nodes you configure, as well as their individual compute capacities like CPU cores and memory, directly determines the Databricks cluster's overall processing power and throughput. More workers mean more parallel execution for faster job runtimes.
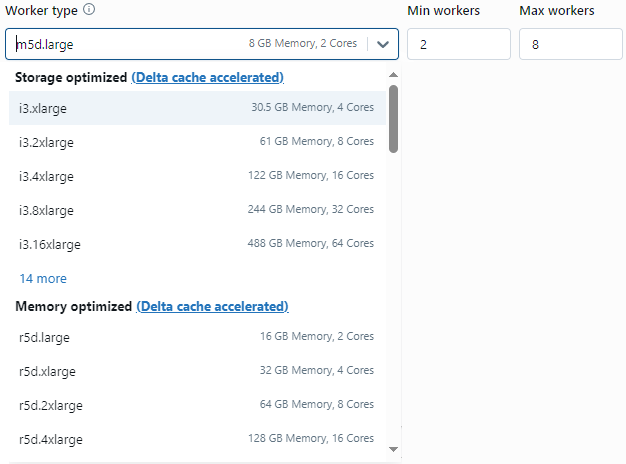
Let's start by configuring the Worker Nodes for our all-purpose cluster. You'll see options to select the specific virtual machine type, as well as the number of nodes to allocate.
There are different classes and generations of machines exposed, including:
- Storage Optimized: Nodes optimized for high throughput data I/O needs like big ETL jobs
- Memory Optimized: More memory per dollar for in-memory analytics
- Compute Optimized: Focus on CPU power for heavy processing workloads
- General Purpose: Balanced compute, memory, and storage for versatile needs
- GPU Accelerated: For hardware acceleration of machine learning and AI
For our general use case, let's go with a reasonably balanced General Purpose node profile, selecting something like a m5d.large instance that provides 8GB of RAM and 2 cores of CPU. This gives us sufficient headroom for compute and memory.
As for the quantity, we'll start with a minimum of 2 Worker nodes and a maximum of 8 Worker nodes. Having at least 2 allows for parallel task distribution. We'll be able to easily increase the node count later if needed through autoscaling or manual adjustments.
For running a Spark job, you need to have at least one worker node. If a cluster has zero workers, you can run non-Spark commands on the driver node, but Spark commands will fail.
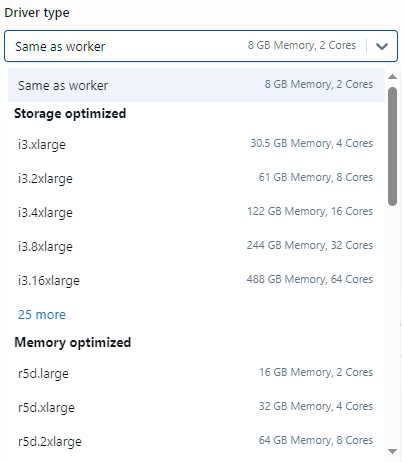
b) Driver Node
While the worker nodes handle the computational heavy lifting, the driver node acts as the orchestrator and coordinator of the overall Spark workload execution.
The driver node runs the Spark Driver process. This manages and monitors all the parallel executors running across the workers. It interprets commands, maintains state information like the SparkContext, and coordinates activities to produce final results.
The driver is also responsible for running any logic that cannot be parallelized across executors. For example, aggregating and collecting results, attaching notebooks, caching datasets in shared memory, etc.
So the driver acts as the "brain" telling the workers what tasks to do and how to do them efficiently in a distributed manner. It tracks progress, handles failures, schedules tasks, and manages overall execution flows.
Given its critical orchestration duties, the driver node's compute capacity like CPU cores and memory must be sized appropriately. A driver that is underpowered relative to the overall worker resources can become a bottleneck.
As a best practice, Databricks recommends sizing the driver node type to at least match the largest worker node instance type selected. This helps avoid imbalances where executors outpace the driver's coordinating abilities.
To select the worker node, click on the dropdown option. You will see a plethora of options, including the option to select the same as the worker node, Storage Optimized, Memory Optimized, General Purpose, Compute Optimized, and GPU Accelerated. Choose the one that is suitable for your workload, but it is recommended to select the "same as worker" option. For example, if using a m5d.large for workers, you'd pick the same m5d.large for the Driver. This helps avoid bottlenecks.
TL;DR: Worker nodes provide the raw distributed computational power while the driver node acts as the conductor optimally coordinating this compute for efficient Spark execution.
For now, take a moment to review the selections for both Worker and Driver nodes to ensure they align with your expected use case demands on this all-purpose cluster. The right sizing decisions here are critical to optimal cost and performance outcomes.
Step 7—Enable Autoscaling (optional)
Now that we've selected our base node count and types for the Databricks cluster, there's one more key option to consider—autoscaling.
You'll notice a checkbox right below the Driver node options that says "Enable Autoscaling". So what exactly does this enable?
Autoscaling essentially gives your Databricks cluster the ability to dynamically scale up and down its resources in response to workload demand in real-time.
If you did not enable autoscaling, your cluster is locked into the static node count and configuration you originally specified. While you can always manually make adjustments, it requires human intervention. But if you enable autoscaling, everything happens automatically!
So how does Databricks determine when more resources are required beyond your starting configuration? Behind the scenes, it monitors load metrics like concurrent tasks, query queues, available memory, and more. If usage spikes and crosses defined thresholds, Databricks will instantaneously spin up more worker nodes on-demand to handle the increased load.
And on the flip side, if activity dips and leaves nodes underutilized, Databricks will safely decommission those idle resources to rein things back in. It's a beautiful self-managed elasticity.
What Are the Key Benefits of Having This Autoscaling Capability on Your Databricks Clusters?
First, it ensures that your performance stays consistent, no matter if there's a lot of demand or just a little. Jobs won't slow down because of not having enough resources when you have autoscaling turned on.
Second, it proactively optimizes costs. You're not wasting money on over provisioned resources sitting idle. Autoscaling makes sure you only use—and pay for—exactly the capacity required for the current workload.
Databricks lets you customize how autoscaling reacts to different situations. You can adjust thresholds and factors to make it more or less aggressive in scaling up or down.
You can also enable autoscaling for local storage. To autoscale local storage, Databricks monitors the amount of free disk space available on your cluster’s Spark workers. If a worker begins to run too low on disk, Databricks automatically attaches a new EBS volume to the worker before it runs out of disk space.
For long-lived all-purpose clusters prone to demand swings, it is highly recommended to enable autoscaling. It makes a data team's life much easier to "set it and forget it" rather than having to actively scale up and down clusters.
With the autoscaling checkbox enabled, our cluster can now automatically stretch and flex its muscles as needed!

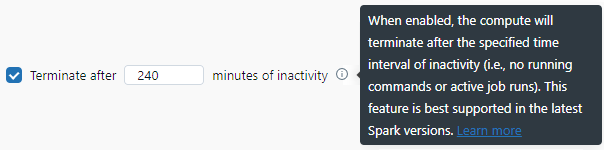
Step 8—Setting Automatic Termination
Another key configuration related to autoscaling that can greatly impact costs is automatic termination. Even with autoscaling enabled, you may have periods of extended inactivity where minimal cluster resources are needed.
In those cases, it makes a lot of sense to have Databricks automatically shut down and terminate the cluster entirely, rather than keep it provisioned and accruing charges while idle.
Databricks supports an automatic termination configuration that does exactly this. You specify an idle timeout threshold in minutes. If the entire cluster goes that period of time without any active jobs, queries, or tasks, Databricks will automatically initiate the termination of the full cluster environment.
This doesn't permanently delete the setup. The cluster's state and details are saved, so you can easily start it up again later without any issues. But it does free up the actual provisioned infrastructure and charges in the interim.
You'll notice the default automatic termination timeout is set to 120 minutes (2 hours). So if there is no workload usage on the cluster for 2 hours straight, Databricks will terminate it.
Depending on your usage patterns, you may want to adjust this default timing. On the flip side, for very heavy/intensive workloads with long periods of inactivity in between, you may reduce the timeout to save even more aggressively on costs. Just remember, if you set the termination threshold lower, it might take a bit longer to start the cluster again because of some extra setup time.
So let's go ahead and enable automatic termination and set the timeout for 4 hours (240 minutes) to balance cost and convenience for our interactive all-purpose cluster use case.
Step 9—Setting up Instance Profiles
At this stage in the Databricks cluster configuration, we have options to integrate and authorize secure access to external compute and storage resources like your cloud provider's services.
These integrations are facilitated through something called an instance profile. Let's discuss what that is.
We are using AWS as our cloud storage object, so in this case the instance profile allows you to access your data from Databricks clusters without the need to manage, deploy, or rotate AWS keys.
To configure an instance profile for your Databricks cluster, you'll first need to create an IAM role in the AWS console that grants the necessary privileges.
Once you have the IAM role created, there are two key pieces of information you'll need to reference in Databricks:
- Instance Profile ARN: This is the Amazon Resource Name uniquely identifying the instance profile object that is associated with your IAM role.
- IAM Role ARN: This is the ARN of the IAM role itself, not the instance profile. The role defines the permissions.
You can find both of these ARN values in the AWS IAM console. Search for your role, click on its details, and you'll see the full ARN values displayed.
Now that you have noted the ARNs, you can then head to the Databricks admin console under Workspace Settings ➤ Security ➤ Instance Profiles. Here you can input the profile and role ARNs along with a few additional settings:
- Meta Instance Profile: Allows the Databricks cluster to assume the identity of whichever user or job is executing code, inheriting their IAM permissions.
- Skip IAM Validation: Skips validation that the IAM role and instance profile allow the ecs.amazonaws.com service, which is not technically required for Databricks usage.
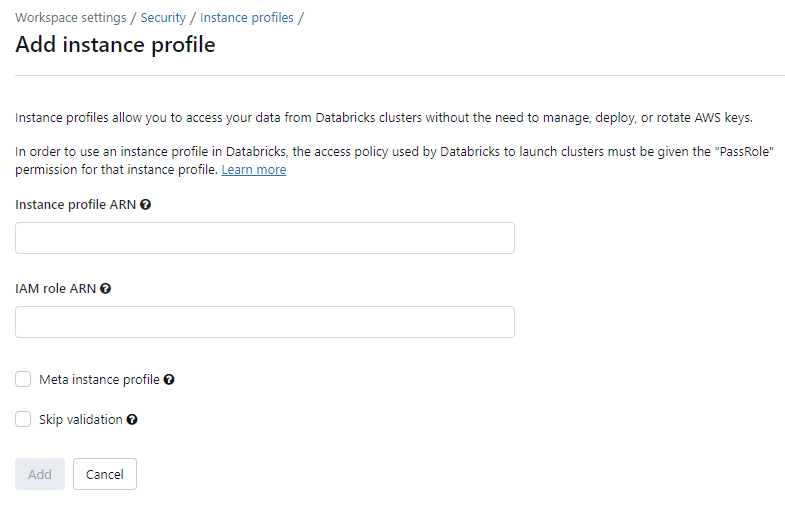
Once configured and saved, your Databricks clusters will be able to leverage the IAM permissions granted by the associated role, which allows secure, least-privileged access to integrated AWS resources from within the Spark environments.
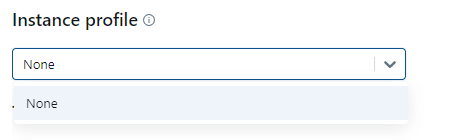
But for this example, we are currently creating none. To do this, go to the Instance profile dropdown and select None as an option.
Step 10—Adding Tags
Tagging is an important organizational concept when working at cloud scale with many Databricks clusters and workloads. Tags are simply metadata key/value pairs that you can attach to cloud infrastructure resources like Databricks clusters.
These tags provide a way to logically group, categorize and identify related resources. They also enable other downstream automation capabilities around access control, cost tracking, lifecycle management—and more.
Your organization likely has policies around standardized tagging requirements, the keys used, allowed values, and so on. Work closely with your admin teams to understand proper conventions.
On the Databricks Cluster configuration page, you'll see a "Tags" section that allows you to manually specify key/value pairs to apply as metadata tags to your new cluster.
Go ahead and add any relevant tags based on your organization's conventions. For example:
Environment: test
Product: FinOps
Owner: [email protected] 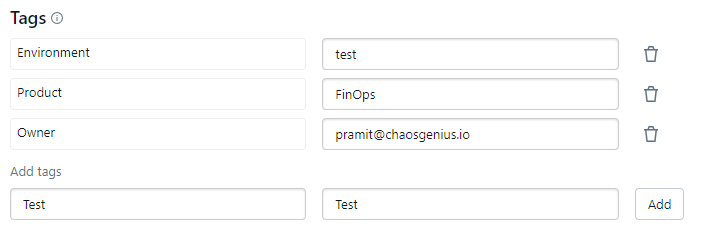
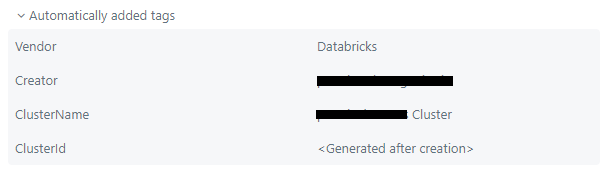
Also, Databricks automatically adds some system tags as well. These are used for internal purposes. You don't need to manually specify these.
So take a moment to review and add the appropriate tags for your new all-purpose cluster.
Step 11—Setting Advanced Configuration
We've now configured many of the foundational attributes for our Databricks cluster in terms of access, compute sizing, scaling behavior, termination policies—and more. But there are still some advanced options we can tweak as well.
Let's discuss a few of the most impactful advanced configurations to consider:
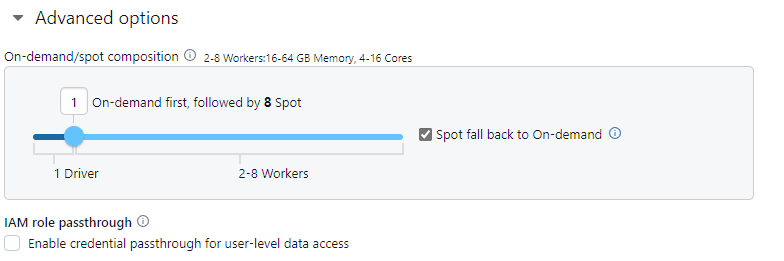
a) On-Demand vs Spot Instance Composition
By default, clusters use stable, guaranteed on-demand pricing for virtual machines. But you can opt to use lower-cost spot instances that take advantage of spare cloud capacity.
Spot instances provide the same resources at a discounted rate but with the risk of potential interruptions if cloud demand spikes. Databricks has ways to mitigate this like decommissioning nodes gracefully. Spot makes sense for some workloads despite the interruption risk. By default, the max price is 100% of the on-demand price.
b) IAM Role Passthrough
The IAM Role Passthrough option allows you to pass IAM roles from authenticated Databricks users through to the cluster environment. When enabled, any privileges and permissions an individual user has in the underlying cloud provider account get inherited on the cluster, which makes authentication and access handling more seamless across cloud resources and Databricks. But it also reduces the ability to strictly control cluster permissions. So it's a trade-off between convenience and least privilege principles.
Step 12—Configuring Instances
In previous steps, we selected the base virtual machine types for our worker and driver nodes, specifying the vCPU, memory, and local storage capacities.
But there are some additional capabilities we can leverage on the cloud provider's instance types to further enhance and optimize our cluster's performance, cost profile , and reliability characteristics.
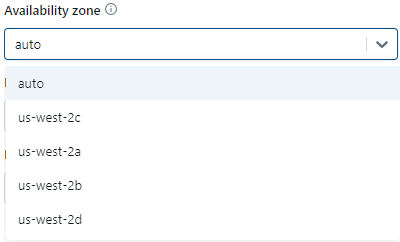
For example, we have options around the availability zone placement for instances. You can distribute nodes across multiple availability zones to improve resilience if an outage impacts a single zone.
There are also configurations to set the maximum spot pricing you're willing to pay if using that discounted instance type. This helps control unexpected cost spikes. By default, the max price is 100% of the on-demand price.

Another advanced option relates to storage. You can specify additional EBS volumes to be added to each node of the cluster. This feature is particularly useful when running workloads that demand a significant amount of shuffle space. If you are uncertain about sizing them, consider using the "Autoscaling Local Storage" option.
Learn more about EBS volume type.

Step 13—Configure Logs and Storage
Now, let's dive into the settings for managing and storing the activity logs created by your Databricks cluster.
Fundamentally, you need to determine where the log files containing details on completed jobs, tasks, errors and more should be delivered and stored.
The log delivery location essentially specifies the storage path where Databricks will ship log files containing the activity details, output, and diagnostic information related to your cluster.
Some common log storage options available are:
- Local storage directly on the cluster
- S3 buckets in your AWS account
- ADLS storage in an Azure subscription
- GCS storage buckets in GCP
- Databricks DBFS
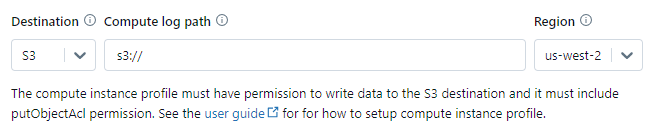
Storing logs locally on the cluster itself is not a best practice if you want persistence. Those logs only stick around as long as the cluster remains active. If it terminates, you will lose everything. So, it's recommended to configure a scalable, durable cloud storage location integrated with your cloud platform.
Step 14—Customize with Spark Properties
Apache Spark, the core distributed processing engine powering Databricks, provides countless configuration properties and environment settings to tune and optimize performance.
These configurations can be set systemically for the entire Spark cluster environment, which allows you to bake in optimizations tailored to your specific workloads and requirements.
To optimize Spark jobs, you have the option to specify custom Spark configuration properties in the cluster settings. To do so:
- Navigate to the cluster config tab.
- Click on the Advanced Options toggle.
- Select the Spark tab.
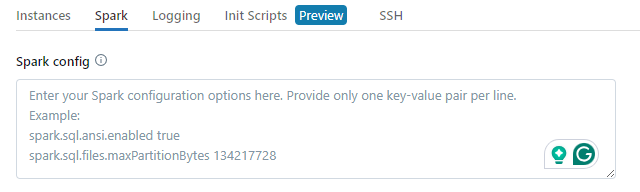
- Under Spark config, input the custom Spark configuration properties. Enter these properties as one key-value pair per line.
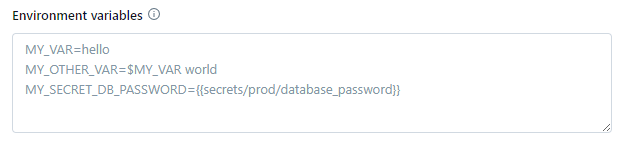
Just below the Spark configuration input, there is another field that allows you to define custom environment variables. These are name/value pairs that get injected into the cluster's operating system-level environment.
Custom environment variables specified here become accessible from any initialization scripts(init scripts) or commands executed during the startup and runtime of the cluster's nodes. This allows you to parameterize and pass through configuration details to bootstrap scripts, custom code, installed packages, etc.
Speaking of initialization scripts, Databricks supports the ability to upload and execute shell scripts that automatically run during the provisioning of each worker and driver node in the cluster. These "init scripts" are executed before the Spark runtime itself initializes.
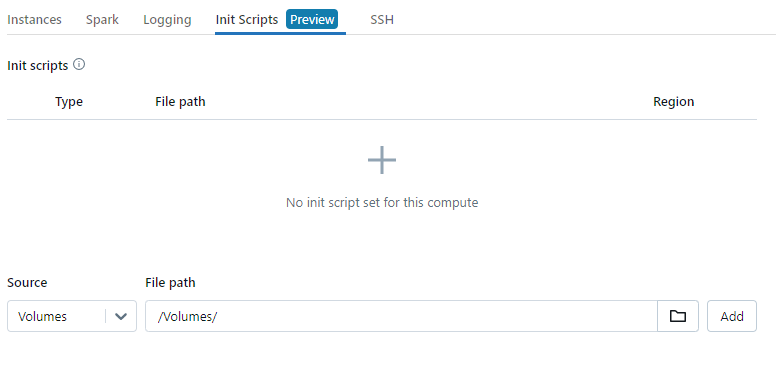
Init scripts give you an extremely powerful capability—the ability to fully customize the software environment of the cluster through arbitrary code execution during the boot process. You can install packages, download dependencies, mount volumes, configure services—and so much more.
Step 15—Finish and Launch Databricks Cluster
Congrats, you made it through configuring all the key options and attributes for our interactive all-purpose Databricks cluster! We've assembled quite a powerful and optimized virtual analytics environment.
Now, take a moment to double-check that all the details you've configured match your needs and preferences. If everything seems good to go, it's time to give the thumbs up! Just scroll down to the bottom of the configuration options in the UI and click the "Create Compute" button.

This will initiate the provisioning workflow. Databricks will begin allocating cloud infrastructure, applying configurations, installing software, booting up nodes and more in the background.
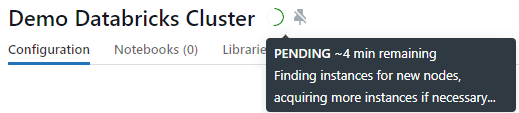
This process typically completes within 5-10 minutes depending on the selected resources and state of cloud capacity. Not too bad for spinning up a fully customized distributed analytics environment!
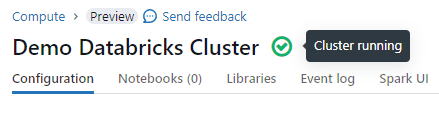
Once you see this ✔️, your Databricks cluster is officially online and ready to use.
Step-by-Step Guide to Manage Databricks Clusters
Now that you've set up your Databricks Clusters, the next crucial step is understanding how to configure and manage them effectively throughout their lifespan. In this section, we'll guide you step-by-step on configuring and managing your Databricks clusters.
Step 1—Viewing Databricks Clusters List
The "Compute" page in Databricks provides a centralized place to monitor and access all your clusters. To view the list, click "Compute" in the left navigation menu. Here you'll see an overview of all your existing clusters along with their current status at a glance.
You can also hover over each status for more descriptive information. The list also shows basic details of each cluster like Policy, Runtime version, Active memory, Active cores, Active DBU / h, Source, Creator, Attached Notebooks—and other metadata.

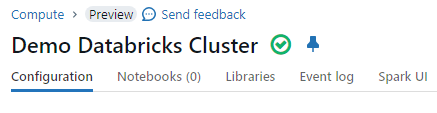
Step 2—Pinning Databricks Cluster
Pinning Databricks clusters is useful for marking special Databricks clusters that you want to exempt from automatic deletion policies. As a cluster admin, you can pin up to 100 Databricks clusters. Pinned clusters will not be deleted even if they are terminated or if they exceed automatic termination timeouts, which is useful for safeguarding important long-running clusters.
To pin a Databricks cluster, click on the cluster name and then select the 📌 option. The cluster page will now display a pinned icon. Unpinned Databricks clusters not in use are deleted automatically after 30 days by default. Pinning helps retain cluster configuration data long-term without recreation.
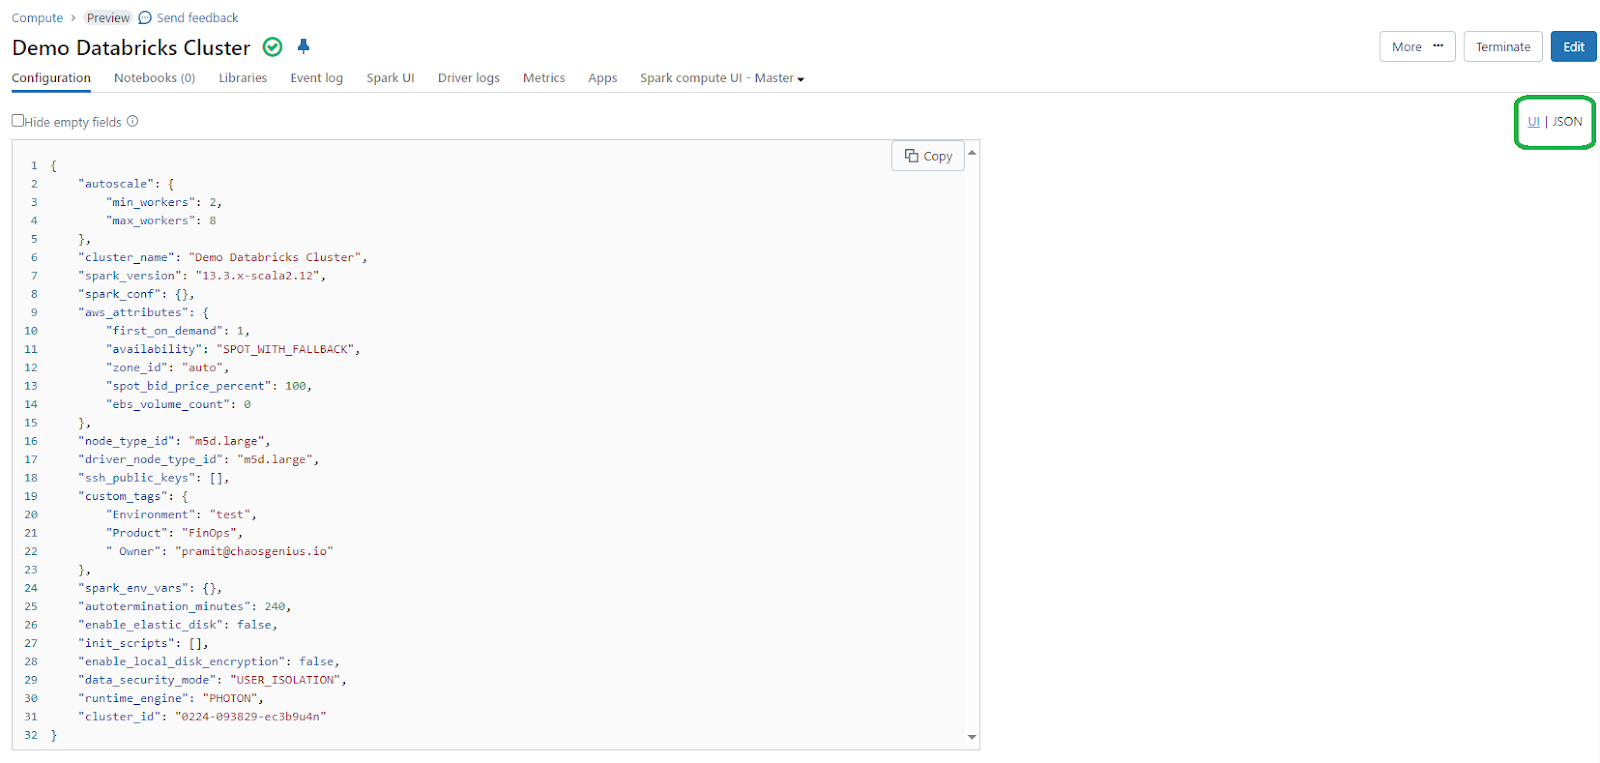
Step 3—Viewing Databricks Cluster Configuration as JSON
The cluster details page also allows exporting the effective cluster configuration as JSON. This exported JSON contains all configured attributes, properties, security settings etc. and can be useful for cluster versioning, audits or programmatically recreating clusters via APIs.
To export, click the JSON next to the cluster name. Copy and save the JSON output as needed. It also allows reconstructing an identical replacement cluster should the original be accidentally terminated.
Step 4—Editing Databricks Cluster
Cluster configurations can be easily changed after creation. Common edits involve tweaking the number of driver or worker nodes or making adjustments to autoscaling policies. You can carry out these edits directly from the cluster details in the user interface (UI). To make changes, head to the Compute page and click on the specific Databricks cluster you want to edit. You'll find the Edit option there, so go ahead and click on it.

Remember that Notebooks and jobs associated with the cluster remain connected even after editing, and libraries installed on the cluster remain in place. If any attribute of a running cluster (except for the cluster size and permissions) is edited, a restart is necessary. But this may disrupt users currently utilizing the cluster. The ability to edit is available for both running and terminated Databricks clusters.
Step 5—Cloning Databricks Cluster
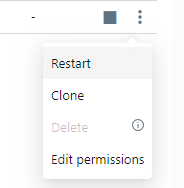
If you need to create multiple new clusters with similar configurations, using the clone option is more efficient than recreating from scratch each time. The clone action lets you duplicate an existing cluster configuration with just a few clicks. To clone the cluster, navigate to the Compute page and then click on the kebab menu. There, you will find the Clone option, so go ahead and click on it.

But, do note that not all attributes like Cluster permissions, installed libraries, attached notebooks, etc. are preserved.
Step 6—Managing Databricks Clusters Access
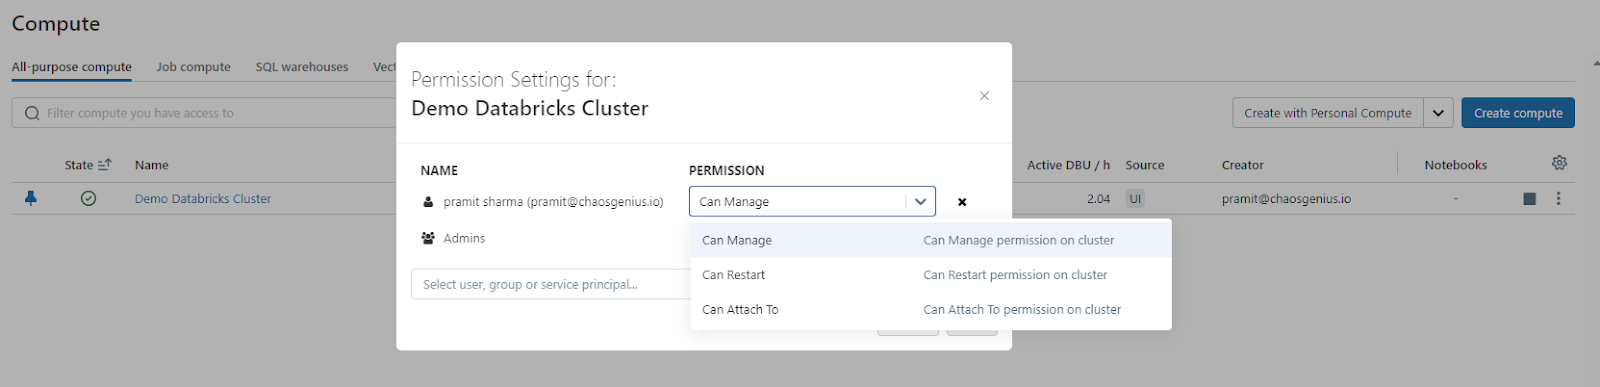
As a cluster admin, you have fine-grained control over cluster creation and access permissions. These can be configured through Spark properties, the Databricks platform API, or the permissions' editor in the admin panel. Common access controls allow defining who can create, edit, start/stop or delete Databricks clusters. There are two types of cluster access control:
- Cluster-creation permission: Workspace admins can determine which users are permitted to create clusters.
- Cluster-level permissions: A user with the "Can manage" permission for a cluster can configure whether other users can attach to, restart, resize, and manage that cluster.
To edit permissions for a cluster, choose "Edit Permissions" from that cluster’s Kebab menu.

Step 7—Terminating Databricks Cluster
Over time, many transient job-specific or unused clusters may accumulate in the list. It's best practice to regularly terminate idle clusters that are no longer required to avoid incurring unnecessary compute costs.
To terminate the cluster, click on the cluster and choose the "Terminate" option. This action will deallocate all the connected resources.

Alternatively, you have the option to enable Automatic Termination, which we covered in an earlier section, to automatically terminate the cluster if it is not in use.
Step 8—Deleting Databricks Cluster
Once terminated, clusters can further be deleted entirely from the Databricks workspace. This is useful for long-archived clusters no longer needed. However, make sure to delete only after termination to avoid inconsistent states.

Also, note that pinned clusters cannot be deleted. The cluster must first be unpinned by an admin.

Step 9—Restarting Databricks Cluster
If you want to restart the cluster, you can simply reboot the underlying infrastructure while preserving the configuration and mounted volumes. This is very useful for cluster updates, applying Spark/Python package changes without recreation, or clearing out driver/executor logs and caches.
To restart, click on the cluster and select "Restart" from the Kebab menu.
Note that all running notebooks and jobs will be interrupted, so it's best done during off-peak hours.
Step 10—Monitoring Performance
Databricks Cluster metrics and logs are important to monitor for performance and debugging purposes. The cluster details page, including Event logs and Driver logs, displays aggregated metrics of your overall cluster activity. You can also enable Databricks integrated monitoring, such as Datadog, or send logs to external services/integrations.
For even deeper insight, consider using third-party tools like Chaos Genius that provide end-to-end visibility for your entire Databricks workload. It can easily pinpoint bottlenecks without any hassle.
Step 11—Handling Preempted Spot Instances (Decommissioning Spot Instances)
To cut down on costs, it's a common practice to form clusters using spot instances rather than on-demand instances. But, spot instances can be preempted by the cloud provider's scheduling mechanisms. Preemption of spot instances may cause issues with running jobs, including:
- Shuffle fetch failures
- Shuffle data loss
- RDD data loss
- Job failures
To address these issues, you can enable decommissioning. Decommissioning takes advantage of notifications that cloud providers usually send before terminating a spot instance. When a spot instance with an executor gets a preemption notification, the decommissioning process tries to move shuffle and RDD data to healthy executors. The time before the final preemption is typically 30 seconds to 2 minutes, depending on the cloud provider.
It's advisable to enable data migration when decommissioning is on. Generally, having more data migrated reduces the chances of errors, including shuffle fetching failures, shuffle data loss, and RDD data loss. Data migration can also lead to less re-computation and saved costs.
When decommissioning is active, task failures caused by spot instance preemption don't count as failed attempts. These failures aren't counted because they are external to the task and won't lead to job failure.
To enable decommissioning on a cluster, set the following properties in the Spark tab under Advanced Options in the cluster configuration UI.
To enable decommissioning for applications, set this property in the Spark config field:
spark.decommission.enabled trueTo enable shuffle data migration during decommissioning, set these properties in the Spark config field:
spark.storage.decommission.enabled true
spark.storage.decommission.shuffleBlocks.enabled true
To enable RDD cache data migration during decommissioning, set these properties in the Spark config field:
spark.storage.decommission.enabled true
spark.storage.decommission.rddBlocks.enabled true
Note: When RDD StorageLevel replication is set to more than 1, it is not recommended to enable RDD data migration, since the replicas ensure RDDs will not lose data.
To enable decommissioning for workers, set this property in the Environment Variables field:
SPARK_WORKER_OPTS="-Dspark.decommission.enabled=true"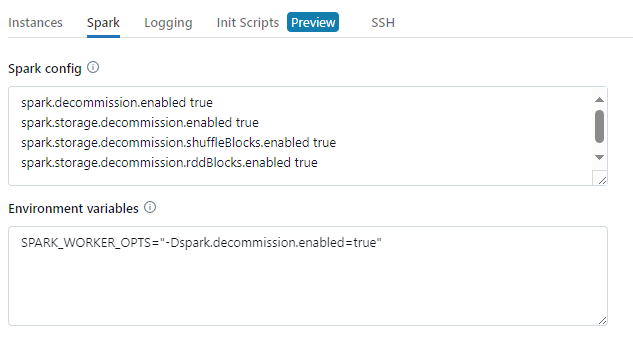
What Are the Best Practices for Configuring/Managing Databricks Clusters?
To efficiently handle Databricks clusters, it's crucial to follow some best practices to maximize performance, stability, and cost-efficiency. In this section, we will highlight key best practices to consider when setting up and working with Databricks clusters.
1). Choosing the Best Cluster Type for Your Workflow
As we have already covered above, there are two types of Databricks clusters:
- All-Purpose Clusters
- Job Clusters
If you are starting a new project on Databricks, consider your cluster needs at different stages of work. For interactive exploration, prototyping, and rapid development, use an all-purpose cluster. This allows multiple users to collaborate on notebooks, test ideas, and iterate quickly without reconfiguring clusters.
Once your ETL pipelines, analytics code, or ML workflows are implemented, switch to running them on job clusters. Job clusters are optimized for scheduled or on-demand batch processing workloads, such as production ETL jobs, model training, and more. Since job clusters terminate automatically upon the completion of tasks, they minimize idle compute costs compared to all-purpose clusters.
As you prepare code for operational execution, test on a job cluster to validate cluster setup and workload performance in a production-like environment. Then, configure automated runs on a schedule to run jobs seamlessly as part of your regular workflows.
TL;DR: Use all-purpose clusters for collaboration and iterative development work, and job clusters for tasks that need to be run periodically at scale in a fully automated fashion. This hybrid approach helps optimize cluster resources based on workload needs at each stage.
2). Databricks Cluster Mode Best Practices
When it comes to choosing between single-node or multi-node Databricks clusters mode, the decision depends on your workload's ability to leverage parallelism.
Single node mode incurs the least cost since it only utilizes a single worker node. It is best suited for workloads that process small amounts of data that fit on one machine or that cannot be parallelized across multiple machines. Common examples include small ETL jobs where the data is not partitioned, basic exploratory notebooks on small sample datasets, and non-distributed algorithm prototyping.
Multi-node clusters provide the ability to horizontally scale computation by distributing workload partitions across multiple worker nodes. They should be used when data or jobs can be parallelized by partitioning the data or workload into independent chunks that can be processed simultaneously. This enables faster performance on larger workloads like batch ETL jobs on big data where the datasets exceed the memory limits of a single machine, distributed machine learning algorithms where models are trained on partitioned datasets in parallel, and queries or complex analytics where intermediate results can be combined from partition-level processing.
The typical best practice recommendation is to start with a single node and only switch to multi-node when parallelization becomes necessary. Single node is enough for smaller testing and development stages, but performance-critical production tasks would likely need to leverage the power of multi-node clusters for distribution.
3). Right-Sizing Your Instances to Optimize Performance
When launching Databricks clusters in AWS, you have the option to choose between on-demand and spot instances. Determining the right balance between these is an important practice based on workload needs and budgets.
On-demand instances provide dedicated resources at fixed rates, and you pay for compute capacity by the second without any long-term commitments, making them suitable for predictable and critical Databricks clusters where meeting SLAs is crucial, especially those involving sensitive data. They offer the highest reliability for production deployments requiring strict performance.
Spot instances enable the utilization of spare EC2 capacity at substantial discounts compared to on-demand pricing by setting a maximum bid price. This is particularly beneficial for lowering costs in non-critical workloads. Spot pricing adjusts in real-time based on the supply and demand for AWS compute capacity. If the current spot market price exceeds the specified maximum spot price, the spot instances will be terminated.
When configuring on-demand and spot instances in Databricks clusters, consider the following best practices:
- Always use on-demand for the driver node to persist cached data and tables, ensuring data integrity in case of spot node interruptions.
- Enable spot instance fallback to on-demand to maintain cluster capacity and prevent delays or failures in case of spot capacity loss.
- Utilize the Spot Instance Advisor to determine suitable maximum bid prices for your specific regions and instance types, optimizing cost efficiency.
- Accept interruptions for cost-optimized testing and iterative workloads, but avoid using spot instances for critical production workloads.
The recommended approach is to run production Databricks clusters continuously on-demand for reliability while taking advantage of spot bidding wherever possible for savings, such as on development/non-critical clusters. This balanced use of on-demand and spot helps maximize cost efficiency without compromising service levels.
4). Auto-Scaling Best Practices to Dynamically Manage Resources
Auto-scaling allows clusters to automatically increase or decrease resources based on workload demands. This can include adding or removing nodes from the cluster, adjusting the number of replicas for a service, or modifying the hardware configurations of individual nodes. To make the most of autoscaling in your cluster configuration, here are some best practices to follow:
a) Monitor and Understand Workload Patterns
Keep an eye on your workload patterns and understand how your jobs use resources. Identify peak and off-peak periods to set appropriate scaling thresholds. By knowing when your cluster needs more or fewer resources, you can make better decisions for autoscaling.
b) Set Smart Scaling Triggers
Decide when your cluster should scale up or down. Instead of using random values, it's better to set triggers based on actual workload demands. You can look at metrics like CPU usage, memory usage, or task backlog to determine when scaling actions should occur. Experiment with different triggers to find what works best for your workload.
c) Consider Overhead and Startup Time
Remember that scaling a cluster takes some time. When you add or remove instances, there is an overhead and a startup delay. Take this into account when setting scaling actions. If you don't consider these factors, you might experience delays in job execution or insufficient resources during scaling.
d) Test and Validate
Before deploying autoscaling into prod, test and validate your configurations. Use representative workloads and simulate various scenarios to see how autoscaling behaves. Make sure the cluster scales up and down as expected, meeting performance requirements without incurring unnecessary costs. Keep an eye on system metrics during testing to catch any issues.
e) Understand Workload Compatibility
Not all workloads are suitable for autoscaling. Some job types, like spark-submit jobs or those relying on specific Python packages, may work better with fixed-size clusters. Understand the compatibility of your workload with autoscaling and make informed decisions about cluster configurations.
f) Leverage Databricks-Specific Features:
Consider using Delta Live Tables with Enhanced Autoscaling for streaming workloads. This combination offers better performance and flexibility for autoscaling in structured streaming scenarios. Databricks also supports autoscaling local storage, which automatically adds more storage to Spark workers when needed.
If you use autoscaling carefully, it can be a game-changer for your Databricks clusters. It allows them to dynamically adjust to changing resource needs, enhancing performance during busy periods while keeping costs low during quieter times. This careful approach unlocks the flexibility and elasticity of the cloud, ensuring optimal cluster utilization.
5). Staying Up-To-Date on Runtime Versions for Features and Security
Choosing a Databricks Runtime version also impacts the performance and cost of Databricks clusters. For test and development clusters powering exploratory analysis, the latest runtime is generally best as it provides the newest features, optimizations, and library/package support. But for production job clusters executing critical workflows, a long term support (LTS) version offers stability.
LTS versions receive ongoing bug and security fixes for an extended period without sudden package/API changes between point releases, which allows production deployments to be thoroughly tested and validated before upgrading, avoiding any potential impacts to jobs. The tradeoff is access to latest features may be delayed on LTS.
Overall, using the latest runtime for non-critical analysis and an LTS for production workloads follows best practices. You also have the option of specialized runtimes like GPU-enabled.
6). Effective Cluster Sizing
Proper sizing strategy is key to both Databricks cost optimization and workload performance. When configuring the size of your Databricks cluster, it's important to consider various factors beyond just the number of workers. In Databricks architecture, each worker node runs one executor, so the terms executor and worker are used interchangeably. To accurately size your cluster, you need to take into account total executor cores, total executor memory, and executor local storage. Also, the worker instance type and size play a significant role in determining cluster performance. Let's explore some best practices for cluster sizing in more detail:
a) Total Executor Cores (Compute):
The total number of cores across all executors in your cluster directly impacts the maximum parallelism of your workload. Consider the computational complexity of your workload and the level of parallelism required. Higher core counts provide more parallel processing capabilities, allowing for faster computation and improved performance.
b) Total Executor Memory:
The total amount of RAM across all executors influences how much data can be stored in memory before spilling it to disk. Assess the memory requirements of your workload and the amount of data it consumes. If your workload heavily relies on in-memory processing, having sufficient executor memory is crucial to avoid frequent disk spills, which can degrade performance. Balancing memory allocation with compute resources is essential to optimize cluster performance.
c) Executor Local Storage:
Executor local storage refers to the type and amount of local disk storage available. Local disk storage is primarily used during shuffles and caching. Consider the requirements of your workload and determine if it involves substantial shuffling of data or caching. If your workload involves frequent shuffles, having sufficient local storage can improve performance by minimizing data spills. Choosing an appropriate instance type with adequate local disk capacity ensures efficient data handling during these operations.
d) Data Consumption and Source:
Evaluate how much data your workload will consume and where it is being read from. This information helps determine the cluster's storage and processing requirements. If your workload involves large-scale data processing or analysis, you may need a cluster with higher compute and memory capacities. Understanding the characteristics of your data source, such as its partitioning in external storage, enables you to optimize data retrieval and processing strategies.
e) Parallelism
Consider the level of parallelism required by your workload. Parallelism is influenced by factors like data size, computational complexity, and the nature of transformations applied. Determine the optimal balance between the number of workers and the size of worker instance types. For workloads with narrow transformations (where each input partition contributes to only one output partition), a compute-optimized configuration with larger instances may be suitable. On the other hand, shuffle-heavy workloads may benefit from a cluster with more memory and storage capacity to handle data spills efficiently.
f) Caching
If your workload involves frequent re-reads of the same data, consider utilizing caching. Caching can significantly improve performance by storing frequently accessed data in memory. For such scenarios, a storage-optimized configuration with Delta Cache can provide benefits. Delta Cache leverages optimized storage mechanisms to enhance data retrieval speed and reduce compute costs.
7). Access Control Best Practices
When sharing Databricks clusters across multiple users or teams, implementing robust access controls is a critical best practice from both a security and cost management perspective. There are two key components:
- Cluster Creation Permissions: Only grant the "Allow Cluster Creation" permission to authorized teams or individuals who should be able to create new clusters in the workspace. This gatekeeper control ensures unapproved users cannot provision arbitrary cluster resources.
- Cluster-Level Permissions: Once a cluster is created, define granular permissions to determine which users or groups can access and manage that specific cluster. Typical permissions include the ability to restart, resize, terminate, or use the cluster for running workloads.
If you combine cluster creation and cluster-level permissions, admins can empower specific teams to self-service provision clusters aligned to organizational policies, while still granting selective access to each individual cluster based on a need-to-use basis.
To enforce these controls consistently at scale, Databricks provides Cluster Policies. Policies allow administrators to centrally define guardrails that automatically apply during cluster creation, such as:
- Restricting eligible cloud regions based on data residency requirements
- Mandating specific Databricks runtimes, Python versions, or software environments
- Requiring assignment of certain tags for governance purposes
- Limiting permissible instance types or cloud configurations to control cloud costs
Databricks Cluster policies leverage role-based access controls (RBAC) to associate these rules with specific user/group identities.
When combined with audit logging, monitoring, and alerting capabilities, robust access controls and cluster policies form a solid security and governance foundation for multi-tenant Databricks deployments. They facilitate self-service operations while still maintaining oversight and control.
8). Proper Termination to Avoid wasted Resources
Terminating idle Databricks clusters is an important best practice to control costs on Databricks. Clusters that are left running unnecessarily accumulate charges for the cloud resources provisioned, even if no workloads are actively using the cluster, which can lead to significant wasted spending if not managed properly.
The recommended approach is to configure automatic termination of clusters after a defined period of inactivity. Databricks allows administrators to set a default inactivity threshold for automatic cluster termination, with 120 minutes being the system default.
But it's extremely crucial to thoughtfully determine termination timeframes based on the specific usage patterns of each cluster. Setting the threshold too aggressively can lead to inefficiencies from constantly restarting clusters and losing accumulated state like caches, functions, and variables that need to be re-initialized.
The optimal termination policy depends on the cluster's primary purpose:
- For interactive analytics and development clusters used for ad-hoc exploration, choose a relatively longer idle timeout, like 4-6 hours. This accounts for users stepping away temporarily while still preserving cluster state.
- For job clusters running automated batch workloads like ETL pipelines, terminate immediately after job completion since no interactive sessions are involved. Job clusters spin up solely to execute a job so no long-lived state needs persisting.
If you carefully apply termination policies tailored to each cluster's expected usage, you can prevent wasteful spending on zombie resources while still providing sufficient warmup time to maintain an acceptable user experience and minimize re-initialization overheads.
9). Tagging for Efficient Cluster Management
Besides just configuration, there are some general cluster management practices that can provide valuable visibility and opportunities for optimization.
One such practice is assigning meaningful tags to all Databricks clusters. Tags, presented as key-value pairs, can be set during cluster creation. This is a recommended best practice as it provides valuable visibility and enables optimization opportunities.
With consistent tagging, cluster costs and associated cloud resource usage can be sorted, aggregated, and analyzed across various dimensions represented by the tags.
To maximize the benefits of tagging, it's advisable to establish and enforce tagging standards through centralized policies. This ensures clusters are consistently tagged based on predefined conventions. Administrators can then offer self-service access through policies that automatically assign mandatory tags during cluster creation.
10). Using Chaos Genius
Finally, the most effective and powerful technique to manage and configure Databricks clusters is by using third-party tools like Chaos Genius. Think of Chaos Genius as a control center that takes your Databricks performance and cost optimization to the next level.
Chaos Genius doesn't just monitor things—it digs into the nitty gritty details, tracking benchmarks and noticing when something seems off. So if you've got clusters using way more resources than they need, it's going to spot that waste. Or if query times start slowing down unexpectedly, it'll monitor that too.
The best part is that once Chaos Genius identifies an issue, it actually jumps in to fix them! It'll suggest tweaks and optimizations you can make, or even apply them automatically if possible. So you get continuous improvements to speed and efficiency, without always having to be the one making those changes manually.
Pretty awesome right? You can just let Chaos Genius work its magic in the background, knowing it's actively improving performance and reducing your Databricks costs over time. It's like having an expert monitoring things 24/7 and making tweaks so you get the most bang for your buck out of Databricks. Sign up and experience the magic of Chaos Genius for yourself!
Conclusion
And that's a wrap! We just covered everything you need to know about Databricks clusters. To summarize, Databricks clusters are a core part of the platform, providing isolated virtual environments that leverage Apache Spark's distributed processing capabilities. Clusters allow for customized provisioning of compute resources like CPUs, memory, and storage on the underlying infrastructure. This enables administrators to tailor cluster configurations for different workloads through various configuration options.
In this article, we have covered:
- What Is Compute in Databricks?
- What Are the Types of Databricks Compute?
- What Are Clusters in Databricks?
- What Are the Types of Databricks Clusters?
- Step-by-step guide to Create Databricks Clusters.
- Step-by-step Guide to Configure/Manage Databricks Clusters
- What Are the Best Practices for Configuring/Managing Databricks Clusters?
…and so much more!
FAQs
What is Databricks compute?
Databricks compute refers to the foundational cloud infrastructure resources like CPUs, memory, storage and networking capacity that are allocated to power data and analytics workloads on the Databricks platform.
What are the types of Databricks compute?
The main types of Databricks compute include All-Purpose compute, Job compute, Vector Search, Instance Pools, Serverless SQL warehouses, and Classic SQL warehouses.
What is the difference between Databricks compute and clusters?
Databricks compute is the selection of computing resources provisioned, while clusters are reusable virtual environments that utilize assigned compute resources to run workloads through Spark.
What are Databricks clusters?
Databricks clusters are customizable virtual Spark environments provisioned on the Databricks platform that optimize the assigned compute resources for distributed data processing and analytic workloads.
What are the types of Databricks clusters?
The main types are All-Purpose clusters for collaborative analysis and Job clusters optimized for automated batch workloads.
How do I view existing clusters on Databricks?
Go to the "Compute" page within the workspace to see a list of all clusters along with status, metadata and usage details.
How do I edit a Databricks cluster configuration?
Access the cluster details page and click "Edit" to modify options like node counts, autoscaling policies, and other attributes after initial creation.
How do I clone a Databricks cluster?
Navigate to the cluster, click the kebab menu and select "Clone" to duplicate an existing configuration for creating a new similar cluster.
How do I terminate a Databricks cluster?
Click the cluster, then select "Terminate" from the kebab menu to shut it down and deallocate resources, or enable automatic termination.
How do I delete a Databricks cluster?
Only delete clusters after first terminating them. Choose the cluster and select the "Delete" option.
How do I pin a Databricks cluster?
Click the pin icon on the cluster page to mark it as pinned. Pinned clusters won't be deleted by automatic policies.
How do I export a Databricks cluster configuration?
The cluster details page allows exporting the effective configuration as JSON, useful for versioning, audits or recreation.
How do I manage access permissions for Databricks clusters?
Admins can define cluster creation and granular per-cluster access controls through policies, ACLs and other options.
What are some best practices for choosing cluster types?
Use all-purpose clusters for collaboration and iterative development, switching to automated job clusters for production workloads.
What are some cluster sizing best practices?
Consider factors like workload parallelism needs, data consumption patterns, and memory/compute/storage balancing when determining cluster resource profiles.
What are some autoscaling best practices?
Understand workload patterns, set smart triggers based on metrics, validate configurations, and test autoscaling behavior before production deployment.
What is the purpose of tagging Databricks clusters?
Tags provide valuable metadata to organize, analyze, and automate management of clusters at scale based on user-defined categories.
How do I handle preempted spot instances on Databricks?
Enable data decommissioning to gracefully move shuffle/RDD data during the warning period before a spot termination occurs.
What is the recommended Databricks runtime strategy?
Always use the latest stable runtime for dev/testing, opting for Long Term Support versions on production job clusters for stability.
How do I configure additional EBS volumes on clusters?
Specify EBS volumes types and sizes on the cluster configuration page under the "Storage" tab for more disk capacity needs.
How do I set up Databricks instance profiles?
Provide IAM role and instance profile ARNs along with permission parameters to allow clusters to assume identities and access external cloud resources securely.
How do I configure logs and storage for Databricks clusters?
Specify a durable location like S3, ADLS or GCS to deliver and retain cluster activity logs instead of ephemeral local storage.
How do I customize Spark settings on clusters?
Inject custom Spark properties and environment variables on the cluster configuration page under the "Advanced Options" for specialized configuration needs.
What are some best practices for termination of clusters?
Automatically shut down idle clusters within planned thresholds aligned to usage patterns to optimize costs without impacting users.
How do I restart a Databricks cluster?
Select the "Restart" option on the cluster details page to reboot its nodes and refresh the runtime while persisting the overall configuration.
How do I integrate clusters with external services?
Configure instance profiles with IAM roles to securely access cloud services without managing access keys directly on clusters.
What is Photon, and when should I use it?
Photon is a high-performance engine on the Databricks Lake house Platform that provides extremely fast query performance at low cost—from data ingestion, ETL, streaming, data science and interactive queries—directly on your data lake. It's enabled by default on Spark 3.0+ clusters for optimized analytical query performance.
How do I monitor Databricks cluster performance?
Leverage event and driver logs, built-in metrics, third-party monitoring integrations, or observability tools like Chaos Genius for deeper performance visibility and troubleshooting.